Chapter 1. Hello! iPhone
This chapter covers
- The Apple Developer website
- Installing the iPhone SDK
- Introduction to Xcode and Interface Builder
- Hello, World!
The iPhone is a fun and powerful phone, and no matter how many apps there are in the App Store, everyone has an idea for another one. It’s great that there’s finally a combination of a large market, a distribution model, and a way to get paid that makes it easy for hobbyist programmers to make a little money (or in some cases, a lot of money) with simple apps.
Look at iSteam. It’s an app that lets you steam up your phone with your breath and that squeaks when you run your finger across it, and it was written in seven days by firsttime iPhone programmers. It made $100,000 in its first three months in the App Store.

The last new platform that caused this much excitement was the web. Today, we have so many tools that can help us make websites without knowing any HTML that it’s hard to remember we used to have to know how to program to create even the simplest site.
But HTML is a nearly ideal way to get started with programming. Its structure looks like what you see in the browser, and you can create simple websites knowing just a few tags and using Notepad and a browser. And if you see a page you like, you can view its source and learn how it was done. This combination of simple coding, an easy on-ramp, cheap tools, and lots of available examples makes it possible for many people to learn to program in HTML.

iPhone programming, unfortunately, isn’t as easy. iPhone apps aren’t just text you can create in any editor, so you need to use the tools that Apple provides to help you create your app. And although lots of code samples are available on the web, there aren’t many complete examples to learn from.
We wrote this book to solve these problems by offering simple explanations of the concepts used by Apple’s tools and step-by-step instructions for complete applications. Let’s get started.

Apple does a lot to make sure Macs are useful for a wide variety of things right out of the box. Your Mac can organize digital photos, play music, make DVDs, and edit videos, and it evens supports a bunch of programming language environments like Java, Python, and Ruby. But if you want to make iPhone apps, you need to set it up.
To start, visit https://developer.apple.com/devcenter/ios, and register for a developer account. The Apple developer site has everything you need to create iPhone apps. The most important thing you need is the developer tools, but you can also find the full SDK documentation, sample code, and video tutorials. After reading this book, you’ll understand a lot of the standard documentation much better.
With the release of Xcode 4.2, you now get Xcode from the Mac App Store, so it’s easy for everyone to get started. You could start programming without the developer account, but it’s free, so you should go ahead and sign up.
If you want to sell apps in the App Store, you’ll need to pay to join the iOS Developer Program. You’ll also need to join to test your app on your own devices. Apple charges $99 per year to join its developer program. But hey, it’s not that much for a hobby, especially one that might make you money, and you can have as many apps as you like without paying any more.

Don’t worry: for almost all the code samples in this book, just being a registered developer will be fine. Apple provides an iPhone simulator that works on your Mac, so you don’t need to have your apps on your device to learn how to make them. Of course, some features of the iPhone aren’t in the simulator (don’t shake your laptop!). If you want to use those features in your app, you’ll need to join the iOS Developer Program so you can put your app on your phone. When we get to one of those features, it will be clearly marked.

Register as a developer on the iOS Dev Center home page. Registering begins with filling out a simple multistep form that consists mostly of contact information, and ends with an email verification form. Once you’ve completed the process, Apple will send you an email with instructions for activating your account (you might need to add Apple to your whitelist or check your spam folder).

After you’ve received the email and followed its directions, you’re ready to log in to the iOS Dev Center and look at what you can access. Now you’re ready to go get Xcode.
Nearly every great iPhone application was written with the same tools you’re going to use. You might not be as good at using them yet, but it’s not like you’re trying to match Clapton on a toy ukelele. You have a long way to go, but you won’t be held back by inferior equipment.

To get these tools, open the Mac App Store and search for Xcode. When you find it, click the Install button and give your credentials.
A large file will begin to download. When it’s done, the installation will start.

The installer will guide you through the process. When you get to the Installation Type page, you should choose the default settings for now and let the installer proceed with a standard installation. Once you’re done with accepting the licenses and other setup, the installer will install Xcode and all the other tools you need. It’s a long installation and could take half an hour to complete.

When it’s done, let’s look at what you have. If you’ve installed anything else on your Mac, you know you can find the installed application in your Applications folder. Xcode is no exception: you can find it in/Applications.

When you install Xcode and the iOS SDK, you get all the tools you need to create Mac, iPhone, and iPad applications. The same tools and concepts you learn can be applied to these other platforms. In the developer applications folder, you’ll see a lot of applications; you’ll be spending the most time with Xcode. It’s so important, that it’s a good idea to put it in your Dock right now. You can do this by dragging it from the Finder window onto your Dock.

With Xcode on your Mac, you need to learn a little about it before you make your first app. If you’ve ever used another programming environment, some of this will feel familiar. If you haven’t, Xcode is about as complex as Photoshop, AutoCAD, Final Cut Pro, or any professional software used to create complex things. Even software like Access or Excel is a good starting point if you’ve created macros or added forms to make simple apps.
Xcode is an Integrated Development Environment (IDE for short). It has
- An editor— For writing your code
- A GUI editor— For drawing your application’s screens
- A compiler— To build applications from your code
- A debugger— To probe your running applications
- A profiler— To collect data on how your applications perform
Over the course of this book, you’ll learn about all those parts, but for your first app you just need to know a little about Xcode’s file organization and a little more about drawing a user interface. Each app you write will introduce a little more.
Your entire project is managed by Xcode, and it’s a lot bigger than you might expect. Even the simple app you’re going to create has nine files. Luckily, Xcode will do some of the work for you.
Start Xcode by clicking the icon in your Dock. When it starts, it shows a welcome screen. Choose Create a New Xcode Project. When you do, you’ll see these templates.

To make your life easier, Xcode comes with application templates. A template is a set of files that has all the code to get you started with some common application types. It’s like a less annoying version of the way Clippy makes a letter for you in Word.

These are the most important templates:
A single-view application starts with one view and has no built-in navigation. It’s a good starting point if your application doesn’t use one of the common navigation styles. This would be the template to use to make the Calculator app that’s on your phone.

A tabbed application is good for any application that uses a tab bar as its main navigation. The iPod, App Store, and iTunes applications on your phone are examples of this style.

A page-based application lets you build apps that look like books and have built-in page turning animation and navigation.
A utility application has two views: a main one with your app and another for the app’s settings that is meant to be on the back of the main view. An info button is put on the main view to flip it over. You can see this style used in the Weather and Stocks apps.

An empty application starts with nothing except the bare bones of an application. If you don’t even want the code that a single-view application has, this is the one to use.

The easiest to understand and use is the single-view application. Click it, and then click the Next button. Xcode will prompt you for a product name, an organization name, and a company identifier. For the product name, use Hello. Enter your full name for the organization name. Add a domain name you own as the basis for your identifier. If you don’t have a domain name, use anything you think will be unique. Put in HW as your class prefix (which is short for “Hello World”), and choose the iPhone as your device. Check Use Automatic Reference Counting, uncheck Use Storyboards and Include Unit Tests, and click Next.

When you click Next, you’ll be prompted for a location to save and source-control parameters, which you can turn off if you don’t want to save your project in a local source-control repository right now. If you don’t use source control (or know what it is), uncheck the box.
The Use Automatic Reference Counting option tells Xcode to automatically manage memory allocation and deallocation. Storyboards are a fantastic tool for creating and organizing complicated projects, but they’re a bit much for smaller apps. You’ll begin using them in chapter 7; but in the meantime, its important to learn how to create projects without them. Unit tests are a software engineering tool that is beyond the scope of this book.
Xcode’s main window will now come up. Xcode can be overwhelming at first, even for the simplest of projects. As you use it, it will feel increasingly natural. You’ll learn more and more about Xcode’s features as you need them. This figure shows you what you need to know right now.

- Toolbar— The most common tools you’ll need.
- Navigator tools— Used to change how you navigate your project. The default, and most common view, is the Project Navigator.
- Project Navigator— Listing of all source, outputs, and other information about the project. It’s used to navigate to the various parts of the project.
- Editor— The place where you’ll type in code. It shows the file currently selected in either of the two file-navigation controls. In the figure, the editor is shown after we selected HWAppDelegate.h. To help you be productive in Xcode, we’ll go over the menus, hotkeys, and views that let you edit a project.
Xcode’s menus control various aspects of creating applications. The File, Edit, View, Window, and Help menus are similar to what you’d find in most Mac applications. The main things you do in Xcode are manage your project, build your application, and test it. To do that, you’ll use the Navigate, Editor, and Product menus.

The Navigate menu has items that let you get around your project efficiently. The best way to use this menu is to learn the hotkeys for each action.

The Editor menu is useful when you’re writing code and gives you ways to get extra help while editing.

You use the Product menu to build and run your projects.

You haven’t really done anything yet, but the Single View Application template created a fully working application for you. It’s just a blank gray window, but let’s build and run it to see how it works. To build the app, press Cmd-B (or choose Product > Build). The message Build Hello: Succeeded should appear at the top of Xcode, like this.

There are a lot of ways to run the application. To get you used to the one that’s the most useful during development, press Cmd-R (or choose Product > Run).
The iPhone simulator will come up with a blank gray screen. Now is a good time to look at the simulator. To simulate turning the iPhone into landscape mode, press Cmd-Left (or choose Hardware > Rotate Left); and to put it back, press Cmd-Right (or choose Hardware > Rotate Right). You can also click the Home button at the bottom of the phone and see an iPhone home screen with a few apps, including Safari, installed.
Play around with the simulator to get a feel for how it works. When you’re done, quit the simulator so you learn how to do more with this app.


Interface Builder is the part of Xcode that lets you draw your application. Well, not really. You’ll still have to write code to make your apps do anything, but for a lot of your screens, you’ll be able to use Interface Builder to make them.
To start Interface Builder, go to the Project Navigator tree in Xcode, and click HWViewController.xib. The file will open in Interface Builder, and you’ll see this:

This is Interface Builder’s main editor, and it lets you navigate through the parts of the user interface. The left side is the dock, and the editor shows the actual UI you’re building. There are inspector panes to show you more detail. You get to them by showing the utilities pane with this toolbar or pressing Opt-Cmd-0.

That will give you access to all the inspectors. The fourth one, the Attributes Inspector, can be used to change how the view looks.

You use inspectors to change the selected part of the view. The easiest thing to change is the background color. Do it by clicking the gray rectangle to the right of the word Background in the inspector. The Colors dialog will come up, and you can change the color in a variety of ways. Choose a new color, and then run the new application by pressing Cmd-R.

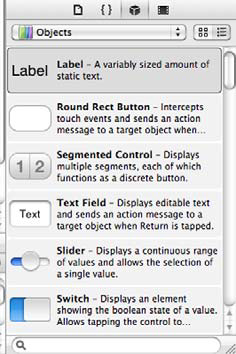
The last utility to take a quick look at is the Object Library. It should have come up automatically, but you can open it with Ctrl-Opt-Cmd-3 (or by choosing View > Utilities > Show Object Library). The Library is a way of browsing all the available controls you can add to your view. The objects in the Library are what you’ll add to your view in order to define your user interface.
There’s a lot more to Interface Builder. You probably noticed that every utility we looked at had multiple tabs. We’ll discuss those when you need them, but you now know enough to make your first app, Hello, World!—so let’s make it.
You’re going to make a lot of apps in this book, each one building on the ideas you’ve learned. The first of these apps is called Hello, World!, and it’s the simplest app you can make that does something. It may not seem like much, but there are apps in the App Store that are just a variation on it. One of the most famous was the I Am Rich app, which was just a picture of a ruby and which sold a couple of times for $1,000 each before Apple removed it.

Even though this app is simple, we suggest that you build it the same way you’ll build all apps, and begin with a drawing and a simple description of what the app does. It would be a good idea to get some graph paper for sketching your apps. The ratio of a preiPhone 5 screen is 320 wide by 460 high, so try to keep that ratio in your drawings (the iPhone 5’s ratio is 320 by 568). Here’s a sketch of Hello, World!:

After you sketch the views, the next thing to do is list the behaviors, transitions, data, and external resources that the app has or uses. Your app is non-interactive, has no other views, stores no data, and accesses no other resources, so that’s easy to specify.
Let’s build the app. In Interface Builder, follow these steps:
- Drag Label from the Object Library onto the view.
- Double-click the label, and type Hello, World!.
- With the label selected, bring up the Attributes Inspector (Opt-Cmd-4).
- Change the font or color to your preference.
- Save.
It should look like this:

Press Cmd-R to build and run the application. The iPhone simulator will open with your app.
Hello, World! is now complete. You might want to take a second to do a little celebratory dance before we move on. Go ahead. No one’s looking.

You’ve now seen most of the major pieces of iPhone development and have used Xcode and Interface Builder to draw, build, and run your first application. Making apps is a constant iteration of this edit-build-run cycle. You’ll be doing it over and over, and eventually you’ll have completed apps. Each time through the cycle, you’ll learn a little more about how to use the tools.

The one thing you haven’t seen is how to code in Objective-C, which is the way you can get your application to react to touches, change views, use data, and access the resources and features of the iPhone. In the next two chapters, you’ll learn the underlying concepts of object-oriented programming, how they work in the iPhone, and how to write code in Objective-C.