Chapter 7. Creating a photo-based application
This chapter covers
- Using tab-based navigation
- Getting images from the Photos application
- Detecting touch positions
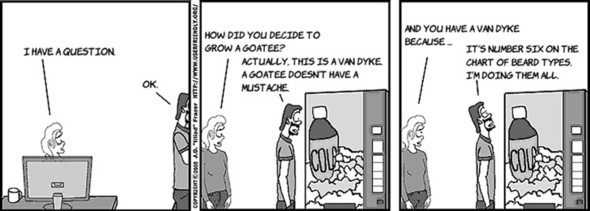
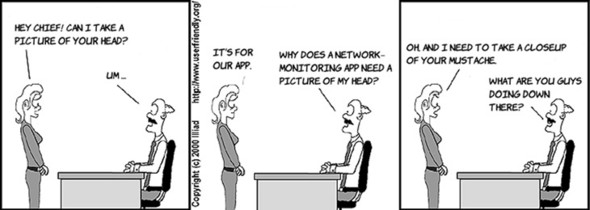
I know that when I (Lou) want to liven up my day, I put on a fake mustache and a rainbow wig. But sometimes, when you need them, they’re hard to find. That’s where the next app, Disguisey, fits in. Disguisey lets you look through your photo album for a picture of a face and then add a fake mustache, beard, wig, funny hat, or tattoo to it.
You already know a lot about how to make Disguisey. Like every app, it has models, views, and controllers. You’ll see a couple of new types, but it’s basically the same. You’ll still use outlets and actions to connect the view to your code, but you’ll also see how to get more information about touches when you need it.
You need to do two basic things in Disguisey. First, you need to be able to grab a picture of a face from your Photos application. Second, you need to be able to pick a mustache, beard, wig, or tattoo from a disguise palette and place it on the face. One way to organize this app is as a group of tabs: one for the face and three for the elements of the disguise. That way, the user has freedom to explore their options.
Let’s start with a sketch. For the first time, you’re going to use tabs to control your app. As we just said, you’ll have one for the face and three for the elements of the disguise. At upper right, you’ll have a button to pick a face from your Photos application.
This is what it looks like when you press the Add button and then pick a face.

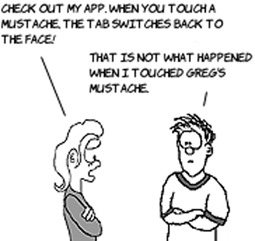
Once you have a face on the first tab, you can pick any other tab and touch a disguise element. When you do, the tab will switch automatically to the face tab, where you can place the element on the face by touching it.

As you’ve seen in previous chapters, these sketches will help you know what views you need when you go into Xcode and Interface Builder. You should already be thinking about the parts of the view that change (and need to be outlets) and the parts of the view that need to have actions tied to them.
To go a little further with the sketches, let’s draw a diagram of what’s happening when you start the app and pick a photo.


Generally, arrows indicate the view sending a message to a controller. In response, the controller changes the models and then updates the views based on them.
Here’s what happens when you want to put a mustache on the face.

So far, that looks pretty simple. Because you’re using tabs, the app’s behavior is much more complex. At any time, you could go to any tab and pick any disguise element. It’s not just a linear flow. Here’s a diagram of what the flow could really be like.

With these sketches done, you’re ready to start designing your app. This app isn’t as complex as it seems. The models are a lot simpler than the card game, and the iPhone has built-in controllers to handle the tabs and photo picking. The hardest part will be composing the disguise on the face, but because that’s the whole purpose of the app, it’s not a big deal.
In every app you’ve made, you’ve looked at the sketches and behavior of the app and tried to come up with models, views, and controllers that will implement that behavior. The models you need for this app are the disguise and the elements that make it up. A disguise element consists of an image (for example, of a mustache) and an x-y point to position it. The disguise itself is the list of elements. To manage the elements, you need messages that let the controller alert the disguise when a new element is chosen and when it’s been placed on a face.

As you’d expect, disguises have zero or more elements.

You have messages to add a face to the view, tell when it was touched, add disguise elements, and clear the disguise.
The three other tabs have the exact same behavior, but they have different elements on them. This means you’ll have three different views, but they can share the controller. In the past, you’ve seen a one-to-one correspondence between views and controllers, but if your views are variations of each other, you don’t need to have copies of the controller.
This is what the facial hair view looks like. The only message it needs is an action for what happens when you touch one of its elements.


You don’t have to create messages for the tab at the bottom because tabs are built into the iPhone, and you can drag them and their controllers onto your application. You also don’t have views or controllers for picking a photo from the iPhone’s Photos app. Like tabs, those are built in.
You now have everything you need to start coding the app. You’ll create the views in Interface Builder and then code the controllers and models in Xcode. So far, most of this should feel familiar. Disguisey is just like the other apps you’ve made, except with a fake mustache and a rainbow wig.
Disguisey uses tabs, so you’ll begin with the Tabbed Application template. To do that in Xcode, choose File > New Project, and select Tabbed Application.

In the next dialog, name the app Disguisey, set the class prefix to DI, and select both the Use Storyboard and Use Automatic Reference Counting check boxes. (That’s right, you’re finally going to use a storyboard!)
The next step is to rename the default classes generated by the template. It’s a pain, but it’s a lot quicker than going out to the store to buy Groucho Marx glasses.

If you look at the class names, you’ll see two view controllers, DIFirstViewController and DISecondViewController. These names are autogenerated and don’t do a good job of describing what you want them to do. In the app design, you named these classes DIFaceViewController and DIDisguiseViewController. You could rename the files and classes and then hunt down all references to them in Interface Builder, but luckily you don’t have to. Xcode has this kind of renaming built in, and it will be sure to do it right.

To rename the first class, click DIFirstViewController.h in the Project Navigator. Then, right-click the word DIFirstViewController right after the @interface keyword. On the menu that comes up, choose Refactor > Rename, and then, in the dialog, rename the class DIFaceViewController. You can click through the dialogs that follow, which show you what Xcode will do and offer to keep snapshots of your current code base.

The app has four tabs, but remember that three of them use the same controller because they have identical behavior. The next step is to create the views that go along with these classes and connect them. You’ll do that using a relatively new feature of Xcode, the storyboard. Storyboards are particularly useful when you’re managing a lot of interconnected views.
With the latest Xcode, it’s possible to work with several related views in one canvas by using a storyboard. It makes sense to use this for tabs, and that’s why you selected the Use Storyboard check box in the template. Let’s look at the storyboard. In Project Navigator, click MainStoryboard.storyboard.

The template put only two tabs on your app, but it’s easy to add more. As you can see, unlike a XIB file, a storyboard holds multiple ViewController views and even knows that they’re related. Because there’s a view with tabs already on it and relationships drawn, the tabs know to switch between the views automatically.
To add the others views, drag two more view controllers from the Object Library onto the Storyboard.

You now have a tabbed view controller and four controllers: one for each tab.

Note that only two views are connected. You make relationships by connecting the Relationship connector of the Tab Bar Controller to the individual views. First click Tab Bar Controller in the Dock.

Go to the Tab Bar Controller’s Connections Inspector, and you’ll see that its view controller’s triggered segues are already connected to the first two views. To connect the other two, drag the little circle on top of each view.

Now the Tab Bar Controller has four tabs.
To finish customizing the template, you need to do a few more things:

- Click the TextView on the Face View Controller, and press Delete to delete it. Do the same with the Label.
- Also delete DIDisguiseViewController’s TextView and Label.
- Click the tab bar item of the Face View Controller. In the Attributes Inspector, set Title to Face and Image to tab-face.png.
- Do the same for the next three tabs, setting their titles to Facial Hair, Wigs/Hats, and Tattoos/Scars and their images to tab-facial-hair.png, tab-wig-hat.png, and tab-tattoo.png, respectively.
- For the two view controllers you added, go to the Identity Inspector and set the class to DIDisguiseViewController.
The storyboard should look like this.

Your app is now set up. The individual views don’t have anything on them, and the tab images haven’t been created, so it’s not an interesting app yet.
Take a quick break, stretch your legs, and get ready for the next part, where you create the individual views for the tabs. The views on the tabs are no different from other views you’ve made, so it should feel familiar.


It would be pretty sad if you had question marks as tab images for your app. If you look at any tab-based apps on your iPhone, you’ll notice that they usually have nice gradient images that turn bright blue when you touch them. Because every app seems to have this look, you should have guessed that it was built in.

All you need to do is create a 32 x 32 pixel PNG image that uses opaque pixels on a transparent background. This image isn’t used as is. Instead, it’s used as a mask against nice gradients to form the tab’s image. Wherever you have opaque pixels, the gradient will show through. Here are our Face and Tattoos/Scars images. The checkerboard pattern shows where the image is transparent.

Like all images you use on user interfaces, if you make one twice as big and name it with @2x before the extension, it will be used on retina displays. For example, name the 32 x 32 face image tab-face.png and the 64 x 64 image tab-face@2x.png. The other images are named tabfacial-hair.png, tab-wig-hat.png, and tab-tattoo.png.
Once you’ve created the eight images (two for each tab), add them to the main Disguisey group in Project Navigator. As always, make sure the Copy Items into Destination Group’s Folder (If Needed) check box is checked.
If you’ve done it right, you’ll see the images in the tab bar of the Tab Bar Controller in the storyboard. If not, check the names of the files against the Image attribute of each tab bar item.
If you run the application now, you’ll see a tab bar with your images, and you can change tabs by touching each one. It’s hard to see that the views are changing because they’re all the same. You’ll fix that in the next section.

When your app comes up, it shows the first tab, the face view. Looking back at the first sketch, you can see that the view has two areas. The top bar has the button that adds a face to the app, and you should probably put the name of the app there too. Most of the view is taken up by the face itself, which is an image. Here’s a refined sketch.

That standard title bar that you add to the sketch is called a Navigation Bar, and the button you put on it is a Bar Button Item. To add them, click the storyboard in Xcode, and then drag the objects from the Library onto the Face View Controller. One nice thing is that Interface Builder knows that Navigation Bars go on top and what size they are. If you drag the Navigation Bar near the top, it will snap into position. Similarly, when you drag the Bar Button Item near the right side of the Navigation Bar, Interface Builder will automatically set its size and location. Double-click the title and type Disguisey, and then doubleclick the button and type Pick Face.

Before you add the image into the center, it’s worth noting that your view doesn’t have the full tab bar on it. That’s because DIFaceViewController doesn’t know about the other tabs. Interface Builder lets you simulate the tab bar, which helps it show you what views will look like in the real app. Go to the Attributes Inspector of the view (select the fourth tab or press Opt-Cmd-4), and see that the Bottom Bar field is set to Inferred in the Simulated Metrics section. When you place elements in the view, they will know to size and place themselves while taking the tab bar into account.
Now, drag an ImageView from the Library onto the center of the view. It’s sized automatically when you drag it to the center, because you have the top and bottom bars in place. While it’s still selected, choose Editor > Arrangement > Send to Back so the disguises you drag around stay under the navigation and tab bars.
To finish the view, click the UIImageView and go to its Attribute Inspector. Set Mode to Top Left, and select the User Interaction Enabled check box (because you want to be able to touch the ImageView).

You’ll come back and make outlets and actions later, but think about what you need to send to controllers (with actions) and what they will need to update (with outlets). Keep the sketch, design, and code loop in mind as you do each part so you can flow from one to the next easily.
The disguise tabs are the hardest part of this app. First, go grow some facial hair (or call in a favor from your dad), dye your hair rainbow colors, get some cool hats, and tattoo your face.


If this seems like too much work, or if for some reason you don’t want a face tattoo, you’re still going to have to call in favors. Look through your digital photos for friends and family who have different beard and hair styles, and then use Photoshop or Gimp to extract just the hair from the pictures and paste it onto a transparent background. Here’s an example.

If you can’t find what you need in your own photo library, look for royalty-free images online. Check the license carefully if you’re planning to use images in a commercial app. The safest thing is to use your own photos and get permission from the models.
Save your images in PNG files that are 150 pixels wide, and name them facial-hair-01.png, facial-hair-02.png, and so on.

To put them on the disguise tabs, click the Facial Hair View Controller in the storyboard. Then, drag a Round Rect Button onto its view. Set the button’s Type to Custom, and choose the image for it. Do this for each different disguise element (putting them on the correct tab in the storyboard).

If you save the storyboard and then run the app in Xcode, you’ll be able to switch between tabs and see the different disguise elements. But when you touch a mustache, nothing happens. You want the app to switch to the face tab. You know you need actions. Think about which part of the view is sending a message to the controller and what the controller needs to change while you go grab a congratulatory cookie for getting this far.

You finally need to add some code. Did you figure out that the disguise button needed an action? That should be obvious by now, because buttons without actions don’t do anything when you touch them.
Every button does the same thing, so you need only one action. In DIDisguiseViewController.h, add this code:
-(IBAction)disguiseElementChosen:(id)sender;
You also need this action, which will change the tab bar to the first tab:
-(IBAction)disguiseElementChosen:(id)sender
{
    self.tabBarController.selectedIndex = 0;
}
Connect each disguise button’s touch event to the action.

Save everything in Xcode, and run the app. Now, when you go to the facial hair tab and touch a mustache, the app automatically switches you to the face tab. If only a face appeared there!
You’re getting to the point where you need models to help you finish the code. Because they’re simple, you’ll do that and then use them to finish the application.
This app has fairly simple models. You need to be able to create and manage the disguise. It’s common to see models when you have a collection of things. The collection and the things are usually classes in the model. In this case, DIDisguise is a collection of DIDisguiseElements.
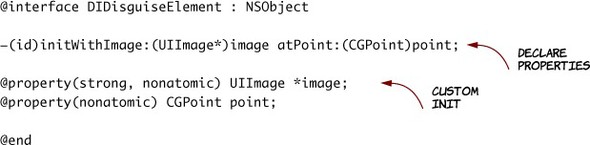
The app’s design represents DIDisguiseElement as shown at right.
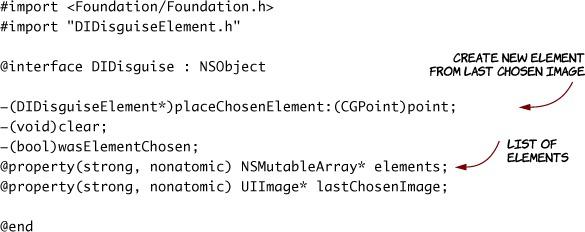
It’s an image and an x-y point on the face. Create a new class called DIDisguiseElement, and edit DIDisguiseElement.h to look like this:

Put the following code in DIDisguiseElement.m.

This is the same familiar code you write whenever you have properties. You ![]() synthesize them and
synthesize them and ![]()
![]() initialize them. DIDisguiseElement is a simple container of two related properties.
initialize them. DIDisguiseElement is a simple container of two related properties.
The disguise is a little more complex.

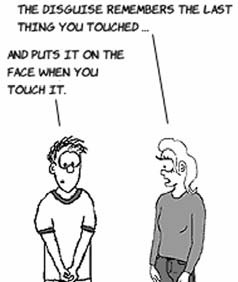
The disguise is accessed in two different ways. Here’s how it works.

When you’re on the facial hair tab and touch a mustache, the disguise keeps track of that as the lastChosenElement. Then, when you’re on the face tab and you touch a face, the last chosen element is used to create a new DIDisguiseElement object, which is added to the list of elements.
To create it, add a class called DIDisguise, and add the following code to DIDisguise.h.
For the most part, the implementation isn’t too bad. Here’s everything except placeChosenElement.
Listing 7.3. DIDisguise.m: the DIDisguise class’s implementation
@synthesize elements = _elements;
@synthesize lastChosenImage = _lastChosenImage;

-(id)init
{
    if (self = [super init]) {
        self.elements = [[NSMutableArray alloc] init];
    }
    return self;
}
-(void)clear
{
    [self.elements removeAllObjects];
}

-(bool)wasElementChosen
{
    return self.lastChosenImage != nil;
}
Now, let’s take a closer look at placeChosenElement.

When the face is touched, you want the disguise element to be centered at that point, so that’s what the point you pass in represents.

Once you create the element ![]() , you need to add it to your elements list. And because you don’t want to place the last element ever again, you set it to nil
, you need to add it to your elements list. And because you don’t want to place the last element ever again, you set it to nil ![]() .
.
With your models in place, you can finish the app. In this case, it was simple to finish the models; but if they’re complex, you can make fake versions of them that have the interface you plan to use but a simpler implementation. For example, if you plan to use a database to store data in the real version, use an array early in the project so you can prototype the app.

The next part of your app involves interacting with the Photos app that comes with your phone. Because this is likely to be where the user has pictures of faces, it makes sense to let users pick from among those photos.

The iOS SDK not only gives you access to the photos in the user’s Library, but also makes the Library easy to integrate because the SDK provides views that control the interaction with the user as well. This isn’t just a convenience; it ensures that access to the user’s photo Library is under their control and consistent across applications. When you open the photo Library, the iPhone shows a UI like this. To do this, you need to create a UIImagePickerController object and handle its events. It will automatically put views on the screen to show albums and then photos, and it even lets the user resize and position the result if you want. At the end of the process, it tells you what happened.

To code the image picker, first you need to change the class declaration in DIFaceViewController.h to allow the picker to control your UI. Change it to this:
@interface DIFaceViewController : UIViewController
   <UIImagePickerControllerDelegate, UINavigationControllerDelegate>
Then add the following messages:
-(IBAction)pickFace:(id)sender;
- (void)imagePickerController:(UIImagePickerController *)picker
    didFinishPickingMediaWithInfo:(NSDictionary *)info;
- (void)imagePickerControllerDidCancel:
    (UIImagePickerController *)picker;
The action pickFace is for the button on your view, so attach it to the button’s selector action in the storyboard. You also need an outlet for UIImageView* that represents the face, so create a property named faceImage.

The other two messages are what the image picker will send when the image-picking process is either canceled or completed. To implement these messages, add #import <UIKit/UIKit.h> to DIFaceViewController.h and use the following code in the implementation.

Getting a photo starts when the Pick Face button is touched to trigger the pickFace action. In response, you allocate a UIImagePickerController object ![]() , configure it, and present it
, configure it, and present it ![]() . By setting the picker’s delegate property to this controller, it will be able to send messages to the DIFaceViewController. When you’re done choosing an image
. By setting the picker’s delegate property to this controller, it will be able to send messages to the DIFaceViewController. When you’re done choosing an image ![]() , you remove the picker’s controller from the window.
, you remove the picker’s controller from the window.
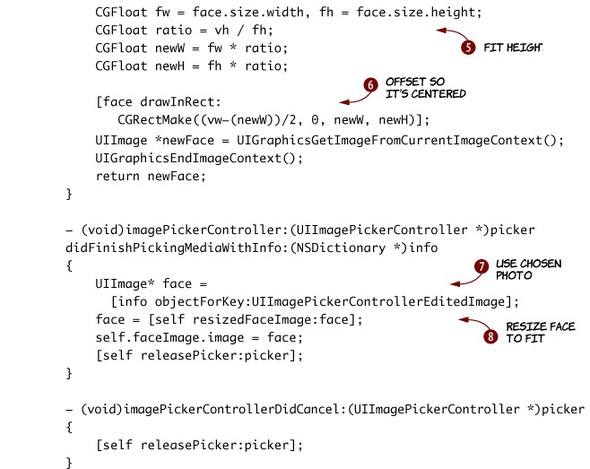
The helper message, resizedFaceImage, makes sure the face fills the whole view. The following figure will help you see how it works.

First resizedFaceImage sets the size of the face image to the size of the view ![]() . Then it recalculates a new height and width so the photo fits, but it maintains the same aspect ratio
. Then it recalculates a new height and width so the photo fits, but it maintains the same aspect ratio ![]() . Finally, it centers the image by offsetting it half the difference in widths between the image and the view
. Finally, it centers the image by offsetting it half the difference in widths between the image and the view ![]() . This way, you get the largest possible photo to work with.
. This way, you get the largest possible photo to work with.
When you touch an album, it shows you its photos. Choosing a photo sends it to the controller ![]() , which will resize it for you
, which will resize it for you ![]() before you use it. If you cancel the image selection, the picker will send the cancel message. In either case, you need to remove the picker.
before you use it. If you cancel the image selection, the picker will send the cancel message. In either case, you need to remove the picker.
If you run the application, the pick face button will now work.
You’re down to the final stretch. All that’s left is placing the mustache when you touch the face. Unfortunately, you can’t use the built-in UIImageView.
The next step is to add a disguise element when you touch the face.

You might think you just need to wire up an action to UIImageView on the face view. Unfortunately, you have two problems. First, UIImageView doesn’t have touch events. But even if it did, actions don’t have x-y coordinates.
When a view is being touched, it gets a series of messages. The one that indicates that a touch started is called touchesBegan: withEvents:. When a button receives this message, it sends out action messages to attached controllers, but images ignore them. You need a way to hook into that message.

To do this, you’re going to use a technique you learned about in chapter 2: subclassing, or creating an is-a relationship. If you inherit a new class from UIImageView called DIFaceImageView, you can handle messages that would otherwise be ignored. Because the plan is to send it to the DIFaceViewController, you need to create a has-a relationship with it. In turn, the controller will have-a FaceImageView.


Create a new class in Xcode called DIFaceImageView. You need to inherit from UIImageView and override its touchesBegan: withEvents: message. Here are the contents of the header:
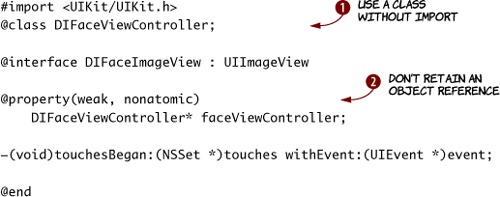
Whenever two classes use each other, in one of the headers you need to use a forward declaration ![]() instead of an import, because two files aren’t allowed to import each other. Also, although the view controller holds a strong reference to this class, DIFaceImageView holds a weak one back to the view controller.
instead of an import, because two files aren’t allowed to import each other. Also, although the view controller holds a strong reference to this class, DIFaceImageView holds a weak one back to the view controller. ![]() . A weak reference doesn’t cause a retain and release, which is important because the circular reference would have fooled ARC into thinking these objects were always being used.
. A weak reference doesn’t cause a retain and release, which is important because the circular reference would have fooled ARC into thinking these objects were always being used.
In the module, synthesize the controller and handle the touch message:
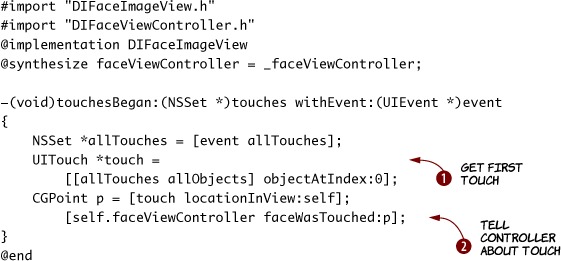
In this code, you get the list of touches and use the first one ![]() . If this was multitouch, you’d need to do more. Then, you tell the controller that the face was touched
. If this was multitouch, you’d need to do more. Then, you tell the controller that the face was touched ![]() . You haven’t written faceWasTouched yet, so this won’t build.
. You haven’t written faceWasTouched yet, so this won’t build.
To finish, you need to connect this new class up with DIFaceViewController. First, change the declaration of the faceImage property from UIImageView* to DIFaceImageView*. Also add a disguise property (of type Disguise*) to the controller.
Then, add #import "DIDisguiseElement.h" and these messages to the controller’s header:
-(void)faceWasTouched:(CGPoint)point;
-(void)drawDisguiseElement:(DIDisguiseElement*)el
           startingAtPoint:(CGPoint)p;
In the module, you need to add the following message implementations.

Also add this in viewDidLoad:

Finally, you need to create a Disguise object and give it to each tab. Add a disguise property to your app delegate, and make the init message in DIAppDelegate.m look like this:
-(id)init
{
    if (self = [super init]) {
        self.disguise = [[DIDisguise alloc] init];
    }
    return self;
}
Be sure you made a disguise property for the two view controllers, and set them like this in the viewDidLoad of both view controllers:
- (void)viewDidLoad
{
    [super viewDidLoad];
    DIAppDelegate* app = (DIAppDelegate*)
        [[UIApplication sharedApplication] delegate];
    self.disguise = app.disguise;
}
Run the app, touch a mustache, and then touch the face.
Well, at least that was better than a face tattoo. To finish this app, you’ll want to add more disguise images to the various tabs. Now that you have a framework in place, that should be easy to do. Once you add an image to the appropriate view, connect it to the touch action that makes the tab switch. And if you want to do more, make an icon and a default startup image for the app, too.


Now you know how to make tab-based applications and work with photos stored on the device. You also learned a little more about touch events, but you’ll discover even more about that soon.
In the next chapter, you’ll keep playing with this app. You need ways to move, resize, and delete disguises. You can also use a little animation to give the app some life. Disguisey will be App Store ready in no time.