Chapter 9. Working with location and maps
This chapter covers
- Using maps in your views
- Getting the current location
- Showing pins on a map
The iPhone has so many features that many things that used to be separate gadgets can be apps. For most of us, the GPS on the phone is sufficient for our location and direction needs, and we don’t need a dedicated GPS device. The next application you’ll write, Parkinator, uses this feature to solve an important mobile computing problem: remembering where you parked.

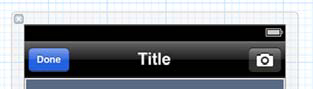
Let’s make the UI for this app just a front and back screen. On the front, you’ll see your location and the last place you parked. On the back, you’ll take a picture of your car, and when you’re finished, the app will flip back and put a pin at your spot.
Let’s make a quick sketch.

See the little i in a circle at the bottom? That’s how you get to the flip side of the app. You haven’t used this kind of navigation before, but lots of apps use it, including the built-in Weather app.
This application’s behavior is simple. Because you just want to learn about location, maps, and pins, we’ll make sure the rest of the app uses things you’ve seen before.

When the app comes up, you want to get the current location and show it on the map. When the user touches the i, you’ll flip the app around. There they can take a picture. Then you’ll flip the app around again to show the parking spot picture and a pin on the map.
It’s pretty obvious from the sketches that you have two views (and controllers): one for the front side, which we’ll call the main view, and one for the other side, which we’ll call the flip-side view.
The main view needs to respond to two things. First, when the i is touched, it needs to show the other side of the app. You’ll see soon that you get that behavior for free with the template you’re going to use. Second, when the user is finished with the flip side, you need to show the parking-spot photo and put a pin on the map. To hold this information, you’ll use a model class called PAParkingSpot.

The flip side is simple as well. It needs to take a picture, show it on the screen, and then let the user say that they’re finished.

Most of the hard part of this app involves interacting with the new frameworks you’ll incorporate. Other than that, the behavior and the kinds of classes you’ll make are similar to the other apps you’ve built already.
You want the app to use a kind of navigation that you haven’t seen yet. It uses a main view to show most of the functionality of the app and a flip-side view to set it up. This is called a utility application.

To get started, go into Xcode and choose File > New > Project from the menu. When you do, you’ll see the list of templates: choose Utility Application under the choices for iOS applications.


If you run the app in the simulator, you’ll see that it has a blank main screen and that it already includes the i button that flips to the other side. You’ve probably seen Map View in the Interface Builder object library when you were building other apps, and you probably already know that you’ll use it next. Before you do, however, you need to add the frameworks to your project.

Because maps and location aren’t used in every app on the iPhone, Xcode makes you add them if you’re going to use them. To do that, click the main Parkinator node at the top of Project Navigator, and then choose the Parkinator target.
Click the Build Phases tab, and open the Link Binary with Libraries area as shown.


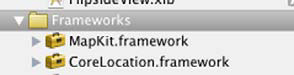
You need to add two frameworks: MapKit, which draws maps for you, and CoreLocation, which talks to the GPS. To add MapKit, click the + button, and then type map in the search bar.
Choose MapKit.framework, and then click the Add button. Repeat this with CoreLocation.framework.

Notice that in Project Navigator, these frameworks are in the main group. To make things tidier, drag them into the Frameworks group.
Now you can start using maps in your views and getting location information from the GPS.
With the frameworks added, the Map View object is like any other object you’ve put onto views. Let’s go add it.
Click PAMainViewController.xib in Project Navigator, and scroll the Object Library until you see the Map View.

Drag it onto the bottom area of your screen, taking up about half the area.

To make sure you can still touch that i button, while the Map View is still selected, choose Editor > Arrangement > Send to Back. Doing so puts the map under the button.
Finally, go to the Attributes Inspector and select the Shows User Location check box.
Run the application by pressing Cmd-R or clicking the play button at upper-left in Xcode. When you do, you’ll see this.

If you live in the United States and don’t need to see any streets on the map, then you can skip the next step. The rest of us would like the map to show the current location.

By default, the simulator acts like you’re at Apple headquarters in Cupertino, California. If you slide the map over to California and zoom in, you’ll see a blue dot showing that you’re there. Once you learn how to test your apps on an actual iPhone, you’ll see that the map will show your real location. In the meantime, choose Debug > Location in the simulator and select a new location or even a simulation of movement.
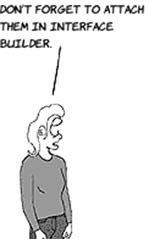
Right now, you want to get the map view to center around the blue dot, wherever it is. Because you have to change the view with code in the controller, you need to add an outlet for it. Try to do this part yourself before moving on. The one thing to know is that the Map View is of type MkMapView*, and you need to add #import <MapKit/MapKit.h> in the PAMainViewController.h file.
You added a lot of outlets in the previous chapters, and this one is no different. Always make sure your view controller knows the type of view you’re using: unless it’s part of UIKit, you need to add an import line for it. Put this at the top of PAMainViewController.h:
#import <MapKit/MapKit.h>
To create the outlet, click PAMainViewController.xib and display the Assistant Editor. Ctrl-drag from the MKMapView into the assistant, and call the property mapView.

The MkMapView needs a way to tell you about location changes, and it does that by sending messages to a delegate. You saw this with UITableView, which did the same thing. To set it up, click the MkMapView and, in its Connections Inspector, drag the delegate outlet to the File’s Owner cube icon.
Finally, to make the controller able to receive these messages, go to PAMainViewController.h and change the interface declaration to look like this (adding MKMapViewDelegate):
@interface PAMainViewController : UIViewController
    <FlipsideViewControllerDelegate, MKMapViewDelegate>
Now you can get messages from the Map View in your controller. You want to know whenever the map senses you’re at a new location. That’s the time to update the map. To handle this, add the following code to PAMainViewController.m.

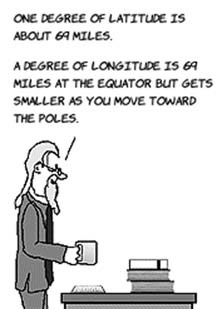
This message will be sent to your controller whenever your location changes. You want to show the relevant area of the map, so the first thing to do is to figure out how much of the map to show ![]() . The .02 is the number of degrees of latitude and longitude to show; this value gives you a good overview of the area and lets you get a sense of the streets. Zoom in more by making this number smaller, and zoom out by making it larger.
. The .02 is the number of degrees of latitude and longitude to show; this value gives you a good overview of the area and lets you get a sense of the streets. Zoom in more by making this number smaller, and zoom out by making it larger.
Later you’ll want to place a pin here, so let’s save the location in a property ![]() . Locations are stored in a CLLocationCoordinate2D. Create this property on your own by putting this line in its proper locations:
. Locations are stored in a CLLocationCoordinate2D. Create this property on your own by putting this line in its proper locations:
@property(nonatomic) CLLocationCoordinate2D lastLocation;
Run the app, and it should look like this.

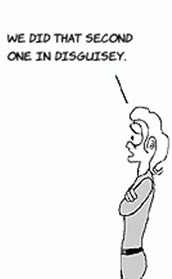
Now that you can show where you are, the next step is to let the user take a picture of their parked car. Almost all the code to do this is like the code you used to get a face for Disguisey, so we’ll go through it fairly quickly in the next section.
If you’re feeling adventurous, try to do it on your own. Set up the app to grab a photo from your photo library, because there is no camera in the simulator. You don’t have to worry about hooking up the Info button or the Done button on the flip side, because the Utility Application template did that for you.

In order to implement the flip side, you need to be able to take a photo and show it. In Disguisey, you used an image from the Photo Library; the steps and code to use the camera are basically the same. You’ll begin by putting a UIImageView on the flip-side view and hooking it up to an outlet.
After you take the picture, you want to show it on the view, so you need to drag a UIImageView onto the flip-side view. Select PAFlipsideViewController.xib in Project Navigator, and set the UIImageView to take up the view’s entire size.

In order to set the image, you have to connect it to an outlet. Here’s what PAFlipsideViewController.h needs to look like. Most of this code was written for you by the template, but you have to add the outlet and prepare the interface with the proper delegates for using the image picker to get photos.

When you take a photo, the image picker takes over the GUI and sends you messages to let you know what’s going on. To do that, it needs you to implement these delegates. Once the photo is taken, you need to update the UIImageView with it, so you declare a property to connect the view to the controller. Later, to make the camera button take a picture, you’ll attach the button to the takeCarPhoto action.
To finish this part, select PAFlipsideViewController.xib and connect the UIImageView to the carPhoto outlet.

You added the takeCarPhoto action so you can hook a button up to it, so the next step is to add that button.
The iOS SDK gives you some premade icon buttons that are used in the built-in apps and in apps throughout the App Store. Let’s add the camera button to the Navigation Bar.
Find the Bar Button Item in the Object Library.

Drag it onto the right side of the Navigation Bar. Then, in the Attributes Inspector, change Identifier to Camera.

Doing so changes the look of the button to a standard camera icon.

Then, choose the takeCarPhoto action from the list.

Now you need to implement the message to get a photo and put in it the carPhoto UIImageView on the app screen.
To get photos from the photo library or camera, you use the iOS SDK’s UIImagePickerController. Here’s what the takeCarPhoto implementation looks like.


Before trying to use a camera, make sure you have one ![]() . This helps you in the simulator and also makes sure your code works on any iOS devices without a camera, such as the original iPad. If there’s no camera, you show the photo library
. This helps you in the simulator and also makes sure your code works on any iOS devices without a camera, such as the original iPad. If there’s no camera, you show the photo library ![]() .
.
Next you have to handle the messages from the image picker. This is exactly like what you did for Disguisey.

Run the app. The camera button now gets an image from your library.
On a device with a camera, the app will take a new picture instead.
You’re almost done. The final step is to get back to the front side of the app, show this picture, and put a pin on the map.

The Utility Application template set up a Done button for you that automatically flips the app back to the main view. Because it’s likely that the information on the flip side will alter the main-view side, the template set up a message that it will send to the main view when the user clicks Done. Look in PAMainViewController.m and see if you can guess which message you’ll alter to update the image.
Before you can handle the message that you’ve flipped back, you have to put a UIImageView onto the main view. Click PAMainViewController.xib, and drag on an ImageView.

Of course, because you want the controller to update this view, you need an outlet for it. Add one called carPhoto by making a property in your header.
When you’ve done that, edit the flipsideViewControllerDidFinish: that the template created for you so it looks like the following listing.

Run the app, click the info button, choose a picture, and touch the Done button to see the image used on the main view.
If you stick a pin here, you’re done. Then, when you start walking away from your car, the blue dot will follow you, but a pin will be left behind to make sure you can find your car later. You’ll make a model class called PAParkingSpot and use it to hold the location.

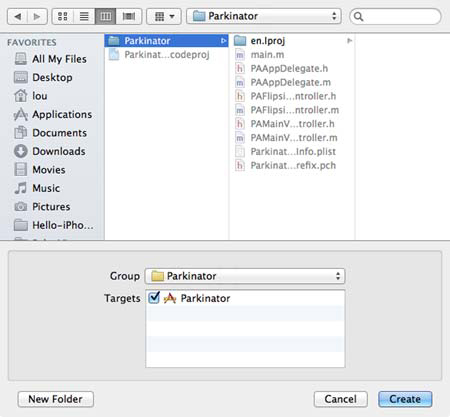
In order to put a pin on a map, MapKit requires you to create a class that implements the MKAnnotation delegate and has a property called coordinate that holds the location of the pin. Because you want a model class anyway, you’ll make it conform to what the Map View wants. To begin, right-click the Classes group in Project Navigator and choose New File. Then, in the next dialog, choose Objective-C Class under Cocoa Touch in the iOS section.

Like most model classes, you’re going make this one inherit from NSObject. But to also conform to the MKAnnotation delegate, use NSObject<MKAnnotation>.

Save it in the main group.
Listing 9.6. PAParkingSpot.h: interface for PAParkingSpot
#import <Foundation/Foundation.h>
#import <MapKit/MapKit.h>

@interface PAParkingSpot : NSObject<MKAnnotation>

-(id)initWithSpotCoordinate:(CLLocationCoordinate2D)spot;

@property (nonatomic) CLLocationCoordinate2D coordinate;

@end
Nothing much to see there: a simple property and an init to set it up. Here’s the implementation.
Listing 9.7. PAParkingSpot.m: implementation of PAParkingSpot
#import "PAParkingSpot.h"

@implementation PAParkingSpot

-(id)initWithSpotCoordinate:(CLLocationCoordinate2D)spot
{
    self = [super init];
    if (self != nil) {
        self.coordinate = spot;
    }
    return self;
}

@end

It doesn’t get much simpler than that.
All you have to do now is to create a PAParkingSpot object and add it to the map. Remember, you want to do that once the main view is flipped back, so you need to add a little more code to the message where you set the UIImageView to the car photo.
When the view flips back, you already know flipsideViewControllerDidFinish will be sent, because that’s where you set up the main view’s image from the flip side. Now you want to create a PAParkingSpot object, hold onto it in a property, and add it to the map.
The first step is to add a PAParkingSpot* property called spot. Add the property yourself, and then update this message to use it.

You saved the last location that you received from the map, so now you can use it to init the PAParkingSpot ![]() . Then you add it to the map view
. Then you add it to the map view ![]() .
.
The map knows it has the pin, but it doesn’t know what you want the pin to look like yet. To find that out, it sends the controller a message if the pin is on the screen; you have to implement it to set what kind of annotation to use and what color it should be.
The final step is to implement the message to provide the viewing properties of any annotation. Viewing annotation properties is similar to viewing table elements, in that messages sent to request viewing properties are only generated for pins that are in view.


This message is sent for every annotation on the map, including the current location. First you need to check to see if the message is asking about your parking spot ![]() . If it is, then you want to reuse old pins that you saved under the name spot
. If it is, then you want to reuse old pins that you saved under the name spot ![]() . If you haven’t saved a pin yet, then you make one
. If you haven’t saved a pin yet, then you make one ![]() and set its color to green.
and set its color to green.
Run the app, and mark a parking spot with the flip side to see the new pin.
You see that there are two annotations on the map. The green pin represents the parking spot, and the glowing blue dot is your current location. If you were on a device, you could start moving, and the blue dot would follow you. The green pin would remain behind to let you know where you parked.


That’s a simple utility app with a map and a pin. You could use this basic idea for all kinds of location-based apps. You’ve used it to track parking spots, but you could tag your favorite outdoor art, track birds on a nature walk, or remember the antique store where you saw that cool lamp. This is the first step toward building a check-in–style app like FourSquare.
But let’s say you’re successful at getting millions of users to use Parkinator. If so, each user collects some valuable data about where there have historically been parking spots and which spots have recently been vacated. In the next chapter, you’ll use some simple mechanisms to collect that data on the internet and use it in your app to find a place to park.