concept video in category android

This is an excerpt from Manning's book Android in Action, Third Edition.
Accessing raw resources closely resembles accessing files. You open a handle to an InputStream
. You call Context.getResources() to get the Resources for your current application’s context and then call openRawResource(int id) to link to the particular item you want
. Android will automatically generate the ID within the R class if you place your asset in the res/raw directory. You can use any file as a raw resource, including text, images, documents, or videos. The platform doesn’t precompile raw resources.
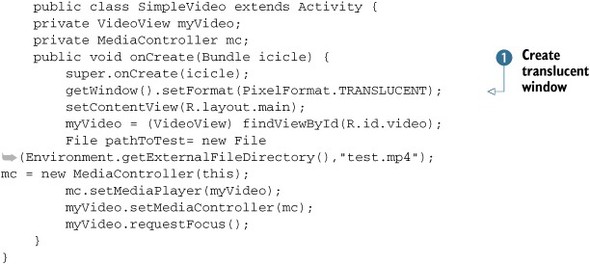
All we’ve done in this listing is add the VideoView widget
In this listing, we first create a translucent window, which is necessary for the SurfaceView
Before you can run this application, you’ll need to either use the ADB to push a video onto your Android 3.0 device or create one that you’ll reference in the setVideoPath() method. You can download this project from the book’s source code repository, which includes a number of short, license-free videos you can use for testing. When the videos are on your device’s SD card, run the application and touch the screen where the movie will play in the upper-left corner. Doing so will cause the controls to appear. Push Play, and you should see something like figure 10.3.

This is an excerpt from Manning's book Android in Practice.
Well cover these libraries briefly, to describe the Android middle tier. Our intention is to give you an idea of what’s possible with Android by looking at some of the technologies that ship with it. We’ll begin with the stuff that gets your attention first: audio and video from OpenCORE. Then we’ll check out the database storage option, SQLite. From there we’ll look at the browser rendering engine, WebKit. And finally we’ll wrap it up with a discussion of hardware sensors and the camera.
The Android Market is a vibrant and diverse bazaar of applications and games. You can find applications for listening to music, editing photos, and broadcasting videos among others with a focus on multimedia of one type or another. Obviously, if you want to build an application with a similar focus, then you’ll need to master many of Android’s multimedia APIs. But what if you don’t? What if you’re among the many developers whose applications will focus on something other than multimedia? Should you even care which APIs you’d need to play music or create a thumbnail for a video?
Earlier in this chapter, we talked about how smartphone users use multimedia to share information. So far, we’ve concentrated on the consumption sides of things—viewing images, listening to audio, and watching videos from within an Android app. For the rest of this chapter we’ll focus on how to capture input—how to take pictures and record audio and video from within an Android app. You might be surprised by how simple this is to do using Android. It’s possible to complicate things, but we’ll focus on straightforward ways to capture multimedia from your application. We’ll also cover more advanced techniques and unusual situations where appropriate. We’ll start with what is surely the most useful technique, taking pictures.
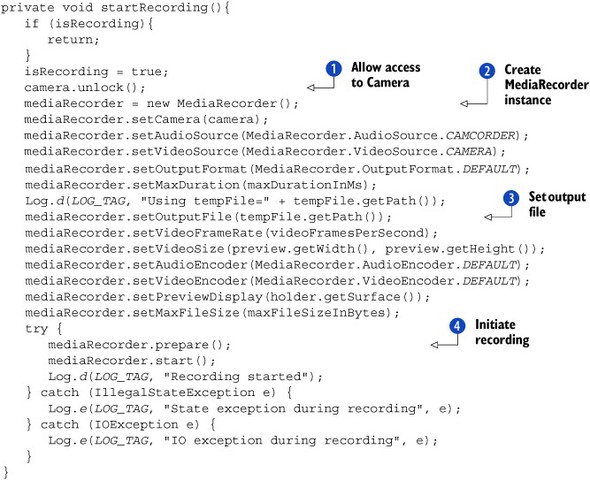
This method involves several straightforward steps to configure recording of audio and video. First we need to unlock the Camera object
, so that other objects can access it. Then we need to create a new instance of MediaRecorder
, the primary class in Android for recording any kind of audio or video. Next, we pass it a reference to the Camera object. Then, several simple methods configure things such as the audio and video source, the format for the output file, the frame rate of the video, the dimensions of the video, and the encoding type to use. We’ve mostly used default values in listing 11.16, but you can look at the API documentation to see some of the available options. One of the most important configuration steps is to set the output file of the MediaRecorder
. This is the file that we created earlier in listing 11.14. Now we’re ready to start recording audio and video, so we make calls to prepare and start the recording
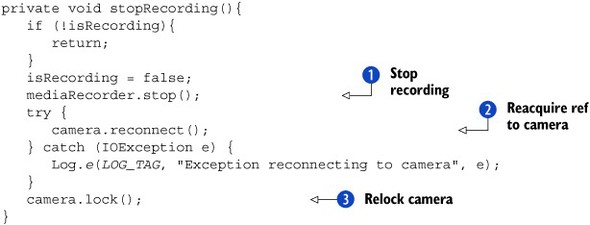
. When the user has finished recording, they’ll use the menu to select the Stop Recording button we saw in figure 11.7. Here’s the stopRecording method that will be invoked when this happens.
The code in listing 11.17 is simple. First, we tell our MediaRecorder object to stop recording audio and video