concept control in category asp.net

This is an excerpt from Manning's book ASP.NET 4.0 in Practice.
Figure 1.9. The Web Form we created in listing 1.2, before and after PostBack. The first request contains the controls to add your input. The second request hides them and shows only the resulting text.
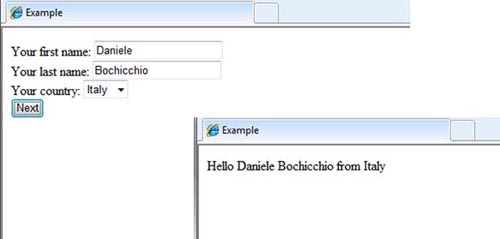
You can use custom controls in ASP.NET Web Forms to benefit from componentization. As you learned in previous chapters, ASP.NET Web Forms are based on the concept of controls, which are used as placeholders for their given features. Controls are useful when you’re developing complex applications because you can avoid code duplication. Because custom controls are objects, you can use the typical features offered by OOP.
When you write a custom control, you’re trying to solve a recurring problem in order to avoid writing the same logic—and code—multiple times. Because the control will be available in the page’s control tree, you need to code it accordingly.
You can register a control in two ways:
Locally on the page —The control will be available only on this page Globally —The control will be available to the whole application The syntaxes you use in each of these two cases are similar, and there isn’t a preferred choice. If you need a set of controls in many pages and you don’t want to repeat the registration every time, the global approach is the best way to go. On the other hand, if you need them only on one page, it’s better to register them on the page where you use them.
If you want to globally register a control, you need to open your web.config and place the registration under configuration\system.web\pages, as in the following snippet:
<controls>
  <add tagPrefix="controls"
       namespace="CustomControls.Composite"
       assembly="CustomControls.Composite" />
</controls>
You can locally register a control in a page (or user control) using the @Register directive:
We’ve omitted the declaration of the properties from listing 6.2 for brevity. When you need to set the properties for the inner controls, you have to use a special approach: you need to access an inner object’s property from outside the control. In these situations, the preferred way to go is shown in the following snippet:
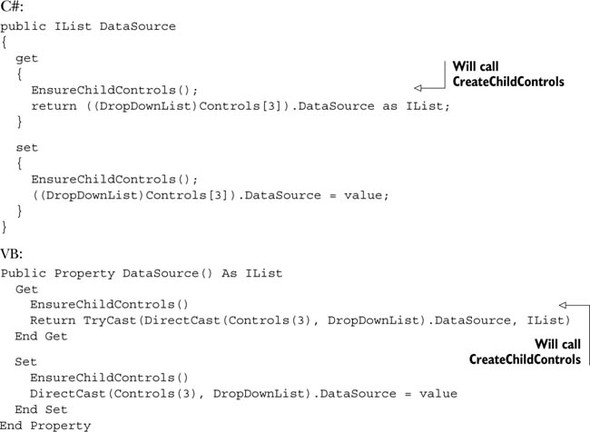
As you can see, we’re referring to the control we created in listing 6.2 (in this case, the DropDownList), finding it by position, and directly exposing its inner property. Because you don’t have to keep the inner property in sync (it’s automatically performed using this pattern), this example shows you the best way to handle this situation.

This is an excerpt from Manning's book ASP.NET MVC 2 in Action.
ASP.NET MVC is both an alternative and a complement to Web Forms, which means you won’t be dealing with pages and controls, postbacks or view state, or complicated event lifecycles. Instead, you’ll be defining controllers, actions, and views. The underlying ASP.NET platform is the same, however, so things like HTTP handlers and HTTP modules still apply, and you can mix MVC and Web Forms pages in the same application.
The example in listing 16.8 is a true catchall route that will literally match any URL that hasn’t been caught by the higher-priority rules. It’s valid to have other catchall parameters used in regular routes, such as /events/{*info}, which would catch every URL starting with /events/. But be cautious using these catchall parameters, because they’ll include any other text on the URL, including slashes and period characters (which are usually reserved as separators for route segments). It’s a good idea to use a regular expression parameter wherever possible so you remain in control of the data being passed into your controller action, rather than just grabbing everything. Another interesting use for a catchall route is for dynamic hierarchies, such as product categories. When you reach the limits of the routing system, you can create a catchall route and do it yourself.

This is an excerpt from Manning's book ASP.NET MVC in Action with MvcContrib, NHibernate, and More.
It is important to realize that we are setting up a fake object that implements IScheduleMapper. We are passing this stub to the controller’s constructor, and our controller will use it without knowing the difference. It is worth noting that the application uses an IoC, or inversion of control, container to manage dependencies. This means that we have a custom controller factory use our IoC container to create the controller complete with whatever dependencies are declared by the constructor. We’ll cover controller factories in greater depth later in chapter 3, but realize that this is a best practice not just for controllers but for C# code in general. You can see the IoC container usage by opening the full solution delivered with this book. In general, a class should openly declare dependencies by requiring they be passed in through the constructor.
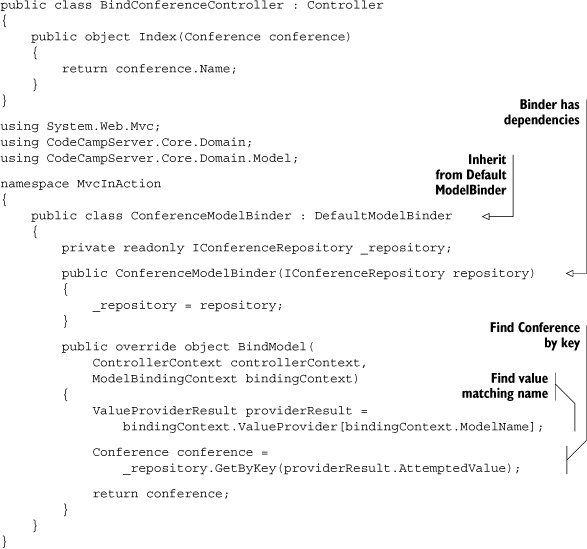
The example in listing 5.8 is a true catch-all route and will literally match any URL that has not been caught by the higher priority rules. It’s valid to have other catch-all parameters used in regular routes such as /events/{*info} which would catch every URL starting with /events/. Be cautious using these catch-all parameters as they will include any other text on the URL, including slashes and period characters. It’s a good idea to use a regular expression parameter wherever possible so you remain in control of the data being passed into your controller action rather than just grabbing everything.

This is an excerpt from Manning's book ASP.NET AJAX in Action.
Next up in the core library is the Components layer. Built on top of the type system’s solid foundation, the Components layer does a lot of the heavy lifting for the core library. This layer provides support for JSON serialization, network communication, localization, DOM interaction, and ASP.NET application services like authentication and profiles. It also introduces the notion of building reusable modules that can be categorized as controls and behaviors on a page.
Listing 7.7. Adding an UpdatePanel control and child controls to invoke asynchronous postbacks
<asp:Panel ID="Panel1" runat="server" GroupingText="UpdatePanel1"> <asp:UpdatePanel ID="UpdatePanel1" runat="server" UpdateMode="Conditional"> <ContentTemplate> Last Updated: <asp:Label ID="LastUpdated1" runat="server" /> <div> <asp:Button ID="Update1" runat="server" Text="Update" OnClick="Update_Click" /> </div> </ContentTemplate> </asp:UpdatePanel> </asp:Panel>
In the .NET framework, visual components are called controls. On the client side, you can create either a control or a behavior. We’ll discuss the differences between controls and behaviors shortly. Figure 8.2 shows the hierarchy of client components as defined in the client component model.
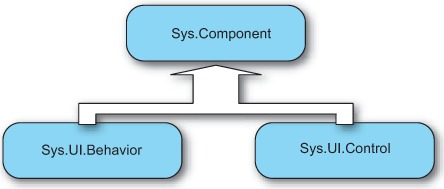
Just like behaviors, controls are visual components associated with DOM elements. Conceptually, a control differs from a behavior in the sense that instead of just providing client functionality, a control usually represents—or wraps—the element, to provide additional properties and methods that extend its programming interface. In ASP.NET, for example, a text box element is represented on the server side by the TextBox control. You can program against a TextBox object to specify how the element’s markup is rendered in the page. In the same manner, you can have a Text-Box control on the client side and program against it using JavaScript.
In the following sections, we’ll explore client controls and focus on a couple of scenarios where they’re useful. We’ll show you how to create an element wrapper and how to use a control to program against a block of structured markup code, instead of a single DOM element. In chapter 11, we’ll explain how you can use a control to program against a DOM element using the XML Script declarative language.

This is an excerpt from Manning's book ASP.Net 2.0 Web Parts in Action: Building Dynamic Web Portals.
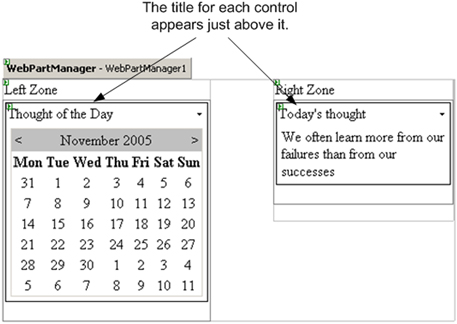
Figure 2.2. Code and debugging breakpoints are used to inspect the state of controls on our page during the pre-rendering phase of the page lifecycle.
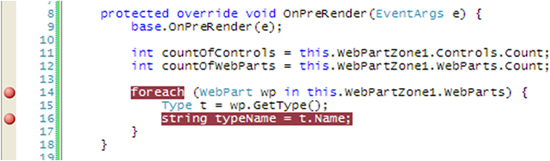
After an ASP.NET has been processing a good while, it enters into a phase that is referred to as the pre-rendering phase of the page. During the pre-rendering phase of the page, the OnPreRender event handler in the page is called by the ASP.NET engine, which causes code in our method to be executed. At this time, page execution will halt at the breakpoints that we’ve set. When the execution halts at runtime, we can inspect the state of the controls on the page at runtime. The control that we are interested in is WebPartZone1.
A WebPartZone control has two properties that are of particular interest to us because they will provide information regarding where our Label control is, and what type of control it is. These properties are called “Controls” and “WebParts” and, as you may guess from their names, they contain collections of controls that are contained by the web part zone. Logic would have us believe that the Label control will turn up in the WebPartZone’s “Controls” collection because it is a web control but, from what we’ve observed, it’s pretty easy to expect that it will show up in the “WebParts” collection instead. Let’s run the page and see. From the Debug menu in Visual Studio, press Start Debugging to run the page and attach the debugger to it.
Visual Studio 2005 supports the themes feature by offering new designer support for it. As shown in figure 2.12, nearly all server controls offer the developer support via the new Common Tasks feature. This feature reveals itself by offering a menu of additional features that can be accessed directly from a control when that control is viewed in design mode. In figure 2.12 we see the common tasks menu being displayed for the WebPartZone control with a single menu item that allows the user to Auto Format that control. Clicking on the menu item displays a dialog that allows the user to apply one of four named formats to that control. Figure 2.13 shows four zones, each with a different format applied to it. The name of the format is shown in the title of the web part.
Listing 6.2. The OnPreRender method is used to configure the visibility of the controls for the application.
protected override void OnPreRender(EventArgs e) { base.OnPreRender(e); this.lnkToggle.Visible = WebPartManager1.Personalization.CanEnterSharedScope; this.lnkReset.Visible = WebPartManager1.Personalization.CanEnterSharedScope; this.LoginStatus1.Visible = Page.User.Identity.IsAuthenticated; this.lnkBrowse.Visible = Page.User.Identity.IsAuthenticated; this.lnkDesign.Visible = Page.User.Identity.IsAuthenticated; this.Login1.Visible = !Page.User.Identity.IsAuthenticated; }