concept change in category c#

This is an excerpt from Manning's book Code like a Pro in C#.
We have set requirements and an old code base that we need to mimic (where appropriate and possible), but we also start with an empty project. In the real world, this is a scenario that you often encounter. You no doubt have had the experience of trying to create a new version of an existing product;- a “next-gen” version, if you will. You may ask, why would we not just work in the existing code base, branching off in some kind of source control system, and merging in the changes as we go. My response to that is that you could definitely do that, and depending on your team and work environment, it might be the preferred way of doing it. It does, however, introduce complexities that are unnecessary for this book.
You can use the partial
keyword to implement functionality in the same class across multiple files. In general, it creates a bit of a readability mess but can be useful. Partial classes are especially useful for automatic code generators (like Entity Framework Core), as the generators can put code in partial classes without having to worry about a developer changing a class’ implementation somewhere else.
That said, since we know we are not going to be providing more functionality to FlyingDutchmanAirlinesContext
in a different file, we can remove the partial
keyword from the class. This is a good example of making sure that the code that is automatically generated is exactly how you want it. Just because a generator or template did it a certain way, does not mean you cannot edit it.
We discussed the concept of writing code that reads like a narrative using small methods before. This is that same concept. In his monumental work Clean Code: A Handbook of Agile Software Craftsmanship (Prentice-Hall, 2008), Robert C. Martin touches on this subject many times. One particular occasion is the section appropriately titled “Do One Thing”. He tells us that “Functions should do one thing. They should do it well. They should do it only.” If we hold this message in the back of our heads when we write code, we are one step ahead of the curve when it comes to writing amazing code. We discussed the Single-Responsibility principle, which concerns itself with writing clean methods that only do one thing, in chapter 6.

This is an excerpt from Manning's book C# in Depth, Fourth Edition.
The changes in C# 2 made an enormous difference to the look and feel of idiomatic C#. Working without generics or nullable types is frankly horrible.
There are differences between the two pieces of code: you’ve already seen that the timing of when condition is evaluated changes relative to any finally blocks higher up the call stack. Additionally, although a simple throw statement does preserve the original stack trace for the most part, subtle differences can exist, particularly in the stack frame where the exception is caught and rethrown. That could certainly make the difference between diagnosing an error being simple and it being painful.

This is an excerpt from Manning's book Functional Programming in C#: How to write better C# code.
This is almost identical to the sequential version; there are only two differences. First, AsParallel is used to turn the given list into a ParallelQuery so that everything after that is done in parallel. Second, the change in using static has the effect that Range now refers to the implementation defined on ParallelEnumerable (this returns a ParallelQuery, which is what the parallel version of Zip expects). The rest is the same as the sequential version, and the parallel version of Format is still a pure function.
Most programs are built to represent things and processes in the real world, and because the world constantly changes, programs must somehow represent that change. The question is how we represent change. Commercial applications written in the imperative style have state mutation at their very core: objects represent entities in the business domain, and change in the world is modeled by mutating the state of these objects.
We’ll start by looking at the weaknesses we introduce in our programs whenever we use mutation. We’ll then see how we can avoid these problems at the source, by representing change without using mutation and, more pragmatically, how to enforce immutability in C#. Finally, because much of our programs’ data is stored in data structures, we’ll introduce the concepts and techniques behind functional data structures, which are also immutable.
Let’s look more closely at change and mutation. By “change,” I mean change in the real world, such as when 50 units of stock become available for sale. “Mutation” means data is updated in place; as you saw in the Product class, when the Inventory value is updated, the previous value for Inventory is lost.
In FP we represent change without mutation: values aren’t updated in place. Instead, we create new instances that represent the data with the desired changes. The fact that the current level of inventory is 53 doesn’t obliterate the fact that it was previously 3, as shown in figure 9.2.

This is an excerpt from Manning's book C# in Depth.
Our first set of changes (shown in the following listing) tackles the first two items listed previously, including the most important change in C# 2: generics. The parts that are new are in bold.
Listing 5.4. Demonstration of breaking change between C# 1 and C# 2
delegate void SampleDelegate(string x); public void CandidateAction(string x) { Console.WriteLine("Snippet.CandidateAction"); } public class Derived : Snippet { public void CandidateAction(object o) { Console.WriteLine("Derived.CandidateAction"); } } ... Derived x = new Derived(); SampleDelegate factory = new SampleDelegate(x.CandidateAction); factory("test");
For the most part, the changes are intuitive: to check whether any particular method is applicable, the compiler tries to build a list of the arguments it would pass in, using the positional arguments in order, and then matching the named arguments up with the remaining parameters. If a required parameter hasn’t been specified or if a named argument doesn’t match any remaining parameters, the method isn’t applicable. The specification gives more detail about this in section 7.5.3, but there are two situations I’d like to draw particular attention to.

This is an excerpt from Manning's book Continuous Integration in .NET.
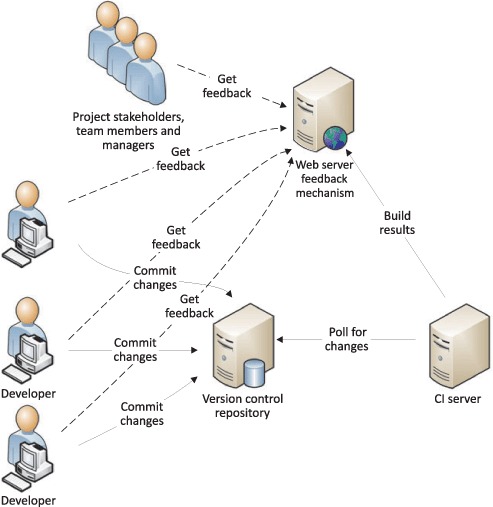
2. Make changes to the code.
One thing that drove this change was Microsoft’s desire to encourage VSS users to move to TFS Version Control, which is a part of the TFS family of tools. The old VSS is infamous (for good reasons or not) for its instability. A corrupted repository is the last thing you want to experience after a hard day of work. And the sad truth about VSS is that corruption happens way too often. TFS Version Control can’t be compared to VSS: it uses a completely different file-access mode (changes are transactional), and it uses SQL Server as its repository. You can also use SQL Server Express. TFS scales safely to a large number of users. Now that it isn’t so expensive, you definitely should give it a try.

This is an excerpt from Manning's book DSLs in Boo: Domain-Specific Languages in .NET.
Not much of a change, I’ll admit, but the second version is easier to read. There is less syntactic noise for you to parse.
Listing 6.21. Implementing an AST attribute
# AST attributes inherit from AbstractAstAttribute class EnsureAttribute(AbstractAstAttribute): # expr is the expression that we were supplied by the compiler # during the compilation process expr as Expression # Store the expression in a field def constructor(expr as Expression): self.expr = expr # Make the changes that we want def Apply(target as Node): # Cast the target to a ClassDefinition and # start iterating over all its members. type as ClassDefinition = target for member in type.Members: method = member as Method # We do not support properties to # keep the example short continue if method is null # If the member is a method, modify # it to include a try/ensure block, which # asserts that the expression must # be true. Then override the method body with # this new implementation. methodBody = method.Body method.Body = [| try: $ methodBody ensure: assert $expr |]
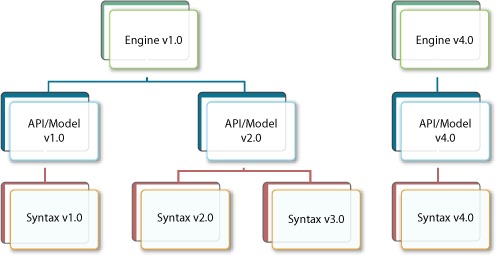
Memory— There will almost certainly be a significant number of changes to the scripts that will have to be recompiled, loading more assemblies into memory. Because we can’t release assemblies on the CLR, we have to either accept this issue or deal with AppDomains to manage it.
Once the application is in production, how are users supposed to edit the DSL scripts? It’s likely that some important behaviors are defined in the DSL and that users will want to make modifications to them. This is a question that comes up often. Yes, the DSL is easy to change, but how should you deal with changes that affect production?
Let’s first assume we’re talking about a web application or a backend system, not a Windows application. There are several aspects to this problem. First, there is the practical matter of creating some sort of UI to allow users to make the changes. This is generally not something trivial to produce as part of the admin section of an application.
There are also many other challenges in this scenario that need to be dealt with, such as handling frequent changes, cascading updates, debugging, invasive execution, error handling, and so on. Just making sure that all the scripts are synchronized across all the nodes in a web farm can be a nontrivial task. You also have to deal with issues such as providing auditing information, identifying who did what, why, and when, and you need to be able to safely roll back a change.

This is an excerpt from Manning's book LINQ in Action.
LINQ to SQL automatically keeps track of changes to objects and updates the database accordingly through dynamic SQL queries or stored procedures. This is why we don’t have to provide the SQL queries by ourself most of the time. But all this will be developed in part 3 of this book. For the moment, let’s make our first steps with LINQ to SQL code.
We’ll discuss concurrency in chapter 8. For now, understand that when making updates, we check to see if values were changed since we last fetched the values. Because the database updates a timestamp each time the row is changed, we don’t need to worry about changes to any other column. By combining the previous value of the ID and timestamp, we check to see that someone else didn’t make a conflicting change to our record while we were working on it. The rest of the properties are not needed for concurrency checking and thus we can state that we never need to check the values on update (UpdateCheck.Never).
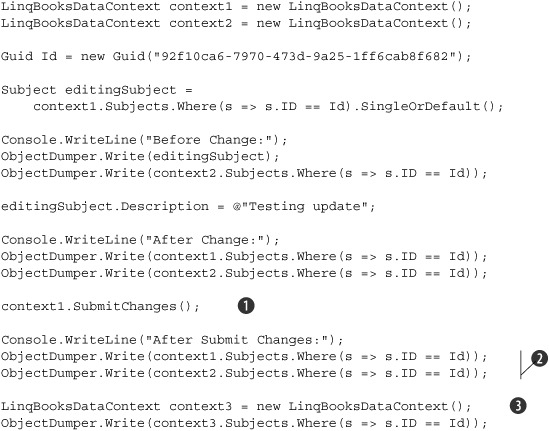
So far, all of the changes we’ve made have been retained in memory and not persisted to the database. It only appears that the changes have been applied on subsequent queries due to the identity tracking on the DataContext. As we demonstrated in chapter 6, submitting changes to the database is done with a single call of SubmitChanges on the context. When SubmitChanges is called, the context compares the original values of the objects that it is tracking with the current values. If these differ, the context packages up the changes and creates the necessary query string to be executed by the database.
Assuming no conflicts occurred in the update and the appropriate records are updated, the context flushes its list of changes. If there are problems, the changes are rolled back in the database based on the concurrency management selected. Listing 7.5 extends the previous example by actually saving the data to the database.
Before Change:
ID=92f10ca6-7970-473d-9a25-1ff6cab8f682
Name=Novel
Description=Initial Value
ObjectId=448c7362-ca4e-4199-9e4f-0a0d029b9c8d

ID=92f10ca6-7970-473d-9a25-1ff6cab8f682
Name=Novel
Description=Initial Value
ObjectId=5040810a-eca9-4850-bcf6-09e42837fe92

After Change:
ID=92f10ca6-7970-473d-9a25-1ff6cab8f682
Name=Novel
Description=Testing Update
ObjectId=448c7362-ca4e-4199-9e4f-0a0d029b9c8d

ID=92f10ca6-7970-473d-9a25-1ff6cab8f682
Name=Novel
Description=Initial Value
ObjectId=5040810a-eca9-4850-bcf6-09e42837fe92

After Submit Changes:
Id=92f10ca6-7970-473d-9a25-1ff6cab8f682
Name=Novel
Description=Testing update
ObjectId=bc2d5231-ed4e-4447-9027-a7f42face624

Id=92f10ca6-7970-473d-9a25-1ff6cab8f682
Name=Novel
Description=Original Value
ObjectId=18792750-c170-4d62-9a97-3a7444514b0b

Id=92f10ca6-7970-473d-9a25-1ff6cab8f682
Name=Novel
Description=Testing update
ObjectId=207eb678-0c29-479b-b844-3aa28d9572ac
Listing 7.5 begins just as the previous example did. Up until we call SubmitChanges on the first context
, any changes we made were retained only in memory. Calling SubmitChanges on context1 commits the changes to the database and flushes the change tracking on context1. Following SubmitChanges, we issue the same LINQ query on context1 and context2
. Additionally, for the purposes of this example, we create a new third context that is oblivious to the identity and change tracking of the other two contexts
. The final three queries are identical except for the context that is issuing the request. In Table 7.5 we summarize the results before and after submitting the changes.
Table 7.5. Values returned before and after submitting changes from each DataContext
Action
Description1
Description2
Description3
Id1
Id2
Id3
Initial fetch Original Original n/a Guid1 Guid2 n/a After change Changed Original n/a Guid1 Guid2 n/a After commit Changed Original Changed Guid1 Guid2 Guid3 In order to explicitly identify the objects, we’ve added a new Guid property called ObjectId. The value of this column is assigned as part of the Subject’s constructor. This way, the value should change each time we have a different object instance. In the resulting output, compare the values in each object before changes, after changes, and after submitting. Notice that the ObjectId in the subject returned by the first context is retained for the life of the context. Even after we submit changes, context1 continues to track the same object through the identity-tracking service. To prove that the value actually exists in the database following the submit changes, we compare the results from context1 and the local context instance (Description3 and Id3). Notice that the fetched values are identical, but the ObjectId differs between these objects. Also notice that the subject returned from context2 is still maintaining the values from its identity service.
It is important to realize how your objects work in relation to the data context. The DataContext is intended to be a short-lived object. We need to be aware of the context(s) we’re using and how the identity- and change-tracking services work in order to avoid unexpected results. When only fetching data, we can create the context as we fetch the values and then throw it away. In that case, we can optimize the context by setting the ObjectTrackingEnabled property to false. This increases performance by disabling the change- and identity-tracking services, but disables the ability to update the changes.
If we need to be able to update the data, be aware of the context’s scope and manage it appropriately. In Windows applications, it may be acceptable to retain a context as changes are made, but realize the performance and memory overhead that come with retaining all objects and the changed values. The intended usage pattern for LINQ to SQL is as a unit of work, which uses the following pattern: Query – Report – Edit – Submit – Dispose. As soon as we no longer need to maintain changes on an object, we should clean up the context and create a new one.

This is an excerpt from Manning's book ASP.Net 2.0 Web Parts in Action: Building Dynamic Web Portals.
This section opens up for you a new career—and you were ready for a change, weren’t you? You’ve just been hired as a web application developer for Adventure Works Cycles. The section introduces you to the Adventure Works Cycles Company and its major departments, and to the database you will be working with.
To add editing approval capabilities to our own portal we must find a way to create two versions of each page: one version would contain the approved content that is publicly visible, while the other version would contain changes awaiting approval. Figure 8.3 shows the editing process in our portal as it currently stands when a user designs or edits the web parts.
Figure 8.3 shows that users are able to view web pages and change them into edit mode to make changes to the personalization data. When the edits have been made, the user can then save the page to update the content. This is in effect the same action we’ve been taking throughout this book whenever we’ve edited a web part and clicked Save to have those changes persisted.
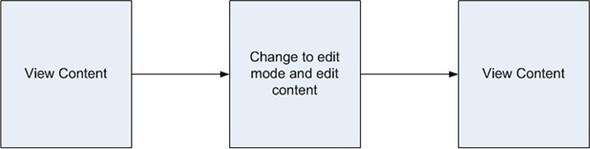
The user first makes changes to the personalization content by switching a page into edit mode; this is indicated by the box in the top right corner of figure 8.4.
When the user begins the editing process, a second version of the personalization data is created for the page to store those changes. The box in the middle of the top row shows us that when the user saves his edits, a second version of the page is created to store those changes. In the third box we see the version of the page that has the changes is not visible to ordinary viewers of the page, and that the original approved version of the personalization data is loaded into the page. To approve the pending changes a moderator can request that the unapproved version of personalization data again be loaded into the page so that they can view the edits made to the page and optionally accept or decline those changes. The final box in the figure shows that after the moderator has approved the changes, only one version of the data exists and that version is visible to all visitors to the portal.
Now that we are able to load revision data, we must also find a way to ensure it is correctly saved. When performing the save, we need to include logic, such as a check to determine whether the save operation is due to a user who is editing content or whether the save is the result of a moderator approving the content. We determine whether or not the user is committing changes by checking a custom property of the PortalWebPartManager called CommittingChanges; this property is set from the user interface layer when an administrator performs a commit operation. The code for the CommittingChanges property is shown in listing 8.3.
Listing 8.3. Adding a CommitChanges method to our WebPartManager allows us to flag that personalization data has changes.
private bool _committingChanges = false; public bool CommittingChanges { get { return _committingChanges; } set { _committingChanges = value; } } public void CommitChanges() { this.CommittingChanges = true; SetPersonalization Dirty(); }
With these changes in place, our portal is now ready for users to begin making changes to the content that will be hidden from public view until they are approved. The only code needing to be created is the logic that ensures the Approve Content button is only visible to users within specific access rights—presumably users with content management rights. In order to keep this simple, I haven’t added that code to our portal solution.
When you run the page and click on the Approve Content Changes button, you will see that the Common Tasks area looks as it did in figure 8.6 and that the catalog zone is displayed. While the page is in revise mode, make some changes to the content—such as adding or removing web parts or moving them around—and then click on End Revising Content to see that the changes are not visible in normal viewing mode. Place the page into revise mode again so you can approve the changes, and after doing so click on the End Revising Content button once again and you will see that the changes are now visible to all portal users.