concept Kubernetes in category camel
This is an excerpt from Manning's book Camel in Action.
Camel’s core can be considered lightweight, with the total library coming in at about 4.9 MB and having only 1.3 MB of runtime dependencies. This makes Camel easy to embed or deploy anywhere you like, such as in a standalone application, microservice, web application, Spring application, Java EE application, OSGi, Spring Boot, WildFly, and in cloud platforms such as AWS, Kubernetes, and Cloud Foundry. Camel was designed not to be a server or ESB but instead to be embedded in whatever runtime you choose. You just need Java.
18.2 Getting started with Kubernetes
This section will teach you the basic climbing skills so you'll learn the basics before we let you attempt climbing the Kubernetes mountains. At first, we’ll walk you through installing and running a local Kubernetes cluster. We’ll show you two ways to deploy and run applications in Kubernetes. In this section, we’ll use the Kubernetes command-line tooling so you’re aware of its existence and can gain knowledge of how to use it. The command-line tool works for any kind of application you want to run, not only Java-based applications. In section 18.3, we’ll take you back to Java and Camel and use the fabric8 Maven plugin, which makes it much easier for Java developers to build, run, and debug applications in Kubernetes.
After some practice with using Kubernetes, you’ll learn in section 18.4 the theories behind the most important concepts and principles of Kubernetes. We could have done this in reverse order (theory before practice), but we want you to have fun, and we think you can best learn Kubernetes by seeing something running in action first.
Kubernetes (and Docker) are native Linux technologies, so they must run in a Linux operating system. You’ll need to use something called Minikube (Minikube is a local Kubernetes cluster intended for development purposes). Minikube makes it easy to run a local single-node Kubernetes cluster on a Windows, Mac, or Linux computer.
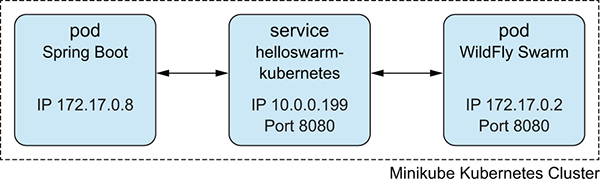
What you want to do now is deploy and run the Spring Boot client microservice that should call the existing WildFly Swarm microservice. One microservice will call the other microservice, with both of them running in the Kubernetes cluster. As you may remember from section 18.1.4, when you were using Docker containers to call each other, you had to change the hostname from localhost to the IP address of the WildFly Swarm container. In Kubernetes, you use Kubernetes services when you want to connect to services—for example, other applications—over the network. Figure 18.4 illustrates this principle.
Figure 18.4 The Spring Boot microservice wants to call the Hello service from the WildFly Swarm microservice. In Kubernetes, you use services to accommodate this. The service sits between the clients and the pods hosting the service and acts as local gateway and load balancer to direct traffic to running pods that are ready to service the traffic.
This time, the pod was killed, and Kubernetes was able to self-heal by restarting the pod. Wait a minute, did we say restart? Yes. As you’ll notice, the hostname in the response is the same as before you killed the pod. Also if you check the IP address of the pod, you’ll see it’s still the same as before. But its restart count is now 1:
$ kubectl get pod NAME READY STATUS RESTARTS AGE helloswarm-kubernetes-171471280-b9bj5 1/1 Running 1 24m spring-kubernetes-2151443245-27s8g 1/1 Running 0 26mWhether the pod is deleted or killed, Kubernetes is able to self-heal and either start a new pod or restart the failed Docker container in the existing pod. Either way, Kubernetes does what’s necessary to keep the state of the running cluster according to the desired state. And what’s the desired state? You can see this from the deployments: