concept project in category java

This is an excerpt from Manning's book JUnit in Action.
If you are familiar with JUnit 4, you may wonder what’s new in this version, as well as why and how to move toward it. JUnit 5 represents the next generation of JUnit. You’ll use the programming capabilities introduced starting with Java 8; you’ll be able to build tests modularly and hierarchically; and the tests will be easier to understand, maintain, and extend. Chapter 4 discusses the transition from JUnit 4 to JUnit 5 and shows that the projects you are working on may benefit from the great features of JUnit 5. As you’ll see, you can make this transition smoothly, in small steps.
17.2 Creating a project with Spring Initializr
In the Spring Boot spirit of supporting developers through the convention-over-configuration approach and supporting the rapid creation of applications, we will use Spring Initializr to generate a project with only what we need to start quickly. To do this, we go to https://start.spring.io/ and insert the configuration data of our new project on the web page. Spring Boot generates a skeleton for the application, and we transfer into it the business logic for tracking passenger registration through the registration manager of the example flight-management system we implemented in chapter 16.
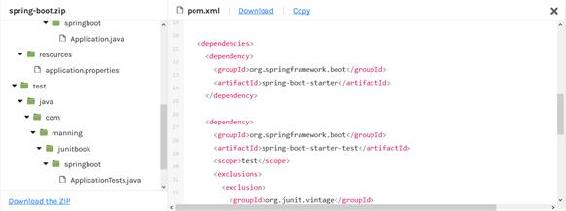
When we click the Explore – Ctrl + Space button, we see a few details about what will be generated: the structure of the project and the content of the Maven pom.xml file. We can click Download the ZIP or, on the previous screen, Generate - Ctrl +, and we’ll get the archive containing the project.
Figure 17.3 The structure of the project (expanded folders), and the content of the Maven pom.xml file (including the spring-boot-starter dependency)

This is an excerpt from Manning's book The Java Module System.
MR-JARs allow you to ship bytecode for different Java versions in the same artifact. You can then rely on the JVM to load the classes that you compiled for the most recent version it supports. Starting with a project that runs successfully on your minimally required version, you can selectively improve it on newer JVMs by using more resilient and performant APIs—without being forced to raise your project’s baseline.
Figure 4.6 The module source path is easiest to use if the project has a single
srcdirectory with each module’s root source directory below it.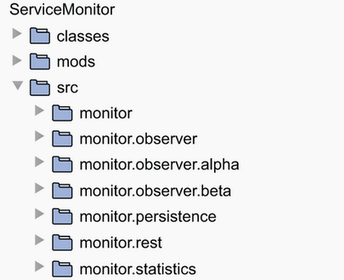
By including a module descriptor in your JARs, you advertise that the project is ready to be used as a module on Java 9+. You should do that only if you’ve taken all possible steps to ensure it works smoothly—chapters 6 and 7 explains most challenges, but if your code uses reflection, you should also read chapter 12.

This is an excerpt from Manning's book Enterprise Java Microservices.
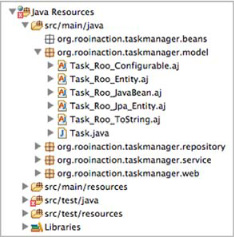
Digging deeper, you’ll see a handful of files sprinkled about the project:
Netflix has been a major proponent of the product-over-project idea for its microservices since rewriting its entire architecture under the leadership of Adrian Cockroft.
All these years, we’ve been developing projects and not products. Why? Because we develop an application that meets a set of requirements and then hand it over to operations. The application might require two weeks or two years to develop, but it’s still a project if, at the end, the application is handed over and the team disbanded. Some team members may be retained for a period to handle maintenance requests and enhancements, but the effort is still considered a project followed by lots of mini projects.

This is an excerpt from Manning's book The Well-Grounded Java Developer.
In order to use the agent finders, the project has a default HollywoodService class that gets a list of agents from a SpreadsheetAgentFinder, filters them on friendliness, and returns that friendly list as shown in the following code listing.
But most developers don’t see build and CI as an exciting or rewarding area to put their efforts into. Build tools and CI servers are often set up at the start of the project and promptly forgotten. Over the years we’ve heard many variations on the following comment: “Why should we spend extra time on the build and CI server? What we’ve got in place kind of works. It’s good enough, right?”
This command creates a project called hello-lein. There’s a project directory that contains a simple README description file, a project.clj file (which we’ll talk more about in just a minute), and parallel src and test directories.
If you import the project that Leiningen has just set up into Eclipse (for example, with the CounterClockwise plugin installed), the project layout will look like it does in figure 12.17.

This is an excerpt from Manning's book Griffon in Action.
Choosing a build tool can lead to heated discussions among Java developers, just as picking the best editor[7] does. Many favor the simplicity of Ant; others preach the advances pioneered by Maven, whereas its detractors complain that it requires downloading the whole internet just to execute a simple goal like cleaning the project’s build directory. Some have gone outside of the bounds of XML-based tools and have chosen Buildr or Rake/Raven, build tools that rely on expressive languages, or even build-oriented DSLs.
If you’ve been working on the previous examples in the book, you know what’s coming. First you create a project. Open a shell prompt into the directory in which you want to create the Griffon application, and create a new form application:

This is an excerpt from Manning's book Spring Roo in Action.
At this point in time, Roo just defines the project as a JAR file—nothing yet tells it that you need a web application configuration. Roo is flexible and won’t configure more than it needs to.
Roo provides the hint command as a way of guiding beginners in configuring a project. As you progress through the configuration process, you’ll see the hints change—from creating the project, to configuring the database, to creating entities, and more. Let’s do the first activity suggested above. Let’s create an application.
roo> addon list

65 found, sorted by rank; T = trusted developer; R = Roo 1.2 compatible
ID T R DESCRIPTION ----------------------------------------------------
01 Y Y 3.0.5.RELEASE
02 - Y 1.0.0.0001 This bundle wraps the standard Maven artifact:
       google-collections-1.0.0.
...
08 - Y 0.7.0 JasperReport support for Spring MVC based projects. With
       JasperReport support you give to the project the feature of
       create...
...
42 Y Y 1.2.0.M1 Offers GIT integration in the project. Each
       successfully executed command will be automatically committed to
       a local GIT...
...
57 - - 1.0.0 The Executable WAR Addon configures the Maven project
       to makes it possible to create web applications that can be
       run from the command
...

This is an excerpt from Manning's book Flex on Java.
The project generated is the minimum project setup necessary to generate site documentation. The index.apt file is the main index page for the site, and is written in the Almost Plain Text (APT) format, which is a wiki-like format. You can also generate a more complete site project using the maven-archetype-site archetype like this:
To get started unit testing in our Flex application, we’ll need to make some changes to the project. Let’s get started.
Now that you’ve got the project set up and ready for testing, you’ll start looking at how to unit test your Flex application. To illustrate this you’re going to test the MasterPresenter, MasterView, and IssueModel. These classes are simple enough for us to keep our examples short and to the point, yet they contain enough functionality to properly illustrate most of the situations you’ll need to test. To start you’ll begin with testing the MasterPresenter.

This is an excerpt from Manning's book JUnit in Action, Second Edition.
In chapter 1, section 1.4, we discussed running JUnit from the command line. Running a single JUnit test case against a single class isn’t difficult. But it isn’t practical to run continuous tests in a project with hundreds or even thousands of classes.
When you build a project, you often want to produce more than binary code. For a distribution, you may also want to generate Javadocs. For an internal development build, you might skip Javadoc generation. At times, you may want to run a build from scratch. You may also want to compile only the classes that have changed. To help you manage the build process, a build file may have several targets, encapsulating the different tasks needed to create your application and related resources.

This is an excerpt from Manning's book JavaFX in Action.
The early chapters give a quick and entertaining (yet comprehensive) guide to the JavaFX Script language; then it’s straight into the projects! Each project chapter houses a self-contained miniapplication requiring specific skills and works from initial goals toward a solution in JavaFX. Successive projects reinforce acquired skills and add new ones. Concepts are demonstrated and explained in real-world scenarios; it’s an approach centered on common practices, solutions, and patterns, rather than merely ticking off every variation of, for example, a scene graph node or animated transition included in the API.
In this chapter we’re going to learn how to use the new controls API, along with other features that debuted in 1.2. So far we’ve had a lot of fun with games, animations, and media, but JavaFX’s controls permit us to write more serious applications, so that’s what we’ll be doing in this chapter’s project. Let’s begin by outlining the application we’re building.
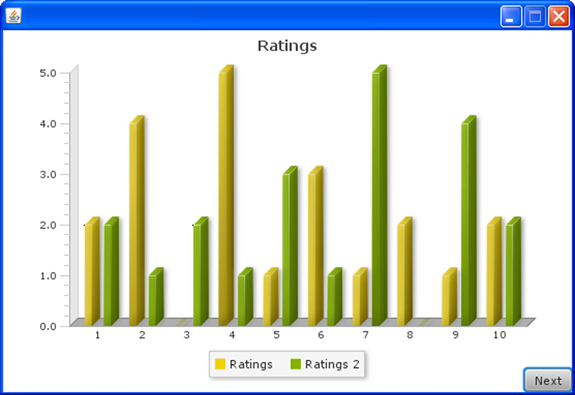
In this chapter we built a simple user interface, using JavaFX’s controls API, and displayed some statistics, thanks to the charts API. We also learned how to store data in a manner that won’t break as our code travels from device to device. Although the project was simple, it gave a solid grounding into controls, charts, and client-side persistence. However, we didn’t get a chance to look at every type of control.

This is an excerpt from Manning's book GWT in Practice.
First, GWT projects are defined in terms of modules, composed of resources, configuration, and source. The module configuration defines compile-time information about a project and specifies resources needed at runtime. Beyond configuration, modules also make possible a rich inheritance mechanism. Because of this capability, projects can be complete web applications, they can be of a pure library nature, or they can fall anywhere in between.
One thing a module defines is the starting point for a project���s code, known as an entry point. Entry point classes are coded in Java and are referenced by a module definition and compiled to JavaScript. Modules themselves, and the entry points they define, are invoked through a <script> reference on an HTML page, known as a host page. Host pages invoke GWT projects and also support a few special <meta> tags that can be used to tweak things. At a high level, these are the three main components of a GWT project: a module configuration file, an entry point class, and an HTML host page.
Along with the module definition, entry point, and host page, some shortcut scripts have also been created for use with the GWTShell and GWTCompiler tools. These scripts run the shell and compiler for the project. Table 2.2 lists all of the files created by ApplicationCreator: the basic resources and shortcut scripts needed for a GWT project.
Table 2.2. ApplicationCreator-generated initial project files that serve as a starting point for GWT applications
File
Name
Purpose
GWT module file ProjectName.gwt.xml Defines the project configuration. Entry point class ProjectName.java Starting class invoked by the module. Host page ProjectName.html Initial HTML page that loads the module. GWTShell shortcut invoker script ProjectName-shell.sh Invokes GWTShell for the project. GWTCompiler shortcut invoker script ProjectName-compile.sh Invokes GWTCompiler for the project. The starting points ApplicationCreator provides essentially wire up all the moving parts for you and stub out your project. You take it from there and modify these generated files to begin building a GWT application. If the toolkit did not provide these files via ApplicationCreator, getting a project started, at least initially, would be much more time consuming and confusing. Once you are experienced in the GWT ways, you may wind up using other tools to kick off a project: an IDE plugin, a Maven “archetype,” or your own scripts. ApplicationCreator is the helpful default. The contents and structure that ApplicationCreator provides are themselves a working GWT “Hello World” example. You get “Hello World” for free, out of the box.