concept image in category kubernetes

This is an excerpt from Manning's book Learn Kubernetes in a Month of Lunches.
There's also a reasonable amount of background knowledge you'll need to work with this book effectively. I'll explain lots of core principles as we encounter them in Kubernetes features, but I won't fill in any gaps about containers. If you're not familiar with ideas like images, containers and registries then I'd recommend starting with Learn Docker in a Month of Lunches from Manning. You don’t need to use Docker with Kubernetes, but it is the easiest and most flexible way to package your apps, so you can run them in containers with Kubernetes.
Figure 11.2 You can mix Docker and Kubernetes - using Compose to build images to run in Pods
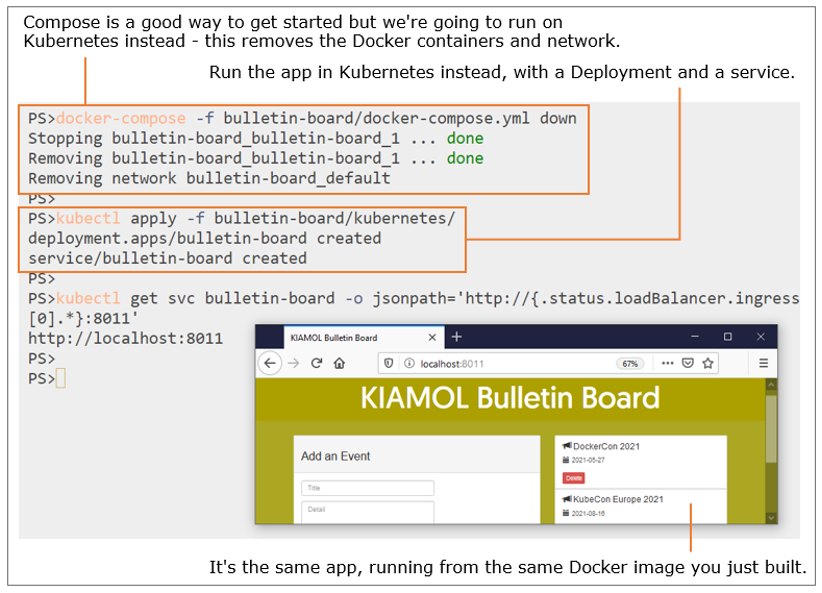
Kubernetes is happy to use a local image which you've created or pulled with Docker, but there are some rules around whether it uses the local image or pulls it from a registry. If the image doesn't have an explicit tag in the name (so it uses the default
:latesttag) then Kubernetes will always try to pull the image first - otherwise Kubernetes will use the local image if it exists. You can override the rules by specifying an image pull policy - listing 11.1 shows the Pod spec for the bulletin board app, which includes an explicit policy.
You don't really need to make a code change - there's a new file which has the changes in it. Just replace the code file and rebuild the image, then delete the Pod to see the new app version running in the replacement Pod.
# remove the original code file:
rm bulletin-board/src/backend/events.js

# and replace it with an updated version:
cp bulletin-board/src/backend/events-update.js bulletin-board/src/backend/events.js

# rebuild the image using Compose:
docker-compose -f bulletin-board/docker-compose.yml build

# try to redeploy using Kubectl:
kubectl apply -f bulletin-board/kubernetes/

# delete the existing Pod to recreate it:
kubectl delete pod -l app=bulletin-board

This is an excerpt from Manning's book Kubernetes in Action, Second Edition.
Images—A container image is something you package your application and its environment into. Like a zip file or a tarball. It contains the whole filesystem that the application will use and additional metadata, such as the path to the executable file to run when the image is executed, the ports the application listens on, and other information about the image. Registries—A registry is a repository of container images that enables the exchange of images between different people and computers. After you build your image, you can either run it on the same computer, or push (upload) the image to a registry and then pull (download) it to another computer. Certain registries are public, allowing anyone to pull images from it, while others are private and only accessible to individuals, organizations or computers that have the required authentication credentials.
To understand how containers, images and registries relate to each other, let’s look at how to build a container image, distribute it through a registry and create a running container from the image. These three processes are shown in figures 2.5 to 2.7.
Figure 2.5 Building a container image

As shown in figure 2.5, the developer first builds an image, and then pushes it to a registry, as shown in figure 2.6. The image is now available to anyone who can access the registry.
Figure 2.6 Uploading a container image to a registry
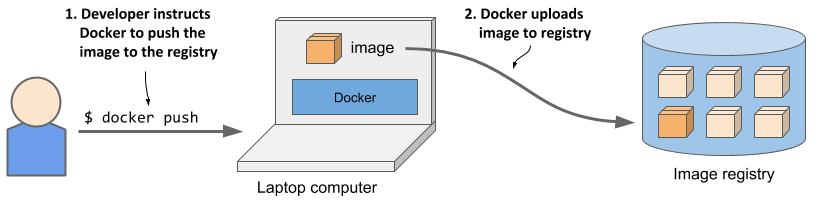
As the next figure shows, another person can now pull the image to any other computer running Docker and run it. Docker creates an isolated container based on the image and invokes the executable file specified in the image.
To package your app into an image, you must first create a file called Dockerfile, which contains a list of instructions that Docker should perform when building the image. Create the file in the same directory as the app.js file and make sure it contains the three directives in the following listing.
Listing 2.3 A minimal Dockerfile for building a container image for your app
FROM node:12                         #A
ADD app.js /app.js                   #B
ENTRYPOINT ["node", "app.js"]        #C
The FROM line defines the container image that you’ll use as the starting point (the base image you’re building on top of). In your case, you use the node container image, tag 12. In the second line, you add the app.js file from your local directory into the root directory of the image, under the same name (app.js). Finally, in the third line, you specify the command that Docker should run when you execute the image. In your case, the command is node app.js.

This is an excerpt from Manning's book GitOps and Kuberentes.
#G The image can be any docker image which simply has the
git,find, andkubectlbinaries preloaded into it.
To keep it simple, we will use sed to update the manifest in this exercise. Typically you should be using a config tools like kustomize to update the image id.
Listing 5.1 replicaSet.yaml
apiVersion: apps/v1
kind: ReplicaSet
metadata:
  name: demo
  labels:
    app: demo
spec:
  replicas: 2   #A
  selector:
    matchLabels:
      app: demo
  template:
    metadata:
      labels:
        app: demo
    spec:
      containers:
      - name: demo
        image: argoproj/rollouts-demo:blue   #B
        imagePullPolicy: Always
        ports:
        - containerPort: 8080
---
apiVersion: v1
kind: Service
metadata:
  name: demo
  labels:
    app: demo
spec:
  ports:
  - protocol: TCP
    port: 80
    targetPort: 8080
  selector:
    app: demo

This is an excerpt from Manning's book Core Kubernetes.
Start the container engine, which mounts the volume into the Pod and starts the image.
Images are tarballs, and kubelet needs well-defined APIs for executing binaries that run these tarballs. That is where standards come into play. Two interfaces, CRI and OCI, define the how and the what for kubelet’s goal of running containers.
The container runtime interface (CRI) defines the "how": the remote calls used to start, stop, and manage containers and images. Any container runtime fulfills this interface in one way or another as a remote service.
type ImageService interface {
    // PullImage pulls an image from the network to local storage using the supplied
    // secrets if necessary. It returns a reference (digest or ID) to the pulled image.
    PullImage(image ImageSpec, pullSecrets []v1.Secret, podSandboxConfig *runtimeapi.PodSandboxConfig) (string, error)
    // GetImageRef gets the reference (digest or ID) of the image which has already been in
    // the local storage. It returns ("", nil) if the image isn't in the local storage.
    GetImageRef(image ImageSpec) (string, error)
    // Gets all images currently on the machine.
    ListImages() ([]Image, error)
    // Removes the specified image.
    RemoveImage(image ImageSpec) error
    // Returns Image statistics.
    ImageStats() (*ImageStats, error)
}
A container runtime could call "docker pull" to pull an image. Similarly, this runtime could make a call to execute
docker runto create a container. The container runtime, as you recall can be set on kubelet when it starts, using thecontainer-runtime-endpointflag:--container-runtime-endpoint=unix:///var/run/crio/crio.sock.
This is an excerpt from Manning's book Kubernetes in Action.
Images—A Docker-based container image is something you package your application and its environment into. It contains the filesystem that will be available to the application and other metadata, such as the path to the executable that should be executed when the image is run. Registries—A Docker Registry is a repository that stores your Docker images and facilitates easy sharing of those images between different people and computers. When you build your image, you can either run it on the computer you’ve built it on, or you can push (upload) the image to a registry and then pull (download) it on another computer and run it there. Certain registries are public, allowing anyone to pull images from it, while others are private, only accessible to certain people or machines.
An image isn’t a single, big, binary blob, but is composed of multiple layers, which you may have already noticed when running the busybox example (there were multiple Pull complete lines—one for each layer). Different images may share several layers, which makes storing and transferring images much more efficient. For example, if you create multiple images based on the same base image (such as node:7 in the example), all the layers comprising the base image will be stored only once. Also, when pulling an image, Docker will download each layer individually. Several layers may already be stored on your machine, so Docker will only download those that aren’t.
You may think that each Dockerfile creates only a single new layer, but that’s not the case. When building an image, a new layer is created for each individual command in the Dockerfile. During the build of your image, after pulling all the layers of the base image, Docker will create a new layer on top of them and add the app.js file into it. Then it will create yet another layer that will specify the command that should be executed when the image is run. This last layer will then be tagged as kubia:latest. This is shown in figure 2.3, which also shows how a different image called other:latest would use the same layers of the Node.js image as your own image does.
To help you visualize what transpired, look at figure 2.6. It shows both steps you had to perform to get a container image running inside Kubernetes. First, you built the image and pushed it to Docker Hub. This was necessary because building the image on your local machine only makes it available on your local machine, but you needed to make it accessible to the Docker daemons running on your worker nodes.
When you ran the kubectl command, it created a new ReplicationController object in the cluster by sending a REST HTTP request to the Kubernetes API server. The ReplicationController then created a new pod, which was then scheduled to one of the worker nodes by the Scheduler. The Kubelet on that node saw that the pod was scheduled to it and instructed Docker to pull the specified image from the registry because the image wasn’t available locally. After downloading the image, Docker created and ran the container.

The image you’ve built has so far only been available on your local machine. To allow you to run it on any other machine, you need to push the image to an external image registry. For the sake of simplicity, you won’t set up a private image registry and will instead push the image to Docker Hub (http://hub.docker.com), which is one of the publicly available registries. Other widely used such registries are Quay.io and the Google Container Registry.
Before you do that, you need to re-tag your image according to Docker Hub’s rules. Docker Hub will allow you to push an image if the image’s repository name starts with your Docker Hub ID. You create your Docker Hub ID by registering at http://hub.docker.com. I’ll use my own ID (luksa) in the following examples. Please change every occurrence with your own ID.
After the push to Docker Hub is complete, the image will be available to everyone. You can now run the image on any machine running Docker by executing the following command:
$ docker run -p 8080:8080 -d luksa/kubia


!@%STYLE%@!
{"css":"{\"css\": \"font-weight: bold;\"}","target":"[[{\"line\":0,\"ch\":0},{\"line\":0,\"ch\":40}]]"}
!@%STYLE%@!
It doesn’t get much simpler than that. And the best thing about this is that your application will have the exact same environment every time and everywhere it’s run. If it ran fine on your machine, it should run as well on every other Linux machine. No need to worry about whether the host machine has Node.js installed or not. In fact, even if it does, your app won’t use it, because it will use the one installed inside the image.