Chapter 3. Event stream processing with Apache Kafka
This chapter covers
- Introducing event stream processing
- Writing applications that process individual events
- Validating and enriching events
- Writing enriched events to output streams
In the preceding chapter, we focused on getting a stream of well-structured events from Nile, our fictitious e-commerce retailer, into our unified log, Apache Kafka. Now that we have a continuous stream of events flowing into our unified log, what can we do with these events? We can process them.
At its simplest, event processing involves reading one or more events from an event stream and doing something to those events. That processing operation could be filtering an event from the stream, validating the event against a schema, or enriching the event with additional information. Or we could be processing multiple events at a time, perhaps with a view to reordering them or creating some kind of summary or aggregate of those events.
This chapter introduces event stream processing briefly before jumping into a concrete example, processing the Nile event stream. Our new stream-processing application will treat Nile’s raw event stream as its own input stream, and it will then generate an output event stream based on those incoming events. You’ll see how, by reading one stream from Kafka and writing another stream back into Kafka, we are able to use our unified log as a kind of “superglue” between our business’s different apps.
We’ll keep our stream-processing application simple: we’ll stick to validating Nile’s incoming raw events and enriching the valid events. Enriching means adding interesting extra information to an event. For a relatively simple example in this chapter, we will enrich the events with the customer’s geographical location, using the MaxMind geolocation database.
Let’s get started.
In chapter 2, we defined an initial event type for Nile, set up Apache Kafka locally, and then went about sending those events into Kafka. All of this initial plumbing was a means to an end; the end is processing the Nile event stream now available in Kafka. But event stream processing is not a widely known term, so let’s take a brief look at why we process event streams, and what that entails.
Your business might want to process event streams for a variety of reasons. Perhaps you want to do one of the following:
- Back up the events to long-term storage such as HDFS or Amazon S3
- Monitor the event stream for patterns or abnormalities and send alerts when these are detected
- “Drip-feed” the events into databases such as Amazon Redshift, Vertica, Elasticsearch, or Apache Cassandra
- Derive new event streams from the original event stream—for example, filtered, aggregated, or enriched versions of the original event stream
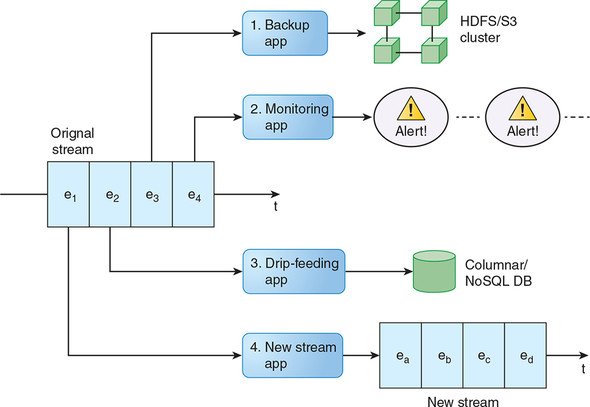
Figure 3.1 illustrates all four of these use cases.
Figure 3.1. Our original event stream is being processed by four applications, one of which is generating a new event stream of its own. Note that each of our four applications can have a different current offset, or cursor position, in the original stream; this is a feature of unified logs.
The general term for what all of these example applications are doing is event stream processing. We can say that any program or algorithm that understands the time-ordered, append-only nature of a continuous event stream and can consume events from this stream in a meaningful way is able to process this stream.
Fundamentally, only two types of processing can be performed on a single continuous event stream:
- Single-event processing— A single event in the event stream will produce zero or more output data points or events.
- Multiple-event processing— Multiple events from the event stream will collectively produce zero or more output data points or events.
Complex event processing
You may hear people talk about complex event processing (CEP) and wonder how this relates to event stream processing as described in this chapter. In fact, Manning has a 2011 book on CEP called Event Processing in Action by Opher Etzion and Peter Niblett.
As far as I can tell, CEP emphasizes the derivation of “complex events” from simpler input events, although this is an important use case for our event stream processing approaches as well. A more significant difference is that CEP thinking predates unified log technologies like Apache Kafka, so CEP systems will tend to work on much smaller (and potentially unordered) event streams than we will look at.
Another difference is that the CEP ecosystem seems to be dominated by commercial applications with drag-and-drop graphical user interfaces and/or declarative event query languages. By contrast, event stream processing as we define it is much more programmer-focused, with most algorithms being hand-rolled in Java, Scala, Python, or similar.
Of the various CEP products introduced in Event Processing in Action, the only one I have encountered being used in a modern event stream processing context is Esper (www.espertech.com/esper), an open-source CEP tool with its own event query language.
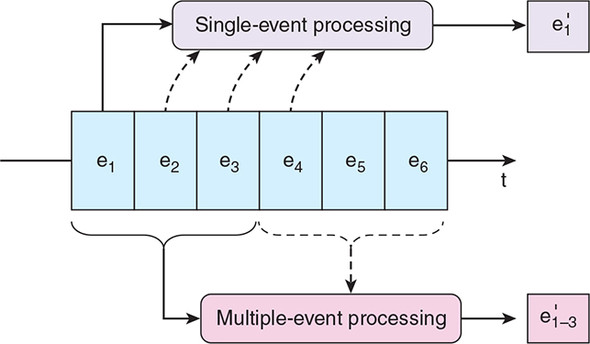
Figure 3.2 illustrates both types. We distinguish between these two types of stream processing because they differ hugely from each other in terms of complexity. Let’s look at each in turn.
Figure 3.2. Our single-event processing app works on only one event from the source stream at a time. By contrast, the application at the bottom is reading three events from the source stream in order to generate a single output event.
The first case, single-event processing, is straightforward to implement: we read the next event from our continuous event stream and apply some sort of transformation to it. We can apply many transformations, and common ones include the following:
- Validating the event—Checking, for example, “Does this event contain all the required fields?”
- Enriching the event—Looking up, for example, “Where is this IP address located?”
- Filtering the event—Asking, for example, “Is this error critical?”
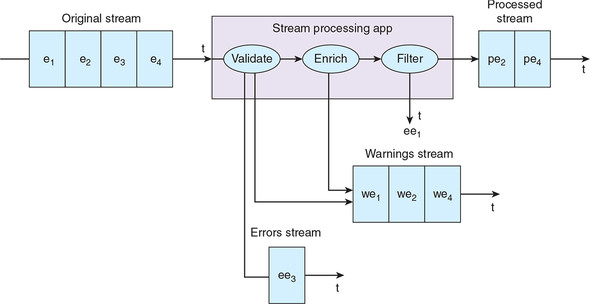
We could also apply a combination of these. Many of these possible transformations would generate either zero or one data points or events, but equally they could produce multiple data points or events. For example, a process could produce a stream of validation warnings as well as a stream of enriched events and filter out some events entirely. This is illustrated in figure 3.3.
Figure 3.3. Here the stream processing application is validating, enriching, and filtering an incoming raw stream. Events that make it through the whole transformation are added to our processed stream. Events that fail validation are added to our errors stream. Transformation warnings are added to our warnings stream.
Regardless of the transformations we attempt, in the single event case, any stream processing is conceptually simple, because we have to act on only a single event at a time. Our stream processing application can have the memory of a goldfish: no event matters except the one being read right now.
In multiple-event processing, we have to read multiple events from the event stream in order to generate some kind of output. Plenty of algorithms and queries fit into this pattern, including these:
- Aggregating— Applying aggregate functions such as minimum, maximum, sum, count, or average on multiple events
- Pattern matching— Looking for patterns or otherwise summarizing the sequence, co-occurrence, or frequency of multiple events
- Sorting— Reordering events based on a sort key
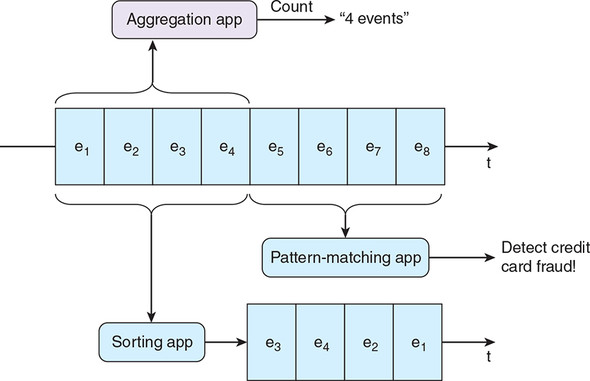
Figure 3.4 features a trio of stream processing apps; each is working on multiple events and applying multiple event algorithms and queries.
Figure 3.4. We have three apps processing multiple events at a time: an Aggregation app, which is counting events; a Pattern Matching app, which is looking for event patterns indicative of credit card fraud; and, finally, a Sorting app, which is reordering our event stream based on a property of each event.
Processing multiple events at a time is significantly more complex conceptually and technically than processing single events. Chapter 4 explores the processing of multiple events at a time in much more detail.
Let’s return to Nile, our fictitious e-commerce retailer. Chapter 2 introduced Nile’s three event types, and we represented one of these event types, Shopper views product, in JSON. We wrote these JSON events into a Kafka topic called raw-events, and then read these events out again from the same topic. In this chapter, we will go further and start to do some single-event processing on this event stream. Let’s get started!
The data scientists at Nile want to start by analyzing one of our three event types: the Shopper views product events. There is just one problem: the Data Science team at Nile is split by geography, and each subteam wants to analyze only shopper behaviors from specific countries.
We have been asked to build a stream processing application to do the following:
- Read the raw-events topic in Kafka
- Figure out where each shopper is located
- Write the events, now with the country and city attached, out to another Kafka topic
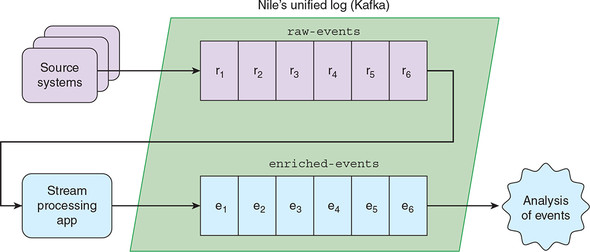
Figure 3.5 illustrates this flow.
Figure 3.5. Our first stream-processing app will read events from the raw-events topic in Apache Kafka and write enriched events back to a new topic in Kafka. As our unified log, Kafka is the glue between multiple applications.
This example shows how we can start to use Apache Kafka, our company’s unified log, as the “glue” between systems without getting, well, stuck. By simply processing the incoming stream as requested and writing the new events back to further Kafka topics, we don’t have to know anything about how either team of data scientists will work with the events.
After we have agreed on a format for the events with the data scientists, we can then leave them to work with the new event stream however they want. They can write their own stream processing applications, or store all the events in an analytics database, or archive the events in Hadoop and write machine learning or graph algorithms to use on them; it doesn’t matter to us. To overload this part of the book with metaphors, our unified log is acting as the Esperanto for our different applications and users.
Before writing any code, we need to bottom out the requirements for our stream processing app. Remember that the Shopper views product events occur in the shopper’s web browser and are relayed to Kafka via some kind of HTTP-based event collector. The events are created in an environment outside our direct control, so the first step is to validate that each event found in raw-events has the expected structure. We want to protect the Nile data scientists from any defective events; they are paid too much to spend their time cleaning up bad data!
After we have validated our events, we need to identify where each event originated geographically. How can we determine where our Nile shoppers are located? Let’s look back at the data points in each incoming Shopper views product event:
{"event": "SHOPPER_VIEWED_PRODUCT", "shopper": {"id": "123",
 "name": "Jane", "ipAddress": "70.46.123.145"}, "product": {"sku":
 "aapl-001", "name": "iPad"}, "timestamp": "2018-10-15T12:01:35Z" }
We are in luck: each of our events includes the IP address of the computer that our shopper is using. A company called MaxMind (www.maxmind.com) provides a free-to-use database that maps IP addresses to geographical location. We can look up each shopper’s IP address in the MaxMind geo-IP database to determine where the shopper is located at that point in time. When we use algorithms or external databases to add extra data points to an event, we typically say that we are enriching the event.
So far, we are validating the incoming event and then enriching it. The final step will be to write out the validated, enriched events to a new Kafka topic: enriched-events. Our work is then done: the Nile data science teams will read the events from those topics and perform whatever analysis they want.
Putting it together, we need to create a stream processing application that does the following:
- Reads individual events from our Kafka topic raw-events
- Validates the event’s IP address, sending any validation failures to a dedicated Kafka topic, called bad-events
- Enriches our validated events with the geographical location of the shopper by using the MaxMind geo-IP database
- Writes our validated, enriched events to the enriched-events Kafka topic
We can now put together a more detailed diagram for the stream processing application we are going to build. Figure 3.6 provides the specifics.
Figure 3.6. Our single-event processing app is going to read events from the raw-events topic, validate the incoming events, enrich the valid events with the geographical location, and route the enriched events to enriched-events. Any errors will be written out to bad-events.
;%22/%3E%3C/svg%3E)
We are now ready to start building our stream processing app!
- We will create a simple Kafka worker, which can read from our raw-events topic in Kafka and write all events to a new topic.
- We will evolve our Kafka worker into a complete single-event processor, which handles validation, enrichment, and routing as per Nile’s requirements.
Let’s get started on the first pass.
Our first cut of the stream processing app will let us get comfortable reading and writing to Kafka topics from Java, without Nile’s pesky business logic getting in the way. We chose Java (version 8) because it has first-class support for Kafka and should be a familiar programming language for most readers; however, you won’t need to be a Java guru to follow along. For our build tool, we will use Gradle, which is growing in popularity as a friendlier and less verbose (but still powerful) alternative to Ant and Maven.
Let’s set up our development environment. First, you should download and install the latest Java SE8 JDK from here:
www.oracle.com/technetwork/java/javase/downloads/index.html
Next you need to download and install Gradle from here:
www.gradle.org/downloads
In order to avoid the process of manually installing every library and framework required for the examples in this book, we will take advantage of Vagrant, which provides an easy-to-configure, reproducible, and portable work environment. Using Vagrant, you can quickly install and manage a virtual machine environment with everything you need to run the examples. We selected Vagrant because it requires little effort to set up and use. In production, you might choose another tool, such as Docker, that could serve a similar purpose. If you’re unfamiliar with Vagrant, you can visit www.vagrantup.com to get started.
For Vagrant users
If you are a Vagrant user (or would like to become one), you are in luck: we have created a Vagrant-based development environment for this book, using Ansible to install all required dependencies into a 64-bit Ubuntu 16.04.5 LTS (Xenial Xerus).
If you haven’t already, install Vagrant (www.vagrantup.com) and VirtualBox (www.virtualbox.org).
Now start the environment:
And that’s it! You can now browse to a specific chapter’s example code and build it:
Be aware that the Ansible step within vagrant up will take a long time.
Finally, let’s check that everything is installed where it should be:
$ java -version
java version "1.8.0_181"
...
$ gradle –v
...
Gradle 4.10.2
...
All present and correct? Now we are ready to create our application.
Let’s create our project, which we will call StreamApp, using Gradle. First, create a directory called nile. Then switch to that directory and run the following:
$ gradle init --type java-library
...
BUILD SUCCESSFUL
...
Gradle will create a skeleton project in that directory, containing a couple of Java source files for stub classes called Library.java and LibraryTest.java, as per figure 3.7. You can delete these two files; we’ll be writing our own code shortly.
;%22/%3E%3C/svg%3E)
Next let’s prepare our Gradle project build file. Edit the file build.gradle and replace its current contents with the following listing.
Listing 3.1. build.gradle
plugins {
  // Apply the java-library plugin to add support for Java Library
  id 'java'
  id 'java-library'
  id 'application'
}

sourceCompatibility = '1.8'                       #1

mainClassName = 'nile.StreamApp'

version = '0.2.0'

dependencies {                                    #2
  compile 'org.apache.kafka:kafka-clients:2.0.0'
  compile 'com.maxmind.geoip2:geoip2:2.12.0'
  compile 'com.fasterxml.jackson.core:jackson-databind:2.9.7'
  compile 'org.slf4j:slf4j-api:1.7.25'
}

repositories {
  jcenter()
}

jar {                                             #3
  manifest {
    attributes 'Main-Class': mainClassName
  }

  from {
    configurations.compile.collect {
      it.isDirectory() ? it : zipTree(it)
    }
  } {
    exclude "META-INF/*.SF"
    exclude "META-INF/*.DSA"
    exclude "META-INF/*.RSA"
  }
}
Note the library dependencies we have added to our app:
- kafka-clients, for reading from and writing to Kafka
- jackson-databind, which is a library for parsing and manipulating JSON
- geoip-api, which we will use for our MaxMind geo-IP enrichment
Let’s just check that we can build our new StreamApp project without issue (this may take two or three minutes):
$ gradle compileJava
...
BUILD SUCCESSFUL
...
Great—we are ready for the next step: building our Kafka event consumer.
As a first step, we need to read individual raw events from our Kafka topic raw-events. In Kafka parlance, we need to write a consumer. Remember that in the preceding chapter, we depended on the Kafka command-line tools to write events to a topic, and to read events back out of that topic. In this chapter, we will write our own consumer in Java, using the Kafka Java client library.
Writing a simple Kafka consumer is not particularly difficult. Let’s create a file for it, called src/main/java/nile/Consumer.java. Add in the code in the following listing.
Listing 3.2. Consumer.java
package nile;

import java.util.*;

import org.apache.kafka.clients.consumer.*;

public class Consumer {

  private final KafkaConsumer<String, String> consumer;               #1
  private final String topic;

  public Consumer(String servers, String groupId, String topic) {
    this.consumer = new KafkaConsumer<String, String>(
      createConfig(servers, groupId));
    this.topic = topic;
  }

  public void run(IProducer producer) {
    this.consumer.subscribe(Arrays.asList(this.topic));               #2
    while (true) {
      ConsumerRecords<String, String> records = consumer.poll(100);   #3
      for (ConsumerRecord<String, String> record : records) {
        producer.process(record.value());                             #4
      }
    }
  }

  private static Properties createConfig(String servers, String groupId) {
    Properties props = new Properties();
    props.put("bootstrap.servers", servers);
    props.put("group.id", groupId);                                   #5
    props.put("enable.auto.commit", "true");
    props.put("auto.commit.interval.ms", "1000");
    props.put("auto.offset.reset", "earliest");
    props.put("session.timeout.ms", "30000");
    props.put("key.deserializer",
      "org.apache.kafka.common.serialization.StringDeserializer");    #1
    props.put("value.deserializer",
      "org.apache.kafka.common.serialization.StringDeserializer");    #1
    return props;
  }
}
So far, so good; we have defined a consumer that will read all the records from a given Kafka topic and hand them over to the process method of the supplied producer. We don’t need to worry about most of the consumer’s configuration properties, but note the group.id, which lets us associate this app with a specific Kafka consumer group. We could run multiple instances of our app all with the same group.id to share out the topic’s events across all of our instances; by contrast, if each instance had a different group.id, each instance would get all of Nile’s raw-events.
See how our consumer is going to run the IProducer.process() method for each incoming event? To keep things flexible, the two producers we write in this chapter will both conform to the IProducer interface, letting us easily swap out one for the other. Let’s now define this interface in another file, called src/main/java/nile/IProducer.java. Add in the code in the following listing.
Listing 3.3. IProducer.java
package nile;

import java.util.Properties;

import org.apache.kafka.clients.producer.*;

public interface IProducer {

  public void process(String message);                             #1

  public static void write(KafkaProducer<String, String> producer,
    String topic, String message) {                                #2
    ProducerRecord<String, String> pr = new ProducerRecord(
      topic, message);
    producer.send(pr);
  }

  public static Properties createConfig(String servers) {          #3
    Properties props = new Properties();
    props.put("bootstrap.servers", servers);
    props.put("acks", "all");
    props.put("retries", 0);
    props.put("batch.size", 1000);
    props.put("linger.ms", 1);
    props.put("key.serializer",
      "org.apache.kafka.common.serialization.StringSerializer");
    props.put("value.serializer",
      "org.apache.kafka.common.serialization.StringSerializer");
    return props;
  }
}
This is a great start, but for this to be useful, we need a concrete implementation of IProducer. Remember that this section of the chapter is just a warm-up: we want to pass the incoming raw-events into a second topic with the events themselves untouched. We now know enough to implement a simple pass-through producer, by adding the code in the following listing into a new file called src/main/java/nile/PassthruProducer.java.
Listing 3.4. PassthruProducer.java
package nile;

import org.apache.kafka.clients.producer.*;

public class PassthruProducer implements IProducer {

  private final KafkaProducer<String, String> producer;
  private final String topic;

  public PassthruProducer(String servers, String topic) {
    this.producer = new KafkaProducer(
      IProducer.createConfig(servers));                    #1
    this.topic = topic;
  }

  public void process(String message) {
    IProducer.write(this.producer, this.topic, message);   #2
  }
}
The PassthruProducer implementation should be fairly self-explanatory; it simply writes out each supplied message to a new Kafka topic.
All that’s left is to stitch these three files together via a new StreamApp class containing our main method. Create a new file called src/main/java/nile/StreamApp.java and populate it with the contents of the following listing.
Listing 3.5. StreamApp.java
package nile;

public class StreamApp {

  public static void main(String[] args){
    String servers   = args[0];
    String groupId   = args[1];
    String inTopic   = args[2];
    String goodTopic = args[3];

    Consumer consumer = new Consumer(servers, groupId, inTopic);
    PassthruProducer producer = new PassthruProducer(
      servers, goodTopic);
    consumer.run(producer);
  }
}
We will pass four arguments into our StreamApp on the command-line:
- servers specifies the host and port for talking to Kafka.
- groupId identifies our code as belonging to a specific Kafka consumer group.
- inTopic is the Kafka topic we will read from.
- goodTopic is the Kafka topic we will write all events to.
Let’s build our stream processing app now. From the project root, the nile folder, run this:
$ gradle jar
...
BUILD SUCCESSFUL
Total time: 25.532 secs
Great—we are now ready to test our stream processing app.
To test out our new application, we are going to need five terminal windows. Figure 3.8 sets out what we’ll be running in each of these terminals.
Figure 3.8. The five terminals we need to run to test our initial Kafka worker include ZooKeeper, Kafka, one topic producer, one consumer, and the app itself.
;%22/%3E%3C/svg%3E)
Our first four terminal windows will each run a shell script from inside our Kafka installation directory:
$ cd ~/kafka_2.12-2.0.0
In our first terminal, we start up ZooKeeper:
$ bin/zookeeper-server-start.sh config/zookeeper.properties
In our second terminal, we start up Kafka:
$ bin/kafka-server-start.sh config/server.properties
In our third terminal, let’s start a script that lets us send events into our raw-events Kafka topic. We’ll call this raw-events-ch03 to prevent any clashes with our work in chapter 2:
$ bin/kafka-console-producer.sh --topic raw-events-ch03 \
  --broker-list localhost:9092
Let’s now give this producer some events, by pasting these into the same terminal:
{ "event": "SHOPPER_VIEWED_PRODUCT", "shopper": { "id": "123",
 "name": "Jane", "ipAddress": "70.46.123.145" }, "product": { "sku":
 "aapl-001", "name": "iPad" }, "timestamp": "2018-10-15T12:01:35Z" }
{ "event": "SHOPPER_VIEWED_PRODUCT", "shopper": { "id": "456",
 "name": "Mo", "ipAddress": "89.92.213.32" }, "product": { "sku":
 "sony-072", "name": "Widescreen TV" }, "timestamp":
 "2018-10-15T12:03:45Z" }
{ "event": "SHOPPER_VIEWED_PRODUCT", "shopper": { "id": "789",
 "name": "Justin", "ipAddress": "97.107.137.164" }, "product": {
 "sku": "ms-003", "name": "XBox One" }, "timestamp":
 "2018-10-15T12:05:05Z" }
Note that you need a newline between each event to send it into the Kafka topic. Next, in our fourth terminal, we’ll start a script to “tail” our outbound Kafka topic:
$ bin/kafka-console-consumer.sh --topic enriched-events --from-beginning \
  --bootstrap-server localhost:9092
Phew! We are finally ready to start up our new stream processing application. In a fifth terminal, head back to your project root, the nile folder, and run this:
$ cd ~/nile
$ java -jar ./build/libs/nile-0.1.0.jar localhost:9092 ulp-ch03-3.3 \
  raw-events-ch03 enriched-events
This has kicked off our app, which will now read all events from raw-events-ch03 and mirror them directly to enriched-events. Check back in the fourth terminal (the console-consumer), and you should see our three events appearing in the enriched-events Kafka topic:
{ "event": "SHOPPER_VIEWED_PRODUCT", "shopper": { "id": "123",
 "name": "Jane", "ipAddress": "70.46.123.145" }, "product": { "sku":
 "aapl-001", "name": "iPad" }, "timestamp": "2018-10-15T12:01:35Z" }
{ "event": "SHOPPER_VIEWED_PRODUCT", "shopper": { "id": "456",
 "name": "Mo", "ipAddress": "89.92.213.32" }, "product": { "sku":
 "sony-072", "name": "Widescreen TV" }, "timestamp":
 "2018-10-15T12:03:45Z" }
{ "event": "SHOPPER_VIEWED_PRODUCT", "shopper": { "id": "789",
 "name": "Justin", "ipAddress": "97.107.137.164" }, "product": {
 "sku": "ms-003", "name": "XBox One" }, "timestamp":
 "2018-10-15T12:05:05Z" }
Good news: our simple pass-through stream processing app is working a treat. Now we can move onto the more complex version involving event validation and enrichment. Shut down the stream processing app with Ctrl-Z and then type kill %%, but make sure to leave that terminal and the other terminal windows open for the next section.
The next step involves developing our simple Kafka worker into a complete single-event processor, which handles validation, enrichment, and routing as per Nile’s requirements. Let’s get started.
We are in luck: because we built our pipeline in section 3.3 around a Java interface, called IProducer, we can swap out our existing PassthruProducer with a more sophisticated event processor with a minimum of fuss. Let’s remind ourselves first of what our Nile bosses want this event processor to do:
- Read events from our Kafka topic raw-events
- Validate the events, writing any validation failures to the bad-events Kafka topic
- Enrich our validated events with the geographical location of the shopper by using the MaxMind geo-IP database
- Write our validated, enriched events to the enriched-events Kafka topic
In the interest of simplicity, we will use a simple definition of a valid event—namely, an event that does the following:
- Contains a shopper.ipAddress property, which is a string
- Allows us to add a shopper.country property, which is also a string, without throwing an exception
If these conditions are not met, we will generate an error message, again in JSON format, and write this to the bad-events topic in Kafka. Our error messages will be simple:
{ "error": "Something went wrong" }
For this section, as you prefer, you can either make a full copy of the nile codebase from section 3.3, or make changes in situ in that codebase. Either way, you will first need to create a file, src/main/java/nile/FullProducer.java, and paste in the contents of the following listing.
Listing 3.6. FullProducer.java
package nile;

import com.fasterxml.jackson.databind.*;
import com.fasterxml.jackson.databind.node.ObjectNode;

import java.net.InetAddress;
import org.apache.kafka.clients.producer.*;

import com.maxmind.geoip2.*;
import com.maxmind.geoip2.model.*

public class FullProducer implements IProducer {

  private final KafkaProducer<String, String> producer;
  private final String goodTopic;
  private final String badTopic;
  private final DatabaseReader maxmind;

  protected static final ObjectMapper MAPPER = new ObjectMapper();

  public FullProducer(String servers, String goodTopic,
    String badTopic, DatabaseReader maxmind) {                         #1
    this.producer = new KafkaProducer(
      IProducer.createConfig(servers));
    this.goodTopic = goodTopic;
    this.badTopic = badTopic;
    this.maxmind = maxmind;
  }

  public void process(String message) {

    try {
      JsonNode root = MAPPER.readTree(message);
      JsonNode ipNode = root.path("shopper").path("ipAddress");        #2
      if (ipNode.isMissingNode()) {
        IProducer.write(this.producer, this.badTopic,
          "{\"error\": \"shopper.ipAddress missing\"}");               #3
      } else {
        InetAddress ip = InetAddress.getByName(ipNode.textValue());
        CityResponse resp = maxmind.city(ip);                          #4
        ((ObjectNode)root).with("shopper").put(
          "country", resp.getCountry().getName());                     #5
        ((ObjectNode)root).with("shopper").put(
          "city", resp.getCity().getName());                           #6
        IProducer.write(this.producer, this.goodTopic,
          MAPPER.writeValueAsString(root));                            #6
      }
    } catch (Exception e) {
      IProducer.write(this.producer, this.badTopic, "{\"error\": \"" +
        e.getClass().getSimpleName() + ": " + e.getMessage() + "\"}"); #3
    }
  }
}
There’s quite a lot to take in here. The control flow is perhaps better visualized in a diagram, as shown in figure 3.9. The important thing to understand is that we are looking up the shopper’s IP address in MaxMind, and if it’s found, we are attaching the shopper’s country and city to the outgoing enriched event. If anything goes wrong on the way, we write that error message out to the “bad” topic.
Figure 3.9. Our single-event processor attempts to enrich the raw event with the geolocation as looked up in the MaxMind database; if anything goes wrong, an error is written out instead.
;%22/%3E%3C/svg%3E)
As you’ve probably guessed, we will need to make some tweaks to our app’s main function to support the new MaxMind functionality. Let’s do that now.
Head back to src/main/java/nile/StreamApp.java and make the additions set out in the following listing.
Listing 3.7. StreamApp.java
package nile;

import java.io.*;                                                #1

import com.maxmind.geoip2.DatabaseReader;

public class StreamApp {

  public static void main(String[] args) throws IOException {    #2
    String servers     = args[0];
    String groupId     = args[1];
    String inTopic     = args[2];
    String goodTopic   = args[3];
    String badTopic    = args[4];                                #2
    String maxmindFile = args[5];                                #2

    Consumer consumer = new Consumer(servers, groupId, inTopic);
    DatabaseReader maxmind = new DatabaseReader.Builder(new
      File(maxmindFile)).build();                                #3
    FullProducer producer = new FullProducer(
      servers, goodTopic, badTopic, maxmind);                    #4
    consumer.run(producer);
  }
}
Note the two new arguments in our StreamApp:
- badTopic is the Kafka topic we will write errors to.
- maxmindFile is the full path to the MaxMind geo-IP database.
Before we build the application, open the build.gradle file in the root and change
version = '0.1.0'
to
version = '0.2.0'
$ gradle jar
...
BUILD SUCCESSFUL

Total time: 25.532 secs
Great—now we can test this!
Before we can run our app, we need to download a free copy of the MaxMind geo-IP database. You can do this like so:
$ wget \
  "https://geolite.maxmind.com/download/geoip/database/GeoLite2-City.tar.gz"
$ tar xzf GeoLite2-City_<yyyyMMdd>.tar.gz
To run our event processor, type in the following:
$ java -jar ./build/libs/nile-0.2.0.jar localhost:9092 ulp-ch03-3.4 \
  raw-events-ch03 enriched-events bad-events ./GeoLite2-
     City_<yyyyMMdd>/GeoLite2-City.mmdb
Great—our app is now running! Note that we configured it with a different consumer group to the previous app: ulp-ch03-3.4 versus ulp-ch03-3.3. Therefore, this app will process events right back from the start of the raw-events-ch03 topic. If you’ve left everything running from section 3.3, our events should be flowing through our single-event processor now.
Check back in the fourth terminal (the console-consumer) and you should see our original three raw events appearing in the enriched-events Kafka topic, but this time with the geolocation data attached—namely, the country and city fields:
{"event":"SHOPPER_VIEWED_PRODUCT","shopper":{"id":"123","name":"Jane",
 "ipAddress":"70.46.123.145","country":"United States", "city":
 "Greenville"}, "product":{"sku":"aapl-001", "name":"iPad"},
 "timestamp": "2018-10-15T12:01:35Z"}
{"event":"SHOPPER_VIEWED_PRODUCT","shopper":{"id":"456","name":"Mo",
 "ipAddress":"89.92.213.32","country":"France","city": "Rueil-malmaison"},
 "product":{"sku":"sony-072","name":"Widescreen TV"},"timestamp":
 "2018-10-15T12:03:45Z"}
{"event":"SHOPPER_VIEWED_PRODUCT","shopper":{"id":"789","name": "Justin",
 "ipAddress":"97.107.137.164","country":"United States","city":
 "Absecon"}, "product":{"sku":"ms-003","name":"XBox One"}, "timestamp":
 "2018-10-15T12:05:05Z"}
This looks great! We are successfully enriching our incoming events, adding useful geographical context to these events for the Nile data scientists. There’s just one more thing to check—namely, that our single-event processor handles corrupt or somehow invalid events correctly. Let’s send some in. Switch to back to the third console, which is running the following:
$ bin/kafka-console-producer.sh --topic raw-events-ch03 \
  --broker-list localhost:9092
Let’s now feed our stream processing app corrupt events, by pasting the following into the same terminal:
not json
{ "event": "SHOPPER_VIEWED_PRODUCT", "shopper": { "id": "456", "name":
 "Mo", "ipAddress": "not an ip address" }, "product": { "sku": "sony-072",
 "name": "Widescreen TV" }, "timestamp": "2018-10-15T12:03:45Z" }
{ "event": "SHOPPER_VIEWED_PRODUCT", "shopper": {}, "timestamp":
 "2018-10-15T12:05:05Z" }
Note that you need a newline between each event to send it into the Kafka topic. To test this, we are going to need one additional terminal. This will tail the bad-events Kafka topic, which will contain our event validation failures. Let’s start the consumer script like so:
$ bin/kafka-console-consumer.sh --topic bad-events --from-beginning \
  --bootstrap-server localhost:9092
By way of a sense-check, you should now have a six-pane terminal layout, as per figure 3.10.
Figure 3.10. Our six terminals consist of the same five as before, plus a second consumer, or “tail”—this time for the bad-events topic.
;%22/%3E%3C/svg%3E)
Wait a few seconds and you should start to see the validation failures stream into the bad-events topic:
{"error": "JsonParseException: Unrecognized token 'not':
 was expecting 'null', 'true', 'false' or NaN
 at [Source: not json; line: 1, column: 4]"}
{"error": "NullPointerException: null"}
{"error": "shopper.ipAddress missing"}
This completes our testing. We now have our single-event processor successfully validating the incoming events, enriching them, and routing the output to the appropriate channel.
- We set up a unified log like Kafka and feed events into it so that we can process those event streams.
- Event stream processing can include backing up the stream, monitoring it, loading it into a database, or creating aggregates.
- Processing single events is much less complex than processing batches or windows of multiple events at a time.
- When stream processing, we can write our results out to another stream, so our unified log acts as the “superglue” between our company’s systems.
- We created a simple Java app for Nile that ran as a “Kafka worker,” reading events from one Kafka topic and passing them through to another Kafka topic unchanged.
- We extended this Java app into a single-event processor, which validated the incoming events, attempted to enrich them with a geographical location, and then wrote the output to either a “good” or “bad” Kafka topic as appropriate.
- Geographical location is a great example of information about a raw event that can be derived from the raw event and attached as additional context.


