Chapter 10. Accessing the internet
This chapter covers
- Showing web pages in your user interface
- Posting updates to Twitter
- Getting and processing information from the web
One of the most amazing things about the iPhone is that it’s always connected to the internet. For some users, that means they can check their email while speeding down the highway. For you, it means your app can display web pages, download data, and share information with the world. You’ll build Parkinator into an application that allows you to share and discover available parking spaces using the internet. You’ll also create a web page to display a nicely formatted help page to help the user master these new features.
In this chapter, you’ll extend Parkinator to advertise the location of available parking spaces via Twitter. You’ll also be able to use Parkinator to search for free spaces posted by others. Because Twitter support is built into iOS, reading and writing Twitter messages is a convenient way to share information. As an app becomes more complex, it’s a good idea to provide the user with help. You’ll create a help page for Parkinator using HTML, the language used to create web pages. HTML is an easy way to create and display nicely formatted text in iOS.

You’re adding three new features to the application, and users will need access to them. A common way to expose multiple features is to place multiple buttons in a toolbar at the bottom of the screen. At right is a quick sketch of the main view with a toolbar containing new buttons for viewing help, tweeting a spot, and searching Twitter, and the original button for going to the camera view.

You’re adding new functionality to Parkina- tor. Because the rest of the app is unchanged, you’ll limit this discussion to the new features. Users will share the location of available spaces as longitude and latitude via Twitter. iOS makes it easy to send messages (tweets) via Twitter: after you compose a tweet, iOS handles posting it to Twitter automatically. App tweets will begin with the string #Parkinator. This tag will make the tweets easy to identify and allows you to share information via Twitter without having to build your own website.


To find available spaces posted by other Parkinator users, you’ll search for recent tweets with the #Parkinator tag. Once you receive a list of tweets with this tag, you’ll iterate over the list. For each tweet, you’ll read the latitude and longitude in the tweet and add a pin in the map.

In iOS, you can display web pages or HTML files in an app using a UIWebView. The UIWebView renders the page exactly like Mobile Safari except that the page is displayed in your app in a view that you created. The web pages can include formatted text and images, and they’re a perfect way to lay out and render help information to the user. You’ll create a UIWebView to display help to the users of Parkinator when they press the Help button.

Let’s edit Parkinator’s MainView.xib file in Xcode to add the toolbar and buttons to the bottom of the main view. Once the UI elements are in place, you’ll add the code that allows the user to get help, tweet, and search.
The first step in creating a toolbar is to open the Parkinator project and click MainView.xib in Project Navigator. Before you add your toolbar, you need to make room for it. Drag the bottom of MKMapview up to make it smaller. Don’t worry about its exact size at the moment; you can adjust it later. Also move the i button up so it’s easier to grab.
Now that there is room, find the Toolbar object in the Object Library.

Drag a toolbar onto the bottom of the main view. Resize the MKMapview so it meets the top of the toolbar. Also place the i button inside the toolbar.


With the toolbar in place, you can add buttons to view help, to send tweets, and to search tweets. Because you want one button per feature, you’ll add two more Bar Button Items in addition to the item that was automatically added by Xcode and which you’ll rename later.
From the Object Library, drag two Bar Button Items into the left side of the toolbar.


You’ll now change the buttons to visually represent their function. To make the leftmost button say Help, double-click the word to highlight the text and then type Help.
For the Tweet button, you’ll use the action icon, which looks like an arrow. Click once on the second button to select it, and in the Attributes Inspector, choose Action from the Identifier dropdown menu.


To make your Search button look like a magnifying glass, do the same thing you did for the Tweet button, but instead of choosing Action for the Identifier, choose Search.

Currently, all four buttons are bunched together in the left part of the toolbar. For most apps, you would like to evenly space the buttons. It looks better, and it makes it easier for the user to press the buttons. Buttons in the toolbar can be evenly spaced using the Flexible Space Bar Button Item found in the Object Library.


Drag a flexible space between each pair of buttons.

UIWebViews provide an easy an convenient way to display web pages and rich text. For this application you’ll use this iOS feature to create a help page with instructions for using the app. The page will be formatted in HTML like a web page and loaded into the web view.

To display a UIWebView, you need to create a view and a view controller. Like most views in iOS, you’ll create a view using a XIB file and a ViewController for the XIB. Select File > New > File, and then select the UIViewController Subclass template.

For the controller’s title, enter PAHelpViewController. Make sure With XIB for User Interface is selected.

As in the sketch, you’ll add a Navigation Bar, display Help at the top of the view, and provide a Done button. Then you’ll add a UIWebView to display the help.

Click PAHelpViewController.xib. From the Object Library, drag a Navigation Bar to the top of the view. Double-click the Navigation Bar title, and type Help. Add a Bar Button Item to the left of the Navigation Bar. As you did with the toolbar items, double-click the word item and type Done.
Next you’ll add the web view to your Help view to display the help information.

You’ll take care of displaying help in the web view soon, but for now you’ll create two IBActions. The first will display the Help view when someone presses the Help button, and the second will dismiss the Help view and return to the main view when the Done button is pressed. You’ve done this plenty of times before.
For the Done action, click PAHelpViewController.xib and open the assistant. Ctrl-drag from the Done button into the assistant.


Select Action for the Connection type, and call the message onDone.

Open PAHelpViewController.m, and fill in the implementation of onDone to make the method dismiss the view:
-(IBAction)onDone:(id)sender
{
    [self dismissViewControllerAnimated:YES completion:nil];
}
Finally, you need to create an IBAction to display the new view when the user presses the Help button. This process is almost identical to what you just did for the Done button. Open PAMainViewController.xib, select the Help button, and Ctrl-drag from the button into PAMainViewController.h in the assistant. (Make sure you have the Help button selected and not the whole toolbar.)

Call the action showHelp.

- (IBAction)showHelp:(id)sender
{
    PAHelpViewController *help =
      [[PAHelpViewController alloc]
         initWithNibName:@"PAHelpViewController"
         bundle:nil];
    [self presentViewController:help animated:YES completion:nil];
}

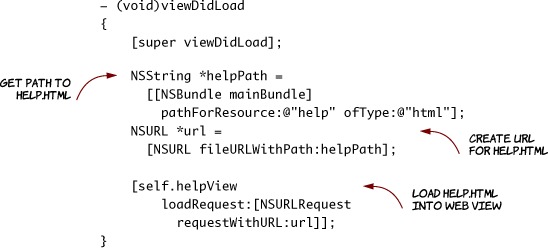
At the moment, if you run the app and press Help, you get a blank web view with Help in the navigation bar and a Done button. Before you can use the web view, you need to create a web view outlet property. Open PAHelpViewController.xib in Interface Builder, and show the assistant. Ctrl-drag from the UIWebView into PAHelpViewController.h.

Now, if you wanted to display a web page (any web page) in the web view, you could change PAHelpViewController’s viewDidLoad definition to this:

- (void)viewDidLoad
{
     [self.helpView
        loadRequest:[NSURLRequest
           requestWithURL:[NSURL URLWithString:
              @"http://www.manning.com/"]]];
}
You would replace http://www.manning.com/ with you help web page URL. But in this case you don’t plan to change the web page, and it doesn’t make sense to require an internet connection just to view help. Fortunately, iOS allows you to create an HTML resource that is a web page saved on the phone as part of your app.
To create an HTML resource for the help page, choose File > New > New File. In the left column, under iOS, choose Other. Create an Empty file.


HTML provides a simple way to create formatted text in iOS. The topic of formatting HTML could be its own book, but here are the basics. An HTML file is a plain text file. Styled text is surrounded by tags: an opening tag, surrounded by angled brackets, < >; and a closing tag that looks like the opening tag but that also has a forward slash,/.
For example, <h1>Parkinator Help </h1> creates a top level (level 1) heading, whereas <h2>Remembering where you parked</h2> creates a second-level heading (which is usually formatted slightly smaller than the first level). Individual paragraphs are surrounded by <p> and </p> tags, and numbered lists can be created by surrounding list items <li></li> with the ordered list tags <ol> and </ol>. For more information about HTML, see www.w3schools.com/html/default.asp.

To create your HTML resource, add the following text to help.html.
Listing 10.1. help.html
<html>
     <style>body {font: 10pt Helvetica }</style>
<body>
<h1>Parkinator Help</h1>
    <h2>Remembering where you parked</h2>
    <p>Parkinator lets you take a picture to remember where you parked.
    When you do, it also automatically gets the current location from
    your phone's GPS and places a pin on a map beneath the picture. To
    do this:
    <ol>
        <li>Tap the information button (the i) on the bottom right of
            the homescreen</li>
        <li>Tap the camera icon on the next screen</li>
        <li>Take a picture</li>
        <li>Tap the Done button</li>
    </ol></p>
    <h2>Tweeting that your spot is open</h2>
    <p>Tap the action button (2nd button from the left). Tweeting your
    spot will only work if you have entered a valid Twitter username and
    password into the iOS Twitter settings.</p>
    <h2>Viewing available spots</h2>
    <p>Tap the seach button (2nd button from the right). Free spaces
    near your location will appear as pins on the map.</p>
</body>
</html>
When you set up the IBAction that created the web view, you used http://manning.com as a stand-in for your help page. Now you need to display help.html instead of the external web page. To do that, you create a new URL that refers to the HTML file that is stored in your application bundle rather than a web page on the internet. Then you tell the web view to load the new URL:


Twitter is a popular social network. It’s particularly good at quickly sharing small bits of information publicly in the form of 140-character messages nicknamed tweets. Twitter also facilitates searching existing tweets. iOS 6.0 makes it easy for developers to use social networks, including Twitter and Facebook, in their apps. You’ll use Twitter in Parkinator to tweet the location of free spaces and to locate available spaces tweeted by others.

iOS provides system-wide support for Twitter, Facebook, and the Chinese social network Sina Weibo. For these networks, users can go to iOS Settings and provide their usernames and passwords or even create accounts. In order to test Parkinator, you’ll need to log in to Twitter.

In Settings, click Twitter, and enter your Twitter username and password. If you don’t have a Twitter account, you can click Create New Account at the bottom of the screen.

Once a Twitter username and password are provided, any app can send tweets without asking the user to log in. This is a convenience for the user and greatly simplifies the developer’s task by allowing you to send a tweet using the SLComposeViewController class without worrying about account management.
SLComposeViewController displays a Tweet sheet, which has a text field for composing text and Send and Cancel buttons. It’s the standard view for sending tweets.
To use Twitter in Parkinator, you need to add the Social framework to your project target. Adding the Social framework is similar to how you added the MapKit framework in the last chapter. Click Parkinator in Project Navigator, and then select the Parkinator target. Click the Summary tab, and scroll down to the Linked Frameworks and Libraries section. Click the + button, and scroll down to find Social.framework (or start typing Social into the text field to filter the list).

After you add the Social framework to the project, you must also import the Social library. In PAMainViewController.h, add #import <Social/Social.h> to the import statements.
The TWTweetComposeViewController class provides all the functionality you need to send a tweet. You’ll use this class to send a tweet when the user presses the action button you added to the main view.
First add an IBAction to PAMainViewController.h that will be called when the user presses the action button:
- (IBAction)tweetLocation:(id)sender;
The tweetLocation method uses SLComposeViewController’s class method isAvailableForServiceType to confirm that the device can send tweets. Then you construct a string that has the #Parkinator tag and the phone’s latitude and longitude. Each tweet should look something like #Parkinator 37.787505 -122.403359. You’ll create a SLComposeViewController and then initialize its text to your string. You’ll present the tweet view; and when you’re done, you’ll dismiss the controller.
In PAMainViewController.m, add the following:
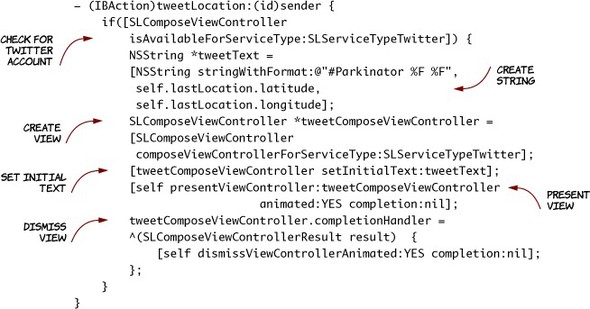
Finally, connect the Tweet button in the toolbar to the tweetLocation action. The process is the same as it was for the Help button. Use the assistant to Ctrl-drag from the Send button to the action (or, if you want some variety, use the Connection Inspector to drag the selector to the File’s Owner and choose tweetLocation from the action list).
By the way, you may have noticed that none of the Social framework classes say anything about Twitter. That’s because they work the same way for all three networks. Just change SLServiceTypeTwitter to SLServiceTypeFacebook, and you can post status updates to Facebook. Use SLServiceTypeSinaWeibo to post to that service. Three networks for the price of one. Social.framework FTW!
Once you give users a way to tweet parking spots for other users, you also need to provide a way to search for spaces. Twitter allows you to search existing tweets via a URL. The following URL
http://search.twitter.com/search.json?q=
 Parkinator&result_type=recent&rpp=10
asks for the 10 most recent tweets with the #Parkinator tag. If you type this URL into a web browser, you’ll see something like this.


Don’t panic! These tweets are returned in a data format called JSON, and you’ll see in a moment that iOS has methods to interpret them.
The following code constructs the twitter request and then handles the resulting JSON data, parses the returned tweets, and displays their location on the map. Add this to PAMainViewController.h:
@property(nonatomic, strong) NSMutableArray *freeSpaces;
- (IBAction)searchTwitter:(id)sender;
- (void) updatePins;
- (void) parseTweet:(NSString*) tweet;
To PAMainViewController.m, add the following definition.

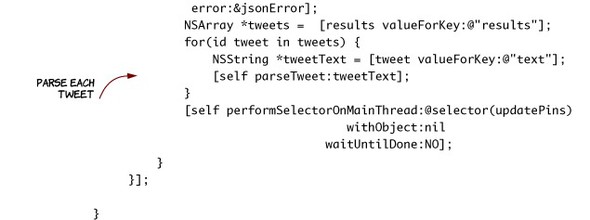

The NSJSONSerialization class turns the JSON data into an NSDictionary. The dictionary contains a lot of information about the query that you don’t care about—for example, how long the search took to execute on Twitter’s servers. The tweets themselves are stored with the key results and are returned as a NSArray by the call [results valueForKey:@"results"].
The data for each individual tweet in the NSArray is stored in an NSDictionary. The dictionaries have fields for the author, date, and so on. You’re interested in the content of the tweet, which is stored in the text field and is returned as an NSString by [tweet valueForKey:@"text"].
Once you finally get the text of an individual tweet, you call parseTweet to parse the tweet and add a map pin.
As we mentioned earlier, each individual tweet generated by Parkinator should look like #Parkinator 37.785834 -122.406417. In other words, it should consist of the #Parkinator tag followed by a space, a floatingpoint number, a space, and then another floating-point number. The following code splits the tweet wherever there is a space and puts the pieces into an NSArray.

If there are three pieces in the tweet (as there should be) ![]() , then the code checks to see if the first is #Parkinator and the next two are valid doubles. If there are two doubles, the code uses them as the latitude and longitude
, then the code checks to see if the first is #Parkinator and the next two are valid doubles. If there are two doubles, the code uses them as the latitude and longitude ![]() to create a new PAParkingSpot
to create a new PAParkingSpot ![]() , which it adds to the array freeSpaces
, which it adds to the array freeSpaces ![]() .
.

When you perform a Twitter search request, the results are returned in a different execution thread. Each thread is like a separate program running along side the main program. The results are returned by Twitter in their own thread. You need to add the pins to the map in the app’s main thread because this is also the Map View’s thread. This is why you put the spots into the freeSpaces array and it’s also why you have at the end of the handler. This causes updatePins to be called in the main program thread. updatePins then adds the annotations to the Map View, just like you did when you wanted to display your current location. Finally, you update the mapView:viewForAnnotation method to add free spot pins to the Map View. The new code is almost identical to the earlier code for marking a parking spot.
[self performSelectorOnMainThread:@selector(updatePins)
                       withObject:nil
                    waitUntilDone:NO];

You have learned some great stuff. You can write apps that use the camera, GPS, maps, and even the internet! You’re now able to load web pages and display formatted text using UIWebViews. You also know how to send tweets using iOS’s built-in Twitter support and search Twitter using special URLs. You’re ready for the next level. In chapter 11, you’ll learn how to evaluate and optimize the performance of your app, after which you’ll finally be ready to submit apps to the App store.