Chapter 4. Writing an app with multiple views
This chapter covers
- Designing classes to match your sketches
- Defining your models, views, and controllers
- Changing views based on user interaction
In the last chapter, you learned the syntax for messages and properties and how you can make them into actions and outlets so that Interface Builder can connect views to them. In this chapter, you’re going to take the sketches for a real application and see how to create all of the various pieces. By the time you’re done, you’ll have made an application to show flashcards, which you can customize with your own content.

For the content of your flashcards, you’ll use U.S. state capitals. Do you know Juneau from Topeka without peeking? If not, this app will help.
This app is more complex than the ones you’ve seen so far, so it’s even more important that you plan it out a little before starting. So, let’s make some sketches of what you want it to look like. The opening screen is shown at right.

Once you choose which way you want to practice, you’ll see a sequence like this:

The sketches show that you need three different views: one for the opening screen, another that shows text and has three buttons for answers, and another with the final score and a restart button.


Finally, it’s a good idea to think of what model classes you might need. The first one, FCCard, represents a flashcard and can handle a recordAnswer message.

To hold the state of the game, you’ll use a FCGame class. It has cards, gives you access to them, and tells you when you’re done.

To configure a game, you’ll use a class called FCAnswerKey that can generate a deck of cards, each with one right answer and two wrong ones.


These three classes hold all the information that each of the views might need. For example, to show a card, the card controller will ask the card for its card text and answers and then use them on the card view.

To show the final score, the result controller will ask the game for the number of right and wrong answers.

Here’s how the whole class diagram looks.

Each different view needs a controller, and, as you saw, the controllers use the models to figure out which view to show and what to show on it.
Init
This is the first message that should be sent to an object after allocating it. There are variants that take arguments if they’re needed. You should only call one init per object.
Another thing to notice is that some classes have a special init message. Every class automatically gets an init message to set it up right after it’s been allocated. If you would like to send parameters to the init, then you need to make special ones, and you name them starting with init. For example, you’ll want to give the view controllers the Game object that you create at the beginning.

Now that you’ve got the basic structure in place, you can learn how to code it. The more you do up front, the easier it will be to concentrate on coding one piece at a time. When you start coding, you’ll find that you made mistakes in the diagram. And once your code is running, you’ll get better ideas of how your app should work. Still, a little planning is good practice until you’re more comfortable jumping right in and coding.

You did a lot of work to get to the point that you can code. This is typical, because once you write code, the app becomes a little harder to change. The sketches will help you keep yourself organized while you’re coding, and they’re also a great way to explain the code to someone else. Sometimes that “someone else” is you in the future when you come back to the project after being away, so do a good job, and remember to thank yourself later.
With your design and specification reasonably fleshed out, you’re ready to begin trying to make this app. In chapter 3, you created your view first and then used the Assistant Editor to create actions and properties. In some cases it’s easy to define your controllers and models first and then create the view. This is especially true when your project is well planned. This is what you’ll do in this chapter. First you’ll go through the view controllers and add the messages the view will need. Then you’ll code the models. Finally, you’ll draw the views and finish the controllers.
To start, open Xcode and create a new project called FlashCards using the Single View Application template. This is exactly the same way you started your Hello World! project:
- Choose File > New > New Project.
- Click Single View Application, and click Next.
- Type in FlashCards as the product name, fill in your company identifier (using your domain or anything unique), use FC as the prefix, uncheck Storyboard, use ARC, and click Next.
- Pick a folder in which to save the project.
To organize your files a little better, create a Classes group and a Resources group. To create each group, choose File > New > New Project. You’re also going to create folders in the Finder that mirror your project’s group structure. For each group, open a file dialog by selecting the group and then clicking the small square under the Path dropdown in the Utilities tray, which is located on the right side of the Xcode window.

When the file dialog opens, click the New Folder button, name the folder Classes (or Resources), click Create, and then click Choose. Move the headers and modules to Classes and the XIB files to Resources.
Open the Classes group, and click FCViewController.h. It looks like this.


The Xcode template helps structure your files, so you just need to put each part in the correct place. Unfortunately, it only knows about Objective-C source files. To add structure to the rest of the things in your life, you’re on your own.
Xcode creates your first view and controller for you when you use the view-based template. Because you have that one already, let’s start with it. It’s easy to use because it only has actions.
In the diagram, FCViewController looked as shown here.

The class diagram lists two messages, showStates and showCapitals, that will be called by the view, depending on what button is clicked. These are actions, so they need to return IBAction and take a sender. Here’s the code for the header:
@interface FCViewController : UIViewController

-(IBAction) showStates:(id)sender;
-(IBAction) showCapitals:(id)sender;

@end
And here’s how you define the messages in the FCViewController.m file:
-(IBAction)showStates:(id)sender {
}

-(IBAction)showCapitals:(id)sender {
}
Eventually, you’ll put the code for the messages there. But the application can now be built, so let’s make sure you’ve done everything right by pressing Cmd-B. Xcode should say Build Succeeded. If you get any errors, check all of the code carefully against the listings.

Now that you’ve written most of this controller and declared and defined its messages, you’re ready to create the rest of your views and controllers. Controllers define the flow of your application, and as you saw, if the actions and outlets are done, Interface Builder will let you attach them to your views.
The design has three view/view-controller pairs. The one you made will be the startup screen, but you also need to be able to show a flashcard and the final results. Let’s do that.
In Xcode, chose File > New > File, and then choose Cocoa Touch in the list at the left and Objective-C Class in the template list. The window should look like this:

Click Next. In the next window, name the class FCCardViewController, and choose the subclass UIViewController (this makes your class a UIViewController). Make sure to create a XIB.

Subclass
Click the Next button, and in the next dialog, make sure the location is set to the Classes subfolder and group of your project.

Click the Finish button. Xcode will create three files: FCCardViewController.m, FCCardViewController.h, and FCCardViewController.xib. Drag the .xib file to your Resources group with the other files. Repeat these steps for FCResultViewController.
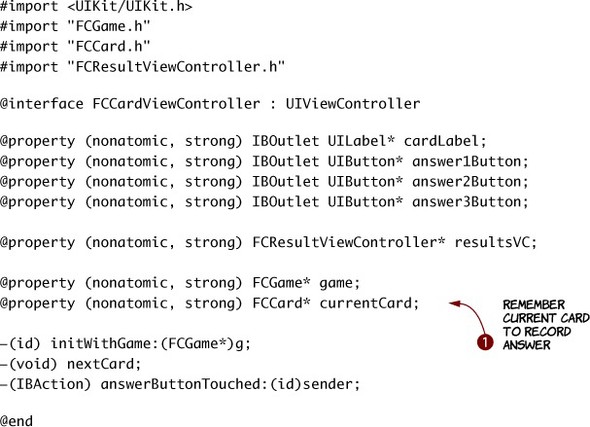
Your FCCardViewController class now looks like this.

@interface FCCardViewController : UIViewController

@property (nonatomic, strong) IBOutlet UILabel* cardLabel;
@property (nonatomic, strong) IBOutlet UIButton* answer1Button;
@property (nonatomic, strong) IBOutlet UIButton* answer2Button;
@property (nonatomic, strong) IBOutlet UIButton* answer3Button;

-(void) nextCard;
-(IBAction)answerButtonTouched:(id)sender;
And here’s the module (you’ll create initWithGame when you make the FCGame class):
-(void) nextCard {
}

-(IBAction)answerButtonTouched:(id)sender {
}

Check your work by pressing Cmd-B to build.
Now you can work on FCResultViewController. It looks like this:

Add these messages after the closing curly brace and before the @end:
@interface FCResultViewController : UIViewController {
    UILabel* numRightLabel;
    UILabel* numWrongLabel;
}
@property(nonatomic, strong) IBOutlet UILabel* numRightLabel;
@property(nonatomic, strong) IBOutlet UILabel* numWrongLabel;

-(IBAction)startAgain:(id)sender;

-(IBAction)startAgain:(id)sender {
}
Check your work with Cmd-B. If you have any errors, look carefully at each part of the syntax. Xcode will usually put you on the line it’s having problems with, so check that one against these listings. If they match, make sure you entered the code in the correct place.
In previous chapters, the apps you built didn’t do much with user input, and they certainly didn’t need to store anything for later. Now you’re going to see what to do when your apps get complex enough to need models.
The model classes, FCGame, FCCard, and FCAnswerKey, have all the information about the app. They work together to set up the game and keep track of what card you’re on, when you’re done, and how many right and wrong answers you have.

Let’s start with FCCard. To create it, in Xcode, right-click the Classes group, and then choose New File from the menu. In the following dialog, choose to create an Objective-C class; and in the next dialog, call it FCCard and make it a subclass of NSObject (all classes have a parent, so use this if you don’t need a different one).

In the next dialog, put the class in the Classes folder.
Click FCCard.h in your Project Navigator. Here you need to declare its four properties and two messages. It looks like this.

Now you need to define your class in the module. In it, you’ll create objects, store them in properties, and send messages to them.
The first thing to do is define the initWithQuestion: answer: wrongAnswer1: wrongAnswer2: message. To do that, you’ll need to send messages for the first time. The syntax for that is as follows:

If a message returns an object, and you need to send a message to it, you can nest message sends. It’s common to do this when allocating and initializing an object. It looks like this:


In the init, you build up an array of answers by allocating it ![]() , adding your answers to it
, adding your answers to it ![]() , randomly swapping the correct answer with a wrong one
, randomly swapping the correct answer with a wrong one ![]() , and then making sure you remember where the right answer is
, and then making sure you remember where the right answer is ![]() .
.

The built-in function arc4random() returns a random integer. Then you use the modulo operator, %, to find the remainder when you divide by three. This leaves you with a random number between zero and two, which means the right answer can end up in any spot with equal probability.
Modulo
An operator that returns the remainder after dividing. The result is always between zero and the right-hand operand minus one.
In recordAnswer, you need to remember if the answer matches the correct one:
-(void) recordAnswer:(int)answerNum
{
    self.isCorrect = (answerNum == self.correctAnswer);
}
This class is done, so build the project to make sure you’ve done everything right. You started with FCCard because it didn’t depend on any other class. The next class we’ll look at, FCAnswerKey, creates the cards that make up the game and only depends on the FCCard class, which is already finished.

So far, most of the classes you’ve seen don’t know anything about states or capitals and could easily be reused in any flashcard application. FCAnswerKey is different. If you were to adapt this app to a different topic, this class is where you’d put the information that is used on the cards.
The purpose of the FCAnswerKey class is to create the deck of cards that is used to play the game. It has two messages to allocate the two kinds of decks you’ll use in the game.

Create the class files by choosing File > New > File. Then choose the Objective-C class template, and enter the class name FCAnswerKey. FCAnswerKey should be a subclass of NSObject. Here’s the header:
#import "FCCard.h"

@interface FCAnswerKey : NSObject

-(NSMutableArray*) allocStateCards;
-(NSMutableArray*) allocCapitalCards;

@end
The only thing to note here is that there is a convention of starting a message with alloc if its main purpose is to create an object. Here is the FCAnswerKey module.

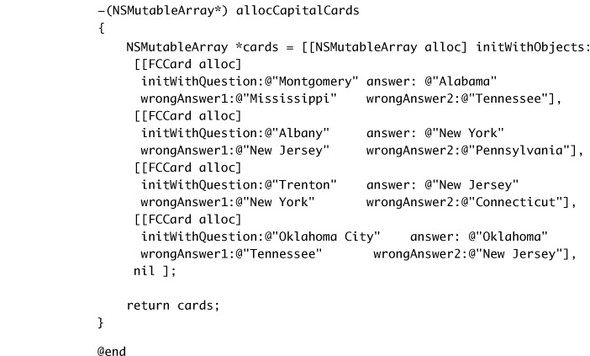
The first message allocates an array ![]() and then fills it with cards, and returns it
and then fills it with cards, and returns it ![]() . You make a similar one for state capitals.
. You make a similar one for state capitals.


Build the project to make sure everything is OK. Next you’ll write the last model class, FCGame, which uses FCAnswerKey to create cards and then keeps track of them and lets you know when the game is over.
The FCGame class has a lot of methods, but each is pretty simple. Here’s how it fits in your overall structure:

Create FCGame as a subclass of NSObject, and fill in the header.

The header is straightforward. Remember that you use strong properties ![]() so ARC will deal with memory for you.
so ARC will deal with memory for you.
Let’s go through the module piece by piece. First is initWithCards, which takes a list of cards and assigns it to a property. Because you’re going to provide the list items one by one, you set the current card to the beginning:
-(id)initWithCards:(NSMutableArray*)c
{
    if (self = [super init]) {
        self.cards = c;
        self.currentCard = 0;
    }
    return self;
}
The next two messages let you know if there are any more cards, and if so, a way to get the next one:
-(bool) hasMoreCards
{
    return self.currentCard < [self.cards count];
}

-(FCCard*) getNextCard
{
    FCCard* card = [self.cards objectAtIndex:self.currentCard];
    self.currentCard++;
    return card;
}
To get the final score, you call the next two messages.

To keep it simple, you’ll just loop through the cards and count the number of correct ones ![]() . The number of wrong cards is the number of cards minus the number of correct ones
. The number of wrong cards is the number of cards minus the number of correct ones ![]() .
.
Build the project, and fix any errors.
The last part of the app draws the views, hooks them up to the view controllers, and then has the view controllers use the models to play the game. You’ve already laid out the outlet and actions in the view controllers, so they’re ready to be connected to the views. You also have fully functional model classes, so each action in the controller can be fully implemented as well. You’ll finish it in the next section.

You’re ready to draw your views and hook them up. In chapter 3, you Ctrl-dragged from Interface Builder into the Assistant Editor and let the Assistant Editor create your properties and actions. This time, you’re going Ctrl-drag from Interface Builder into the Assistant Editor to connect your view to code you already wrote. The process is so similar to what you’ve already done that you’ve probably got your mouse hovering over the .xib, ready to click. Go ahead, do it, it’s OK.
Let’s begin with the starting screen, which is shown here.

Here’s how you build it:
- Select FCViewController.xib in the Resources group.
- Drag a Label from the Library to the View dialog (as in the Hello World! example).
- Double-click the label, and type State Capital Flash Cards.
- Drag two Round Rect Buttons from the Library to the View dialog.
- Double-click the top one and type Show States. Then double-click the other one and type Show Capitals.
- Show the Assistant Editor by clicking the button on the toolbar that looks like a tuxedo. FCCardViewController.h should appear in the Assistant Editor.
- Ctrl-drag from the Show States button in Interface Builder to the showStatesIBAction in FCCardViewController.h. When you’re over the action, it will become highlighted, and you’ll see a tooltip that says Connect Action.
- Repeat the process for the Show Capitals button, Ctrl-dragging from the button to the action. You may have noticed little filled-in circles adjacent to your actions. These represent connections between the view and the file’s owner. You can also inspect, create, or delete connections using the Connections Inspector. To bring up the Connections Inspector, select an element in your view and press Opt-Cmd-6, or choose View > Utilities > Show Connection Inspector. Go ahead and save. Next you’ll draw the card, which uses outlets in addition to actions. If you build and run this application now, it will show the screen you just built. Your action messages are empty, so the buttons don’t do anything yet, but you’re getting close.


The next view to draw is the one for the FCCardViewController, which is shown for each card in the deck. It’s different from the last view because it will be customized rather than having the label and buttons preset with text. You want to access these items in code, so you’ll need to connect them to the outlets you created.
Here’s what you want the view to look like.

Here’s how you build it:
- Select FCCardViewController.xib in Xcode.
- Drag a Label and three buttons onto the view. Make sure they’re wide enough to display any state or capital name, and set their text as shown at right.
- Bring up the Assistant Editor, and then Ctrl-drag to connect the first button to the answerButtonTouched action.
- Repeat with the other two buttons. Notice that it’s OK to connect multiple buttons to the same action.
- Ctrl-drag the label to the cardLabel outlet.


Save and build again to make sure everything is OK. You’re ready for the last view now.
Next is the result view. This one needs two labels to show the score and a button to restart the game. The labels are connected to outlets, and the button is connected to an action. Here’s what you want it to look like:

Because you’ve done this twice, you should already know how to do it, but here’s a brief guide:
- Bring up the view in Interface Builder.
- Put two Labels and a button on the view, and set their Title Text properties.
- Connect the button’s event to the startAgain action.
- Connect the numRightLabel and numWrongLabel outlets of the file’s owner to the corresponding views.
You have completed views and models, and now you need to translate the actions you take in the views to appropriate messages to send to the models. Messages are the way your models determine how the controllers change the views. Controllers have a lot of responsibility. Don’t let working on them go to your head.

As you learned, controllers are where you interpret the various things the user is doing with your app and then respond to the model’s results by switching views or updating the current view. In the last section, you used Interface Builder to attach the button events to action messages, so all you have left is to implement those actions.
The first controller you’ll write is FCViewController, which is the opening screen of the app. Here’s what it needs to do when you click one of its buttons:

Because showStates and showCapitals are similar, you’ll create a helper message called showCards that’s shared. Here’s the header code.

You add some imports ![]() for the other classes you communicate with, and you also need to add a property for the FCCardViewController
for the other classes you communicate with, and you also need to add a property for the FCCardViewController ![]() because you’ll need to keep it around after the message is complete.
because you’ll need to keep it around after the message is complete.
Now, let’s go through the model code. Define the helper message, showCards:
-(IBAction)showCards:(NSMutableArray*)cards {
    FCGame* game = [[FCGame alloc] initWithCards:cards];

    self.cardVC = [[FCCardViewController alloc]
                          initWithGame:game];
    [self.view.window addSubview:self.cardVC.view];
}
The addSubView message is used to put the card into the main window on top of your start view. Here’s how you call the helper message in the two show messages:
-(IBAction)showStates:(id)sender {
    FCAnswerKey* key = [[FCAnswerKey alloc] init];
    NSMutableArray *cards = [key allocStateCards];
    [self showCards:cards];
}
-(IBAction)showCapitals:(id)sender {
    FCAnswerKey* key = [[FCAnswerKey alloc] init];
    NSMutableArray *cards = [key allocCapitalCards];
    [self showCards:cards];
}
The last thing each show message does is add a view to the top of the application’s window, so after either of the action messages is complete, the view will change to show a card. You’ll see the FCCardViewController next.

FCCardViewController goes through each card in the game until you’re done. It receives the init message to start, and then the iPhone sends it a viewDidLoad message when it’s been attached to the view that was created from the XIB file. FCCardViewController receives a succession of answerButtonTouched messages from the view, which you record; then you proceed to the next card until you’re finished. Finally, you need to show the result view.

Let’s look at the complete header.
This is pretty similar to what you’ve seen so far. One thing to notice is that you need to keep track of the current card ![]() because you get it from the game in nextCard, but you need to record an answer later when an answer button is touched.
because you get it from the game in nextCard, but you need to record an answer later when an answer button is touched.
The module is also similar to what you’ve seen. Here are the initWithGame and viewDidLoad messages.

In your init, you need to connect it to a view created from the XIB file you drew in Interface Builder by calling initWithNibName ![]() . The connection is completed when the iPhone sends you the viewDidLoad message, where you can get the next card
. The connection is completed when the iPhone sends you the viewDidLoad message, where you can get the next card ![]() and set up the card’s label and answer buttons. Until viewDidLoad is sent, you can’t access the outlets to update the view. Here’s nextCard.
and set up the card’s label and answer buttons. Until viewDidLoad is sent, you can’t access the outlets to update the view. Here’s nextCard.

The nextCard message checks to see if any cards are left in the game ![]() . If so, it gets the card and uses it to set up the view
. If so, it gets the card and uses it to set up the view ![]() . If not, it’s time to show results, so nextCard creates a result view and adds it to the window
. If not, it’s time to show results, so nextCard creates a result view and adds it to the window ![]() . Because you’re finished showing cards, the last step is to remove the card view from the window
. Because you’re finished showing cards, the last step is to remove the card view from the window ![]() .
.
Each time an answer button is touched, it calls this message.

All the answer buttons are set to call this message when they’re touched. You need to check which one was touched ![]() and record the answer on the currentCard. Then, you call nextCard
and record the answer on the currentCard. Then, you call nextCard![]() .
.
You’re almost there. The last class you have to define is the result view that shows the final score.
The last view of your app shows how many you got right and wrong. If you know the difference between Pierre and Bismarck, then you should be fine. If not, well, at least you got Oklahoma City right.
The result view works like this:

And the code is pretty similar to what you’ve seen.
Listing 4.12. FCResultViewController.h
#import <UIKit/UIKit.h>
#import "FCGame.h"

@interface FCResultViewController : UIViewController

@property(nonatomic, strong) IBOutlet UILabel* numRightLabel;
@property(nonatomic, strong) IBOutlet UILabel* numWrongLabel;
@property(nonatomic, strong) FCGame* game;

-(id) initWithGame:(FCGame*)g;
-(IBAction)startAgain:(id)sender;

@end

The init message needs to load the XIB file ![]() . Then, in the viewDidLoad message, you get the score from the game and update the labels
. Then, in the viewDidLoad message, you get the score from the game and update the labels ![]() . When the startAgain message is sent
. When the startAgain message is sent ![]() , all you need to do is remove yourself from the window to reveal the FCViewController’s view.
, all you need to do is remove yourself from the window to reveal the FCViewController’s view.
The app is done. You should be able to build and run the application using Cmd-R.

There you have it: a complete model-view-controller app that you can use to practice your state capitals (once you fill in the other 47 states, of course). More important, by changing how the AnswerKey works and altering a few message names, you can turn this app into a set of flashcards for anything you know about, from Spanish verbs to Lady Gaga song lyrics.

Even a simple app like this one required you to juggle nine different classes, three views, three controllers, and three model classes. As you progress, it will be important to make sure you map out your app and maintain a good overall picture of what is going on. Even though in this case it might seem as though the design was completely developed and then the code progressed from there, it wasn’t like that. The design was revised several times as the code was developed, to reflect new choices that were discovered as it was coded. You shouldn’t worry about getting the design perfect, but keep it up to date with what you figure out as you code.