Chapter 5. Theory interlude: problem solving and debugging
This chapter covers
- Confidently building your own programs
- Bringing ideas all the way from concept to finished program
- Testing and debugging techniques to find and fix errors
- The program-building progression in a full running program
In the past three chapters, you’ve been immersed in the essentials of TI-BASIC. From input and output commands to conditional statements and flow control, you now know the essential building blocks that go into any calculator (or computer) program. But if knowing the commands is like knowing the vocabulary of a language, and knowing how to use each command is like learning sentence structure, there’s one more step that’s key: you need to know how to put your sentences together into a coherent, flowing essay or novel. In addition, there’s a world of difference between a story that makes sense and a story that is action-packed and full of detail without wasting a single word. In this chapter, you’ll learn to construct the TI-BASIC equivalent of an enthralling story: a program that is fast, small, well-planned, and well-written. You’ll learn to track down the programming equivalents of spelling and grammatical errors: typos and mistakes in how your program works; I’ll also show you how to cut out unnecessary filler to optimize your programs.
This chapter will teach all the generalities you need to write good programs for any platform, including calculators. You’ll learn to go from idea to design to diagramming program flow and sketching interfaces to coding and testing. After I discuss general skills you can apply to any program in section 5.1, I’ll take you through the process applied to a specific example in sections 5.2 and 5.3. The example I’ll show you is a math program that solves for Pythagorean Triplets (A, B, C) that satisfy the constraint A + B + C = N, given a value for N that the user enters. I’ll walk you through planning, diagramming, coding, and testing this calculator program, as well as the steps any good programmer goes through after completing a program: trying to think how it could be made better, faster, or smaller. The remainder of the chapter will be spent on tracking down and solving errors in your code, both things like typos and missing function arguments that make the calculator produce an error message and the more difficult, subtler errors that come from numerical, structural, or planning mistakes.
Let’s begin with an overview of taking any program idea from the conceptual phases through to a complete, polished program.
Creating great programs that are fun, useful, small, and fast isn’t magic that happens in an instant, nor is it a mysterious task that only years of training can perfect. Although simple programs can be created easily with moderate experience and skill, and the best programmers and engineers spend many years and thousands of hours practicing their art, good programs can be brought from idea to completion by following a short series of simple steps.
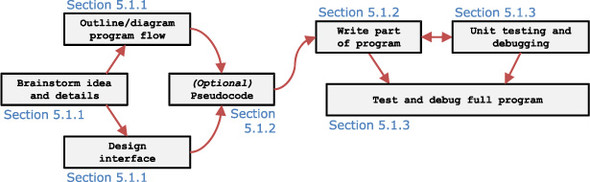
In this section, I’ll describe these steps as they might apply to writing any program or game. Figure 5.1 shows how this discussion will proceed. First, I’ll discuss the four possible pieces of the planning progress in section 5.1.1. Section 5.1.2 will discuss how to turn that plan into code, including choosing when to use loops like For, While, and Repeat, where Lbl and Goto might be appropriate, and how the different conditional constructs and input and output commands could be used to realize your plan. Section 5.1.3 will cover the important step of testing your program piece by piece as you write it and then as a complete whole once you have a completed preliminary program.
Figure 5.1. Taking a program from idea to completion, as covered in sections 5.1.1 through 5.1.3. After you brainstorm a good idea for a program or game and work out the details, you should diagram and outline as much as you need to have a firm idea of how the program will be constructed. If necessary, you can turn these plans into pseudocode before you write the actual program. You should alternate writing and testing rather than writing an entire large program in one go, so you can catch errors early. When you finish, thorough testing and debugging will ensure you’ve made a fast, reliable program.
Before you begin writing any code, you should start with a clear plan of how your program will be structured, what features you want it to have, and how the user or player will interact with it.
The first stage in creating a great program is deciding on the features, flow, and interface for your program. Your planning process should follow this basic outline:
- Decide what your program or game is or will do.
- Design further details: decide the specific features set or game mechanics.
- If applicable, sketch out the interface. If you’re making a math program, for instance, decide how you’ll present answers to the user.
- Use diagrams and pseudocode to design the structure and flow of your program.
Once you’ve completed these steps, you can move on to turning your plans into code. In this section, I’ll be discussing each of the four items in this outline for any general program you might wish to write, so that you’ll know how to bring a program idea from conception through detailed diagrams and pseudocode.
At the beginning of your planning, the first thing you need to do is figure out what you want your program or game to do. It might sound obvious, but if you don’t have a clear vision about what your program is going to offer to players or users, you’ll find yourself floundering as you try to complete the rest of the planning and coding of your project. There’s no hard-and-fast rule about how much detail you need to go into before you can start diagramming, designing, or coding; you should do as much planning as you feel you need to have a clear vision of how you’ll proceed. What you want the program to be or do can be as easy as “a Pong game” or “a program to solve a system of equations.” On the flip side, it could be as complex as figuring out what power-ups you want your Pong game to have and how the scoring would work, or designing exactly what sort of interface into which your users will be entering numbers for the equation solver. When in doubt, I recommend you err toward more detail, because you’ll have left that much less to decide when you’re in the middle of writing your code.
Between deciding details about your program idea and starting to design the flow of the program’s code drawn as flowcharts or written as pseudocode, you may want to sketch out the interface for the program, how the screens where the user interacts with your program will look. This will become more important once you learn to draw complex interfaces, graphs, and games on the graphscreen, but it’s still important when you’re dealing solely with the calculator’s homescreen. With a basic idea of how your program will look to the person using it, you can move on to design the flow of your program’s logic and code.
If you chose to draw diagrams, the diagrams should show enough detail about how your program works as a whole or how a specific piece works that you’ll be able to use the diagram to help you create the program’s code. For very simple programs, the diagram can be simpler, and as you become an experienced programmer, you may decide to do this stage in your head. No matter your skill level, if you have time to quickly sketch out the highest-level overview of your program in some sort of diagram such as figure 5.2 or figure 5.3, your programming will go much faster and involve less frustrating rewriting and reconfiguration of features.
Figure 5.2. A high-level diagram of a theoretical Pong game, perhaps too high-level. In this particular diagram, you can see that the program will have a game section (reached from Play), a help section, and a section that displays credits and quits. If you’re a beginner programmer, it would be good to also diagram more specifics of the boxes describing the gameplay, here surrounded by the large box at right.
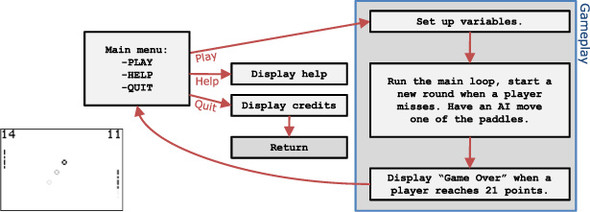
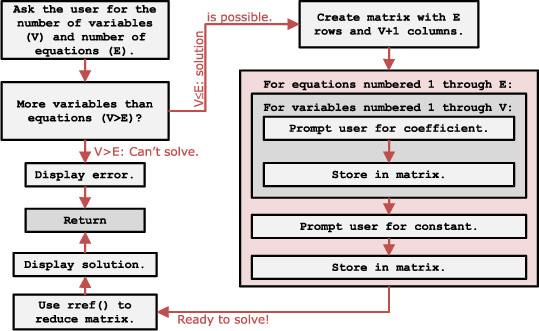
If you compare figures 5.2 and 5.3, you’ll notice that figure 5.2 describes all of the different pieces of the program, such as the help screen, the ending credits, and the ingame portion, but is vague on the actual gameplay. Figure 5.3, which refers to the system-of-equations solver, is much more specific but focuses entirely on the mechanics of solving the system of equations. This particular application uses a matrix-based method to solve a system of equations, putting the coefficients in a matrix and using the rref solution (you’ll learn more about matrices in chapter 9). It’s up to you to work out a good balance between the number and detail of your diagrams; you’ll likely discover over time when you haven’t planned enough and learn to fine-tune how much of your time is worth spending on planning.
Figure 5.3. This diagram for a hypothetical system-of-equations solver describes how the program will get variables from the user, store coefficients in a matrix, and use the rref command to solve the system but omits information about things like menus, how the solution will be displayed, and whether the program can also solve other types of problems. Compare this to the amount of detail in figure 5.2.
Besides drawing interfaces and diagramming how the program will work, you may wish to also (or instead) write pseudocode, especially if you’re not a visual person and diagrams like figures 5.2 and 5.3 confuse you rather than help you. As I’ve mentioned once or twice in previous chapters, pseudocode is a way of writing something that looks like code, describes code, but omits some of the annoying details of actual code. Pseudocode style varies widely from person to person, and there’s no single right way to create pseudocode. I’ll show you a style that resembles TI-BASIC. Consider this chunk of real TI-BASIC code:
You could express this in pseudocode as
Your own pseudocode could more closely resemble TI-BASIC, look like another language if you know a language like C or Python or Java already, or be your own personal style. The most important attribute of the pseudocode you write and the diagrams and sketches that you make is that they make sense to you. They should give you a clear mental picture of how you’ll have to proceed to turn your plan into code that will form a working program.
I’ll now move on to taking your fleshed-out plan and turning it into a program or game, which although a hard task should be eased by the preplanning that you’ve done.
There are no hard-and-fast rules to teach you how to properly take any planned idea and turn it into code that will work. I can’t possibly list even a tiny fraction of the possible programs you might want to make or the possible pieces you might design to combine into a finished project. But I can give you some general guidelines for the commands you learned in chapters 2, 3, and 4 and how those might map to diagrams and pseudocode you’ve created. From your diagrams, you might work with one rectangle at a time being converted to code; with pseudocode, you’d likely translate line by line.
Input and output commands, as I explained in chapter 2, are among the easiest to reason about:
- When you want to revert to a blank homescreen, you use ClrHome.
- If you need to display a single line of text and then pause, you could use Pause "TEXT HERE." If you need to display a lot of text, or text and numbers, and then pause, you can use Disp with several items separated by commas and then a lone Pause command.
- To display numbers or text when you don’t care about placement, use Disp.
- If you want a neater display, you’ll have to specify the position as well as the number or string to display as arguments to the Output command.
- To get a number or string from the user, Prompt is easy, but Input lets you specify the text displayed right before the program pauses to wait for the user’s value.
In chapters 6, 7, and 8, you’ll learn other input and output commands, dealing with directly reading keys and drawing and graphing on the graphscreen.
When your program needs to make a decision, it will probably need to use a comparison, as you learned in chapter 3. These comparisons can be used with If, If/Then, and If/Then/Else constructs or with While and Repeat loops.
- If you need a comparison that compares the numeric values of two variables, or a variable and a number, put one of the six inequality operators from the TEST menu between them.
- You can also use the equals sign (=) to check if two strings match.
- If your program specifies that all of several conditions must be true, you should join the different comparisons with the and Boolean logic operator.
- If only one of several conditions needs to be true, use or.
- If a condition needs to be false instead of true, wrap it in the not Boolean operator or reverse the inequality symbol (for example, turn > into ≤).
- If you have a complex combination of and, or, not, and xor, you’ll probably need to use grouping parentheses.
Recall the lessons about the three different types of If constructs from chapter 3:
- If only one extra line of code needs to be executed when a condition is true, pair that line with a lone If statement.
- If several lines need to be run only when a condition is true, add a Then and End.
- The cleanest way to run one chunk of code when the condition is true and another when it is false is to use If/Then/Else/End.
Whenever your program needs to jump to one of several areas, needs to repeat a chunk of code over and over, has to reuse the same piece of code in several places, or needs to present the user with choices, you’ll need the flow-control commands from chapter 4.
- If you need a menu, the easiest solution is the Menu command paired with several Lbl commands. You could also make your own menu with Disp/Output/Input if the Menu command isn’t flexible enough for your purposes.
- If your plan specifies that you’ll need to jump from one place to one of several places in your program, use several If/Goto statements with corresponding Lbls.
- If you need to go from any of several places in the program to one place, then use Gotos all pointing to the same Lbl.
- Any jump in your program can be formed with a Lbl and a Goto, but be sure to avoid memory leaks by not putting a Goto inside loops, If/Then, or If/Then/Else statements.
- If you need to run one section of code repeatedly, you should use a loop. If you can count the number of times the loop will run, or you want a variable to take each of several predictable, evenly spaced values, use a For loop.
- If the loop should run until a certain condition becomes true, or if you want a loop that always runs at least once, use a Repeat loop.
- If the loop should run only while a condition stays true, or you want a loop that can run zero times, use a While loop.
Terminating your program and properly using subprograms follow more cut-and-dried guidelines than many of the other commands just mentioned:
- If you want a program that could be called from another program to immediately make every program quit, including itself and its caller(s), use the Stop command.
- In any other circumstances, use Return. If you want a subprogram to stop and return to its caller, use Return. If you want a standalone program to stop, use Return.
- A subprogram should be used when you would instead be rewriting the same section of code in several places in your program. It should be code that stands on its own and doesn’t need to jump anywhere else in the program. If it’s the same code in several places, use a subprogram, but if it’s one piece of code in one place to be run several times, use a loop.
As with most of the material in this chapter, these are general rules for the proper use of the programming commands and techniques you’ve learned up to this chapter. They aren’t unbreakable rules, and you’ll hopefully discover many other clever things you can do with the various commands as you continue to program. But they’ll be a good guide for you as you dive ever deeper into programming, with calculators or with any language that uses similar commands and constructs such as C, C++, Java, Python, and PHP.
As you work through converting your ideas into code, you should always test your program piece by piece, and when you have a complete program, test again. I’ll present this vital step to you as the third piece of developing a polished program.
A good coder will thoroughly test a program when it’s finished to make sure it will work well for users. A great coder will write the program a piece at a time, testing each piece as it’s added in case it contains errors. This latter technique is part of an approach called unit testing, and it helps you avoid writing a lot of code, finding that it doesn’t work, and being unable to find the problem. When you build a complex program, it’s likely you’ll make a mistake, so in some cases you create other programs that will individually test the pieces of the first program. This isn’t generally feasible for your TI-BASIC programs, but you can get the same effect by alternating coding and testing. When you test as you create, you catch errors close to where you make them, and you can usually solve them easily. If the error isn’t easily solved, and you need to rearrange your original program plan, you at least have the opportunity to do so before you exert yourself completing the rest of the code. If you wait until you finish, you risk pain and suffering as you try to narrow down a pesky bug.
How you decide to test your program also depends a lot on how you write your program. A common approach is to write the overall structure first, such as the main menu and labels for each section. You can then work from the easiest bits, like the high-score display, the help section, the credits, and the settings, to the harder bits, usually the core gameplay or features of the particular program. This way, you can leave a dummy Lbl for the hardest portion that Gotos right back to the main menu but test out the menu and other areas before diving into writing the hardest part.
Alternatively, if writing pieces of the program out of order is likely to cause you to make errors, lose your place, or accidentally omit bits of the program, you can write your code from top to bottom. You can and should still test your program as you go, so that you don’t reach the end and discover that somewhere deep within your code you made an error. But if you try writing your programs feature by feature rather than top to bottom, you’ll find that it’s easier and makes more sense, because you’ll be completing conceptual chunks one by one rather than working top to bottom, which generally only makes sense if the program doesn’t loop or jump.
If as you’re unit testing you do find problems, or if you find errors when you’ve completed the program, refer to sections 5.4 and 5.5 of this chapter. You’ll find tips on tracking down the simple mistakes that throw TI-OS errors and the subtle blunders that break your program in harder-to-trace ways. Instead of trying to describe the decision-making process behind deciding the order in which to write your program’s components, I’ll dive right into this chapter’s big running example, and you’ll see how it works.
I’ll begin with planning the structure of the Pythagorean Triplet solver using flow diagrams, interface sketches, and pseudocode.
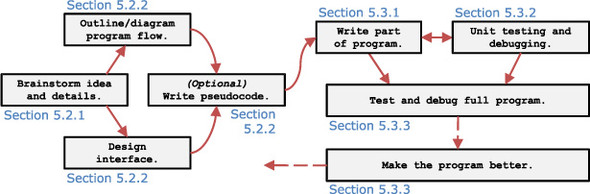
The previous section described the general steps to take to build a program easily and without getting lost in throwing away and rewriting wrong and confusing code. This section will follow the same outline and progression but will follow a specific running math example. I’ll show you the planning process for a real program, a tool to search for certain sets of numbers called Pythagorean Triplets. Figure 5.4 shows how this discussion will proceed; notice that this is the same diagram as figure 5.1, with the section numbers modified to help you navigate through the material.
Figure 5.4. Planning, creating, and testing the Pythagorean Triplet solver, which will be known as PYTHTRIP. The subsections of section 5.2 walk you through the planning process for this program, whereas section 5.3 works through writing and testing the program piece by piece and then optimizing it.
I’ll first discuss the problem we’ll be solving; explaining to yourself what you want your program to do or be is in some ways just as important as typing out the program’s commands. I’ll then show you two different diagrams of how the program will work: one a general overview and the other a specific look at how the program will be looking for acceptable triplets. I’ll conclude with pseudocode and an interface sketch.
Let’s begin with the process of coming up with a concrete idea and basic plan for the Pythagorean Triplet solver.
For the project I’ll carry through this chapter, we’ll be solving a subset of the problem known as Pythagorean triples. As you may know, the Pythagorean Theorem describes the relationship between the lengths of the legs of a right triangle, as shown in figure 5.5. A triangle is called a right triangle when it has a 90-degree right angle between two of the edges, here, between A and B.
Figure 5.5. A right triangle with legs A and B and hypotenuse C, where the lengths of the legs and hypotenuse fulfill the Pythagorean Theorem, A2 + B2 = C2
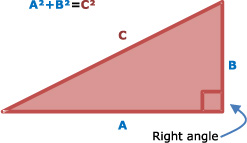
The two legs of the right triangle with lengths A and B are related to the length of the hypotenuse C by the Pythagorean Theorem:
A2 + B2 = C2
For the program I’ll show you how to write in this and the next sections, we want to find Pythagorean Triplets, sets of (A, B, C) values that fulfill the Pythagorean Theorem. We want this program to find triplets only where A + B + C = N, for any N that the user enters. Two valid values of N that we might try are N = 12, which works for the triplet (3, 4, 5), and N = 198, which can be formed from the triplet (36, 77, 85). If the program finds values for A, B, and C that sum to N, it will show the user the first solution it finds and quit. If it instead finds no such values, it will alert the user that it was unsuccessful before exiting. The values A, B, and C will be subjected to the additional constraint that 0 < A < B < C. That is, all of the values are positive, all are distinct, and all are integers.
My design therefore will need to have the following pieces:
- My program will need to get a value for N from the user.
- The program can then look for values of A and B that create a Pythagorean triple and check each such set of numbers to see if they add up to N.
- It should tell the user if it finds one. It should also detect if no such numbers were found and tell the user when that happens.
I’ll use the homescreen for input and output. For this program, I’m choosing to save the details of how exactly to solve for A, B, and C for the next planning stage, where I’ll create diagrams and pseudocode to plan the program. Let’s therefore move on to discuss creating the appropriate diagrams, pseudocode, and sketches to help me write this program to be both correct and well written.
Diagrams and pseudocode to help you plan your program can take many forms, as I introduced in section 5.1.1. I’ll show you several ways I could choose to plan the Pythagorean Triplet solver. If this was your program, you could choose to use all of these to plan the program, use none of them, or pick which planning methods are most helpful to you. Remember that the goal is to help you write a good program as quickly as possible but not to weigh you down with so much preplanning that it takes you hours to get to writing the program. The amount of planning you do should generally be proportional to the complexity of the program you’re writing. In addition, as you become a more experienced programmer, you’ll discover that it takes less and less planning to form a clear mental picture of what your completed program will contain.
I’ll show you a diagram that provides a general overview of the entire Pythagorean Triplet solver, which I’ll call PYTHTRIP to fit into the 8-character limit on TI-83+/84+ program names. I’ll show you the pseudocode that you could write to match that diagram and then a figure and pseudocode that provide a more detailed look at the core math functionality of the solver. Finally, I’ll show you how you could sketch out the interface for this program.
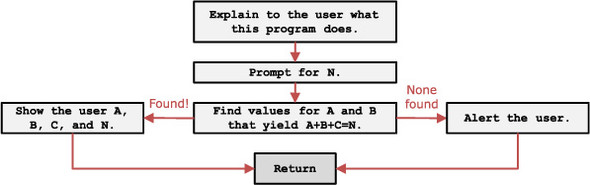
First, you could decide that you want to get a general idea of how the program as a whole will be structured and that you don’t need to worry about the specifics until you start writing the program. For this particular program, you know that you need to get a value for N from the user, solve for A, B, and C, and report the results (or failure) of the program to the user. If you tried to draw a diagram for this in the general flowchart form that I’ve been showing you throughout this book, you might end up with something like figure 5.6.
Figure 5.6. A simple block overview of the Pythagorean Triplet program. It explains the program to the user, prompts for a value for N, and solves for A, B, and C. It tells the user the values if it finds them or warns them it failed and then quits.
Alternatively, you may decide to write the structure for this program in pseudocode. Pseudocode isn’t a real programming language; instead, it’s a way of representing program flow in something that looks like but isn’t code. Everyone’s personal pseudocode style differs, and there’s no right or wrong way to write pseudocode. For the sake of this book, I’ll write pseudocode that resembles TI-BASIC, and I recommend you do the same. Remember, I’m not trying to write actual TI-BASIC here but to sketch out what a simplified version of the program might look like, omitting details like how to solve for A, B, and C. Try to compare this to figure 5.6 and see how it almost directly corresponds.
As you can see, this pseudocode resembles TI-BASIC but obviously would never run. It expresses the flow of the program, in this case first showing the user information about how the program works and prompting for a value for N, then searching for a valid triplet, and finally informing the user of the program’s results.
After you write your highest-level plan for your program, which makes lots of generalizations, you might decide to add more specificity and detail. For this program, the vagueness comes from the Search for A, B, C line, which compresses the entire mathematical process of searching for Pythagorean Triplets into one line without describing how it’s done. If as a beginner programmer you tried to write the program from the diagram in figure 5.6 or the pseudocode just shown, you might get lost and frustrated. Indeed, I’d argue that the details of how exactly the program will search for value for A and B (and therefore C) are more important than writing out what this particular program will Input and Disp, because the math to search for Pythagorean Triplets is the core of the program’s useful functionality. For each new program you write, you should balance how much (and which parts) you want to decide beforehand and what you want to leave to figure out while you write the program itself.
The more detailed examination of the Look for values box in figure 5.6 expands to the contents of figure 5.7, which also includes the two ending display boxes and the Return box. To understand the contents of the large dark box labeled Look for values in this diagram, you must consider what we want this program to do. It should find, if they exist, values for A, B, and C that make the equation A + B + C = N true and must also be a Pythagorean triple. If you pick values for A and B, then you already have C as well, because A, B, and C follow the equation A2 + B2 = C2; in other words, if you pick A and B, then C must be √(A2 + B2). Therefore, we now know one fact: we must pick A and B and use these to calculate C.
Figure 5.7. Expanding the outline of the core math of the PYTHTRIP program. Instead of simply a “black box” that finds if there’s a solution triplet (A,B,C) to A + B + C = N for a given N, we now expand the program plan to think about how to test each possible A and B value to see if they form a Pythagorean Triplet that satisfies the given desired target N value.
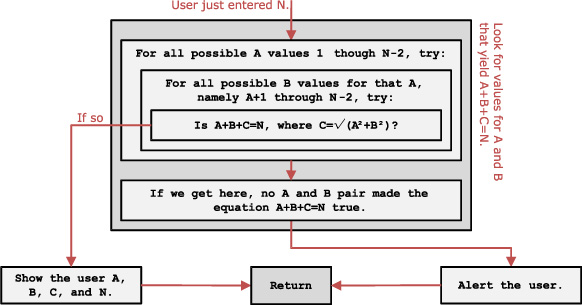
With our valid Pythagorean triple, we’ll have to check if A + B + C = N, and if not, keep trying more values for A and B. The logical next question then is which values of A and B to test. I specified the constraint 0 < A < B < C. This means A, B, and C are all positive, and none is equal to any of the others. We could make A vary between 1 (the smallest possible value larger than zero) and N. Why stop at N? Because if B and C are positive, then A can’t possibly be larger than N to make A + B + C = N be true. We can stop at N – 2, because neither B nor C can be smaller than 1.
We can follow a similar process to pick the bounds on B. We’ll say that it can go as high as N – 2 as with A, but for the lower bound, I’ll pick A + 1, because we know that A < B and that A and B must both be integers. Therefore, A can be 1 through N – 2, and B can be A + 1 through N – 2. This leaves us with this search process:
- Try varying A from 1 to N – 2.
- For each A, try a range of B values, from A + 1 through N – 2.
- With each pair of A and B values, calculate C.
- If A + B + C = N, display and stop; otherwise, try another pair of values.
Figure 5.7 shows this written out as two nested For loops. The outer For loop will run its body for each possible A value. In the body, an inner For loop will try a range of B values for each A. In the inner loop’s body, the program calculates C and tests if A + B + C = N. You could also write this out in pseudocode:
This pseudocode in particular will be helpful when we’re ready to turn the plan into actual TI-BASIC code.
As a final short lesson, I’ll review the task of sketching out program interfaces.
If your program will be simple, you might not need to think about the interface. If it has several different features, is a game, or is designed to look especially professional and spiffy, designing the interface is a helpful part of the planning process. You’ll have a chance to see how your program will look before you write it, and you’ll be able to see if the way your program presents itself to and interacts with the user might be confusing or frustrating. The Pythagorean Triplet solver is a relatively simple program and so the interface is fairly straightforward: some input commands and some output commands. But to give you an idea of what parts you might want to sketch for more complex programs and games, take a look at figure 5.8.
Figure 5.8. Designing the UI. The starting screen is at left; depending whether or not the program finds a solution, one of the screens at the right is shown.

With a solid plan for how this program will look and be structured written down, we can move on to turn the plan into code.
After considering different ways to formulate a program and have a complete design drawn out in diagrams and/or pseudocode, you’re ready to begin to write real code. Ideally, this should be one of the easiest phases. If you simply dove into writing code, you’d likely have to deal with rethinking pieces as you went, redesigning the flow of the program, deleting and re-creating pieces, and spending time frustrated. With a well-thought-out plan, all you need to be able to do is take your diagrams and/or pseudocode and turn it into actual code. You’ll still need to test and debug your program as you go, but the process will have been made vastly easier by your initial planning and brainstorming.
In this section, I’ll first teach you how to turn the flowcharts, interface sketches, and pseudocode for PYTHTRIP into actual code. I’ll show how this program can be unit tested and how final testing will be performed. Finally, I’ll show the finished program and take it one step further. But first, although you may have already gained some insight into the process from previous chapters’ examples, I’ll show you how to turn this program’s plan into code.
This section will draw from figures 5.6, 5.7, and 5.8 as well as the list of concept-to-command mappings in section 5.1.2 to turn the PYTHTRIP plan into code. As mentioned in this chapter, it’s generally preferable to work in chunks, coding one feature before adding more features around it. For this program, the core is calculating an A, B, and C for a given N. Therefore, we’ll start there and then add extra code around that core to create the program’s UI.
If you review section 5.2, you’ll see that figure 5.7 details the math necessary to calculate an A, B, and C that sum to a given N and also form a valid Pythagorean Triplet. That figure was used to create a fragment of pseudocode that describes the same concept, reproduced here:
We can turn this pseudocode into true TI-BASIC code. First, let’s construct the loops that will vary A and B. In this case, we want to use every integer between 1 and N – 2 for A and every integer between A + 1 and N – 2 for B. The logical choice here is a pair of For loops: For loops are good when you need to count or examine each element in a regularly spaced series. The two For loops can be written as follows:

Inside the inner For loop, A and B will take a full range of possible values that could form acceptable triplets. To complete the triplet, we need the third number, C. We know from the pseudocode that we could write this as √(A2 + B2))C and then check if A + B + C = N. But we can save ourselves a variable by creating a conditional that checks instead if A + B + √(A2 + B2) = N and if so displays A and B and stops:

This If/Then conditional executes its code block only if A, B, and C sum to N, which means this is a valid triplet that correctly completes A + B + C = N. For now, we make the program display A and B and immediately return if a solution is found.
At this point, we have all of the code necessary to solve the problem specified for this program. We’ll do some unit testing to make sure it works right before adding UI components to it and testing the full PYTHTRIG program.
The two chunks of code just presented form a full (if rudimentary) Pythagorean Triplet solver. We can combine them into a preliminary PYTHTRIP program, as shown in the following listing. The program is shown as PYTHPREL, but if you’re following along on your calculator, name it PYTHTRIP so you’ll be able to add the final components to it to complete the program.

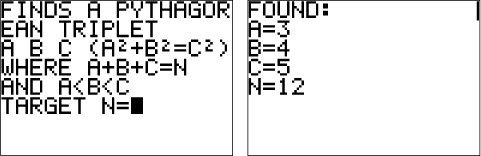
To test this program on your calculator, you’ll have to do something I haven’t previously shown you: manually set up a variable. Figure 5.9 shows how to set up variable N for this program and then execute the simple program (note that it’s PYTHPREL here but can be PYTHTRIP on your calculator). I already said that (3, 4, 5) is a valid triplet; because 32 + 42 = 52 and because 3 + 4 + 5 = 12, this program should display 3 and 4 for N = 12. Lo and behold, that’s precisely what it does.
Figure 5.9. Unit testing the core of the Pythagorean Triplet solver. At left, setting up N = 12; then at right, prgmPYTHPREL correctly finds that A = 3 and B = 4 (and C = 5) form a valid triplet that sums to 12.
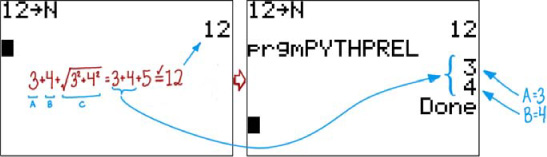
If you try N = 198, another sum that can be formed with a triplet, the program should work for about two minutes before spitting out A = 36 and B = 77.
Because this core code works, we can proceed to wrap it in an interface. The interface diagram in figure 5.9 indicates that the program should display a short explanation before prompting for N. We can clear the screen with ClrHome and write out the explanation and prompt with a multipart Disp command and an Input command. Figure 5.10 shows how this will look.
Figure 5.10. The completed interface for displaying instructions (left) and results (right) for PYTHTRIP
Notice that I’ve cut up the explanation into pieces based on the fact that the homescreen is 16 characters wide:
Next, we need to display “NO RESULTS” at the end if we didn’t already Return after showing a valid solution. That’s a simple Disp command with a ClrHome:
Finally, the slightly fancy display of A, B, C, and N shown in figure 5.10 can be made with a Disp command and four output commands:
Notice that all four output commands start on the third column of their respective lines, making the values appear neatly after the four equals signs as in figure 5.10.
Now that we’ve created all the pieces we need for the final program, we can glue them all together into prgmPYTHTRIP.
Now that we’ve designed the different pieces of our PYTHTRIP program, we can finally put it all together, as shown in listing 5.2 and demonstrated in figure 5.10. This program will ask the user for a value for the sum of A + B + C, called N, and use the two nested For loops we designed to loop for Pythagorean Triplets. If it finds a solution, it informs the user and quits; if it doesn’t find any solution, it also tells the user about that before quitting.

With rare exceptions, you’ll find that no program is ever truly finished. You or your users will find new bugs to fix, users and players will suggest features to add, or you’ll think of new ways to optimize or improve the program. Just as it’s best to consider a few ways you could construct a program before you begin to write code, you should avoid convincing yourself that any program is in the best form it could ever take once you finish putting it together. The program PYTHTRIP in listing 5.2 is a short, correct, and optimized implementation of the original specification to find a Pythagorean Triplet (A,B,C) such that A + B + C = N. But you should always, even for this program, try to think how you could make it faster, smaller, more user friendly, and more fun. Chapter 10 will take you through all kinds of optimization tips and tricks, but let’s quickly look at a handful of them now.
Here, you might start at improving the speed of the program. Though optimized, it still takes four times as long to run if you double N, because the two For loops now cover twice as many values for A and B, respectively. Ideally, you’d be able to come up with a way to reduce this: what if there was a way you could use a single For loop to solve the problem? That might at first seem impossible: you have two independent variables, A and B, one dependent variable, C, and one known quantity, N. It would seem that you would need to try all possible values for A and B. But if you think carefully, you can express A in terms of B or B in terms of A. When you pick values for A, for example, then the only unknown left in the equation A + B + C = A + B + √(A2 + B2) = N is B, and hence there’s only a single value of B that completes the equation. This means that you’d only have to test a single B for each A value, reducing the two For loops to a single For loop!
The following algebra is a little convoluted if you’re not used to this sort of manipulation, but I’ve annotated it to help clarify some of the more complicated steps. Remember, the goal is to get either A or B all by itself.
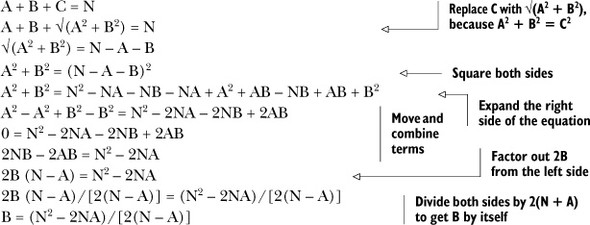
What’s with all the algebra?
Sometimes rethinking your program involves rethinking the structure; other times it’s rearranging the math. Here, we’re realizing that each value of A has only one possible B value that makes A + B + C = N for the Pythagorean Triplet (A,B,C), not a range of possible values between A + 1 and N as we assume in prgmPYTHTRIP. By rearranging the equation that relates A, B, and N, we’re able to solve for the B that matches each A in a single step. We can then see if A and B form a valid Pythagorean Triplet (A,B,C).
With this final equation, we have an expression for B in terms of A and N. Now for each A value between 1 and N, there’s only a single corresponding B value that could possibly make the equation A + B + C = N correct.
So why aren’t there N different solutions? The majority of the values for B that the equation will generate won’t be integers; they’ll instead have decimal parts. The problem statement requires that A, B, C, and N are all integers, so we can discard all possible values for B that aren’t integers. Using a form you’ve seen once or twice before, the following comparison is true only when B is an integer:
Now that we can extract a value for B from each possible A value without running through every possible B, we can rewrite PYTHTRIP with a single For loop, as in the following listing.

Why is this better? The fewer loops, or the shorter the loops, the faster the program will run. If you’re clever, you can even reduce the number of A values that PYTHFAST tries, because there are fewer possible values for A that make A + B + C = N and 0 < A < B < C than A = [1,N – 2]. As I’ve mentioned several times, the best code is both fast and short. Therefore, let’s check that this new version is either faster or shorter, or ideally both!
One approximate way to measure the length of programs is the number of lines of code. PYTHFAST is 19 lines, and PYTHTRIP is 20 lines. If you look in your calculator’s Memory ⇒ Management ⇒ Programs menu ([2nd][+][2][7]), you’ll see that as in figure 5.11, PYTHFAST is only 5 bytes larger than PYTHTRIP, a good tradeoff if, as we expect, PYTHFAST is much faster. Table 5.1 illustrates the extreme speed advantages of the optimized PYTHFAST program.
Figure 5.11. The Memory menu shows that the faster version of the Pythagorean Triplet solver programs is only 5 bytes larger (244 bytes as opposed to 239 bytes) than the slower PYTHTRIP program.
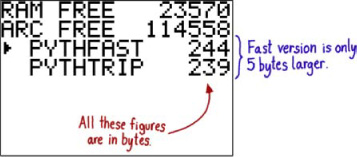
Table 5.1. Timing the PYTHTRIP and PYTHFAST programs for some target N values
| Target N = A + B + C value |
Time for PYTHTRIP |
Time for PYTHFAST |
|---|---|---|
| N = 12 (A = 3, B = 4, C = 5) | 0.9 seconds | 0.4 seconds |
| N = 198 (A = 36, B = 77, C = 85) | 113.1 seconds | 1.1 seconds |
| N = 1000 (A = 200, B = 375, C = 425) | 5728 seconds | 5.1 seconds |
For N = 12, the simplest Pythagorean Triplet where 0 < A < B < C and A, B, and C are integers, the PYTHFAST version runs only twice as fast as the slower PYTHTRIP version. For N = 198, the faster version goes about one hundred times faster than the original implementation. For N = 1000, the PYTHFAST program beats out PYTHTRIP by more than a thousand times, completing in 5.1 seconds instead of over an hour and a half.
As you can see, there can be huge rewards from constantly considering how a good program might be made better, even if the first, second, or tenth version of the program is good or even great. You can almost always find ways to make your math and science programs run faster or show the user more information, your utilities to have more features while taking less space, or your games to be faster and more fun. Here, we tried to see where the program might be wasting time, specifically trying to reduce the number of B values we try for each A. We looked carefully at the equation and saw that there’s only one B value possible for each A value; we used a simple check can determine if that B is an integer and thus forms a Pythagorean Triplet. We could have derived an equation to get A for a given B instead; either way, we’d have gotten the impressive speedup in table 5.1. Reconsidering the mathematical or structural design of a program even when it’s complete is key to creating fast, small, reliable programs.
Things don’t always work out quite this well, and more often than not you’ll find that when you run your programs, even if you’ve carefully planned and unit tested, things don’t work right. There are two major types of errors your programs can have: errors that produce an error message and those that are more subtle, making your program work differently than you intended without revealing what exactly has gone wrong. I’ll first show you TI-OS BASIC errors, introduce the most important types, and explain general approaches to resolving such errors.
If every program worked correctly, programming would be a wonderfully stress-free job and hobby, though there would be little challenge. For better or worse, errors are inevitable with any programming language; as you become more experienced, you’ll encounter fewer errors. The easiest errors to track down are those that come with a clear warning sign to tell you what went wrong. TI-BASIC programs can throw many such errors.
When you do something that your calculator can tell is obviously wrong, such as putting too many closing parentheses, the wrong number of arguments to a command, or trying to add 3 + “HELLO”, your calculator will notify you with errors such as those listed in table 5.2.
Table 5.2. The TI-OS error codes you’re most likely to see when writing TI-BASIC programs. The table shows each TI-OS error, the equivalent Doors CS code, and an explanation of each.
| TI-OS Error Code |
Doors CS Error |
Meaning |
|---|---|---|
| ERR: OVERFLOW | Error 507: OVR | Attempted to store a number larger than ±1099 in a variable. |
| ERR: DIVBY0 | Error 508: DV0 | A math expression divided by zero. |
| ERR: DOMAIN | Error 510: DOM | Either you tried to use a math function undefined for that value (such as log of a nonpositive number) or you specified an offscreen coordinate for Output, Text, etc. |
| ERR: INCREMENT | Error 511: INC | The increment for a For loop or a seq command was zero. |
| ERR: BREAK | Error 512: BRK | The user pressed [ON] to stop a TI-BASIC program. |
| ERR: NONREAL | Error 513: NRL | A calculation was made in Real mode but returned a complex number as an answer. |
| ERR: SYNTAX | Error 514: SYN | Generic typo in a program, such as missing quotes, colons, parentheses, etc. Also can occur when using the wrong variable type in a function (like a Str in a For loop). |
| ERR: DATATYPE | Error 515: TYP | A literal number, string, matrix, picture, list, etc. is used where another data type must be used instead. |
| ERR: ARGUMENT | Error 516: ARG | Most likely, you specified the wrong number of arguments to a function. |
| ERR: MISMATCH | Error 517: MSM | You tried to perform math on two lists or two matrices that have incompatible dimensions. |
| ERR: INVALID DIM | Error 518: DIM | You tried to get or set an element outside the size of a matrix or list or tried to create a list or matrix of an invalid size. |
| ERR: UNDEFINED | Error 519: UND | You referenced a numeric, list, string, picture, matrix, etc. variable that hasn’t been given a value or doesn’t exist. |
| ERR: MEMORY | Error 520: MEM | Your calculator is out of memory, either because of lots of programs/files/data or because of a memory leak (see the “Lbl, Goto, and memory leaks” sidebar in chapter 4). |
| ERR: ILLEGAL NEST | Error 522: ILN | You used a seq inside a seq command, a fnInt inside a fnInt command, or an expr inside an expr command. |
| ERR: LABEL | Error 526: LBL | A Goto command tried to jump, but the target Lbl it specifies doesn’t exist in this program. |
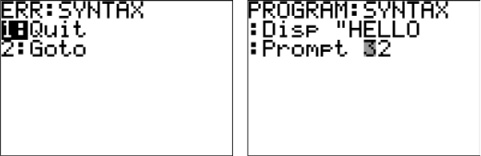
When you receive one of these errors, as shown in figure 5.12, you can choose to immediately quit or to go to where in the source the error occurred. This latter option lets you see exactly where you made your mistake and attempt to correct it. Most errors are fairly self-explanatory if you compare your code with the errors in table 5.2.
Figure 5.12. A SYNTAX error. If you choose 2: Goto in the error message at left, the calculator shows you the source code of your program with the cursor placed over the error; here you need the name of a variable instead of a number after Prompt.
The least-clear errors are those that stem from the values of variables, rather than directly from your code. If you read a DIVBY0 error, the TI-OS will take you to a line with division; you could quit to the homescreen, type in the name of the variable in the denominator of the division, and hit [ENTER] to see that it’s zero. For a MEMORY error, you could check if the Memory menu ([2nd][+][2]) shows you to be low on RAM, and if not, check if you’ve created a memory leak. On the other hand, errors like ERR: LABEL are easy to solve, because choosing Goto at the error message will take you directly to the offending Goto or Menu command, from which you’ll know the name of the missing Lbl.
Unfortunately, not every mistake you make will produce an error message; the majority of your debugging time will be spent tracing code that doesn’t do what it’s meant to do but doesn’t produce any obvious error messages.
When you don’t see any error messages, but your program is still failing to display the correct output, do math properly, or run your game as you intended, you must fall back on a utility belt full of debugging skills. Don’t despair! Practically no programming error is insurmountable. You’ll develop your own particular techniques as you make coding mistakes and learn to find them, but most methods fall into one or more of three categories:
- Add code to narrow down the line or section in error.
- Pluck out a section of code into a separate program for analysis or rewriting.
- Analyze the values of variables at different points in the program.
Many techniques fall into more than one category. You can strategically stop the program with the [ON] key and check the value of variables, or you can insert Disp/Pause statements in code you suspect to be broken to trace the value of that code’s variables as it executes. You can even combine all three, by pulling out a malfunctioning section, adding code to display values and help you understand what isn’t working, then return to the original program and fix the problem.
To debug a program, you must first recognize that it has a bug. Ideally, you’ll discover problems during testing. You should always thoroughly test your programs and games to make sure they work well for you, and if you can, give them to your friends to test as well. Try to think like a user, not like a programmer. Enter invalid numbers at prompts. Press random keys during a game. Enter values into a math program that you know should produce certain output values, and make sure that they do, as we did for our unit testing of PYTHTRIP via the intermediary PYTHPREL program. Once you’ve determined that an error exists, your remaining tasks are twofold, as will be covered in this section. First, you need to determine where the problem lies. Second, you need to figure out how to fix the issue.
I’ll begin by outlining techniques to find malfunctioning code.
If you made a good set of plans describing your program, they’ll come in handy to help you debug. You’ll usually be able to tell in what portion of your program an error occurs from how the error manifests itself. If the player isn’t getting points for shooting down enemy spaceships in a game, then you’ll probably need to look at the code that handles the destruction of the enemy ships and see if you forgot to make it update the score variable. If a math program displays a correct solution for one of two variables but not the second, you can probably focus on the equations that solve for the second variable. You may remember enough of your code to be able to start editing the program immediately and find the error and perhaps even fix it. If not, you’ll need to narrow down the problem area to determine if you can just fix one or two lines or if the fundamental program design is flawed.
Once you know the general area of the program where the error occurs, you can apply tracing techniques to determine where the problem occurs:
- If the issue appears to be a mathematical error, examine your equations, and if possible, compare them as written in your program to your reference materials, either books or your notes. Make sure that you didn’t omit a step in the solution.
- If code that should run isn’t running, or code that shouldn’t run is, check your conditional statements, particularly your comparisons. Make sure you used the proper variables, the proper values for comparison, and the correct operators. If you’re using logical operators such as and and or, did you omit necessary grouping parentheses?
- If loops aren’t running properly, check their conditions and variables. Do your For loops have incorrect arguments? Did you remember to initialize the variables for your While loops? If your loops are running forever, did you add proper code inside the loops to update variables used in loop conditions so that the loops will know when to stop?
- If code takes much longer to run than expected, make sure that it isn’t stuck in an infinite loop, and if not, try to rethink your solution to see where it might be optimized, as we did earlier in this chapter.
- If variables suddenly have unexpected values, look for lines of code where you might have mixed up variable names.
These are a small subset of the many possible issues you may encounter. For any error, tracing the error should involve first understanding the symptoms of the problem and then using those symptoms to identify what portion of the code might be wrong.
For errors where you find the problem and the fix isn’t an easy addition or removal of a few numbers or commands, you may also have to think hard about your solution.
Fixing bugs and mistakes may be as simple as fixing a mistyped number or correcting the target label specified in a Goto. In many cases, even once you’ve identified the malfunctioning code, the solution may not be immediately apparent. If the techniques in the previous section have failed to pinpoint the problem, you can use techniques such as the addition of breadcrumbs, adding extra output to your program to trace problems. From your planning, diagrams, pseudocode, and the ideas for your program that you have in your head, you know how it should work, and you can presumably tell when it deviates from that plan. Therefore, you can add Disp commands, Pause instructions, or both to your program and examine the values of variables as the program proceeds through suspect code. You could start with widely spaced debugging code, check when your variables get unexpected values, and then add more Disp/Pause commands to further narrow down the problem.
You may also find that when you reach a certain Pause, you want to stop the program with BREAK and either examine the code at that point or return to the home-screen, where you can manually check the contents of your program’s variables. TI-BASIC is easier than many languages to debug in that variables retain their contents even after the program ends, which makes performing a “postmortem” investigation of problems simpler. On the flip side, applications written specifically to help you debug problematic programs in languages such as C can step line by line through your code, showing you the contents of the program’s variables and memory at each step, whereas with TI-BASIC you need to add extra commands to your program to achieve the same effect.
If all else fails, your last resort is to try rewriting that particular section of code or to confer with other programmers. If you decide to rewrite the code, it’s important that you keep the original code, in case you suddenly realize what was wrong with the first implementation while you write the new one. Such sudden revelations are more common than you might think, so retaining your original is invaluable. If you need other programmers to talk to, feel free to refer to the forums listed in appendix C.
Once you successfully track down and solve any problems in your program, you’ll find that you almost always learn some new tricks that will help you complete your next project that much more easily. Remember, virtually every coding error is solvable with a bit of patience and careful examination.
Take our tour and find out more about liveBook's features:
- Search - full text search of all our books
- Discussions - ask questions and interact with other readers in the discussion forum.
- Highlight, annotate, or bookmark.
In this chapter, I reviewed the skills necessary for you to become confident writing your own calculator programs, skills you can apply to any programming language. I introduced you to the steps for taking a program all the way from idea to a finished product and the pitfalls you might stumble upon along your journey. I then made these lessons more concrete with a Pythagorean Triplet solver, showing how to deduce the necessary math to solve the problem, create corresponding diagrams and pseudocode, and finally translate those into code. I demonstrated how a bit of consideration and optimizing can make a fast, small program even better. This chapter presented the skills to create programs from scratch and fix any problems that you need in order to boldly experiment with your own great programs. Learning programming isn’t a passive activity, and I strongly urge you to start toying with program ideas of your own, to start fine-tuning the lessons I’ve presented here into intuitive understanding of writing and debugging programs.
With these skills, you can start writing your own programs and games in earnest, exploring the features your calculator has to offer to programmers. In the next chapter, you’ll learn to write dynamic, interactive programs and games that can directly read the calculator’s keypad.