Chapter 14. Testing batch applications
This chapter covers
- Test concepts
- Unit testing
- Integration testing
- Functional testing
In the core chapters of this book, we introduced Spring Batch concepts and you learned how to configure and run a batch job and how to read, process, and write data. Then, in the Spring Batch advanced concepts chapters, we explored exception handling, batch monitoring, and scaling. We addressed all the important aspects of creating batch jobs. The next step is to verify that an application works correctly.
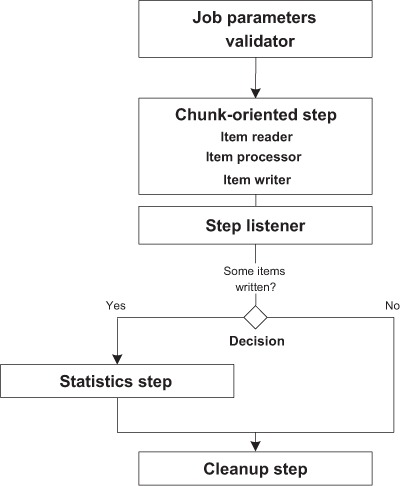
Testing is a best practice in software development and is essential to batch applications. This chapter explains testing concepts and implementing unit, integration, and functional tests. We leverage the Spring Framework, Spring Batch’s testing support, and the Mockito mock framework. This chapter demonstrates how to do all of this by using our case study as an example. Figure 14.1 depicts how to test our use case.
Figure 14.1. High-level view of our batch application workflow. Our testing strategy applies to all the components shown in the figure.

The goal of our batch application is to import products from a text file into a database. You start by validating the job’s parameters: an input file and a report file. Then, you read the product flat file and convert each line into a Product object. A CompositeItemProcessor processes each Product. The CompositeItemProcessor is composed of two Validators: one for checking that a product’s price isn’t null and the other for checking that the price is positive. An item writer outputs products that don’t match these conditions to a reject file with the help of a StepListener. You write product items with your own ProductItemWriter based on the SimpleJdbcTemplate. If the job writes any product to the reject file, a statistics step generates a file that contains the average product price. The job ends with a cleanup step.
Let’s talk a bit about what testing is and how testing can improve the reliability and robustness of an application. We look at different kinds of tests and then see how to implement them for our case study.
Software testing is a process used to ensure that the source code you write does what it’s supposed to do. This process helps you find errors. Let’s look at two main testing strategies: black-box and white-box testing.
Black-box testing focuses on software features without relying on internal knowledge of the implementation. This kind of testing shows that the application accepts input and produces output without errors; you base tests on requirements and functionality.
White-box testing focuses on implementation of software with internal knowledge of design, algorithms, and constraints. In white-box testing, you also focus on code coverage.
Depending on what you want to test, you have two strategies to choose from: white-box or black-box testing. Table 14.1 lists the main types of testing.
Type |
Definition |
Strategy |
---|---|---|
Unit testing | Tests a single software module (a component, a service, and so on) and requires detailed knowledge of implementation internals | White box |
Integration testing | Tests software modules to verify overall functionality and requires detailed knowledge of implementation internals | White box |
Functional testing | Focuses on functional requirements of an application by verifying that input is accepted and expected output is produced without errors | Black box |
System testing | Tests all parts of an application | Black box |
Acceptance testing | Verifies that the application meets customer-specified requirements | Black box |
Performance testing | Checks whether the system meets performance requirements | Black box |
This chapter focuses on unit tests, integration tests, and functional tests.
A unit test should address a single point of functionality and should be fast, understandable (by a human), automatic (no human intervention), and isolated from external resources such as a database, file system, web service, and JMS broker. A unit test aims to test a public API. With integration and functional tests, you can use external systems such as a database, which can even be an in-memory database to speed up tests. All these tests must be automatic and require no human intervention.
Test-driven development (TDD)
TDD is a software development process based on short iteration cycles and unit tests. Using this process, you write an automated test first, ensure that the test fails, write the code, and then ensure that the test passes. The benefits of the TDD process are that it drives the API and design, provides good code coverage, promotes safe code refactoring, and keeps developers focused on the task.
We now know what testing is and what the different types of tests are, but you might be wondering, should I test my applications? What’s the benefit?
If you’re reading this book, you’re human and writing software. Unintentionally, at least, humans make mistakes. A defect in a production environment may cause a malfunction of a part of the software, leading to a system failure with corrupted data. For example, in an insurance company, this could result in an error to a client’s refund or a salesperson may be unable to create a new contract. The later bugs are discovered, the more it costs to fix them. Software testing helps minimize bugs.
During development, we wish to add features quickly without breaking existing ones. Sometimes, developers are afraid of changing code. They don’t know what the software is supposed to do or how it works. Software testing helps developers understand existing source code by reading through test source code. Software applications have grown in complexity and size, and testing in the development phase helps developers gain confidence and get feedback when a test succeeds or fails. Furthermore, automated tests save time. The benefits of testing are great: tests improve the quality, reliability, and robustness of software. Nowadays, software testing has become unavoidable.
With all the necessary pieces in place, we’re ready to write some tests. For the rest of this chapter, we look at each type of test—unit, integration, and functional—and see how to create each test with Spring Batch.
In this section, we introduce how to write basic unit tests with JUnit, and then we look at the Mockito mock framework. Table 14.2 shows which of our sample unit tests require JUnit and a mock framework (the test class names refer to the source code from the book).
Figure 14.2 depicts what components we cover in our unit test examples. This figure shows that we unit test all components except for the statistics step. This is good news: Spring Batch artifacts (validator, reader, writer, and so on) are unit testable! Even if these artifacts are meant to be used in complex jobs that handle large amounts of data, they’re isolated enough from their runtime environment to be unit tested. That’s a direct benefit of the plain old Java object (POJO) programming model that the Spring Framework—and so Spring Batch—promotes. Table 14.3 shows our example test classes and the corresponding Spring Batch domain objects they cover.
Figure 14.2. Components unit tested by our examples. We unit test all components except the statistics step.

Spring Batch domain object |
|
---|---|
ImportValidatorTest | JobParametersValidator |
CompositeItemProcessorTest | ItemProcessor |
ProductFieldSetMapperTest | ItemReader |
PriceMandatoryValidatorTest | Validator in an ItemProcessor |
PositivePriceValidatorTest | Validator in an ItemProcessor |
ProductItemWriterMockTest | ItemWriter |
ProductItemListener | StepListener |
NextDeciderTest | JobExecutionDecider |
CleanTaskletTest | Tasklet |
JUnit is an open source unit testing framework and is the de facto standard for unit testing in Java. Starting with version 4.5 (released in 2008), JUnit provides annotations and additional classes to ease the task of writing unit tests.
Tip
To learn everything there is to know about JUnit, read JUnit in Action, Second Edition, by Petar Tahchiev, Felipe Leme, Vincent Massol, and Gary Gregory (Manning Publications, 2011).
To implement a test case, you start by creating a public class; by convention, you postfix the class name with Test or TestCase, for example, ImportValidatorTest. Because we use annotations, our test class no longer needs to inherit from the JUnit TestCase class as it did in JUnit version 3.
To create a test method, you write a public method with no return value, no arguments, and an @Test annotation. By convention, the method name starts with test.
At the start of a test run, JUnit runs methods with @Before annotations before each test method. Use @Before methods to initialize new instances of test objects stored in instance variables. These objects are available in each test method, and we call them fixtures.
JUnit runs methods with @After annotations after each test method to clean up fixtures or other resources as necessary.
Because some resources are expensive to initialize and manage, you can have JUnit call setup and tear down methods once per test run. Use the @BeforeClass annotation to call a method once per test run before JUnit has run all test methods. Use the @After-Class annotation to call a method once per test run after JUnit has run all test methods.
Methods in the Assert class help you compare an expected value to an actual value. You’ll mostly use methods in the Assert class prefixed with assert. If an assert method contract is respected, the test continues; if not, the method throws an Error, and the test is stopped and marked as failed. Table 14.4 shows the main Assert methods.
Method signature |
Description |
---|---|
assertTrue(booleanValue) | Fails if booleanValue is false |
assertNotNull(value) | Fails if value is null |
assertNull(value) | Fails if value isn't null |
assertEquals(expectedValue, actualValue) | Fails if expectedValue isn't equal to actualValue |
The following listing shows a bare-bones unit test with the annotations and some of the Assert methods described in table 14.4.
Listing 14.1 shows a test case without a superclass. JUnit calls the setUp method annotated with @Before before each @Test method. JUnit calls the tearDown method annotated with @After after each @Test method. These methods manage the lifecycle of fixtures. JUnit calls the @Test methods testMethod1 and testMethod2 and records which test succeeds or fails. In the method testMethod2, you use an assert method to verify that a string isn’t null.
In most of the tests cases in this chapter, we use the static import coding style, so we don’t need to prefix assert method calls with the Assert class name. We can now move on and test some real code.
We apply this new knowledge on simple examples first. Feel free to refer to our plan in figure 14.2 and table 14.3 to keep track of what you’re doing.
In our case study, a CompositeItemProcessor is composed of two ValidatingItemProcessors. Each one calls a custom Validator: PriceMandatoryValidator, which validates that a product’s price isn’t null, and a PositivePriceValidator, which validates that a product’s price is positive.
For this test scenario, you instantiate a Validator, prepare a Product fixture, and verify the result. The PriceMandatoryValidator validates an input object; if this object is invalid, it throws an exception. In this case, it’s easy to test a Validator, which has only one method, validate.
In the first test method, testValidProduct, the validator checks that a product has a positive price.
In the second test method, testInvalidProduct, the test leaves the product price as null, so the validator throws a ValidationException, as expected. To tell the test you expect a ValidationException, we add the attribute expected to the @Test annotation like this: @Test(expected = ValidationException.class). If the test method doesn’t throw a ValidationException, JUnit fails the test.
With the second validator, PositivePriceValidator, you have three cases: a positive, a zero, and a negative price.
In this example, the setUp method creates a PositivePriceValidator . In the method testPositivePrice
, you test a positive product price; this unit test validates the product, and the test method passes. In the method testNegativePrice
, you test a negative price; the test method throws a ValidationException, as expected, which causes JUnit to mark the test as successful.
In this section, we touched on JUnit framework basics: how to use JUnit with example test cases and how to test validators from our batch application. The next section introduces a mock framework to help you control the behavior of objects internal to our case study.
JUnit is a great tool dedicated to unit testing, but our objects aren’t as simple as in the previous example. For a complex object, you only want to verify the behavior of the object, not the dependencies the object relies on. To achieve this goal, you create mock objects for dependencies. Mock objects are powerful for testing components in isolation and under total control. A mock object is a fake object, dynamically (or automatically) generated for us, that you control: you define what a method returns, when a method throws an exception, and so on. You can do all this in a few lines of code without writing new classes. After executing tests, you can verify that execution reached a mock object, what methods the test caused to call, how many times, and so forth.
For this book, we chose Mockito[1] as our mock framework, but many others are available. With Mockito, you can easily create a mock object for a class or interface and control and validate mock objects with a fluent-styled[2] API.
The following sample code, inspired by the Mockito documentation, shows how to create, manipulate, and verify a mock object:
This example checks that the code calls the methods add and clear only once by using the verify method and the call to times(1). The call to verifyNoMoreInteractions checks that the test caused no other method calls on the mock object. The methods prefixed with verify throw MockitoExceptions and fail a unit test when a call doesn’t meet expectations.
With Mockito, you can mock a concrete class and control most of the behavior of the mock object. The following sample shows how to stub a LinkedList’s get method to return the string "first":
You can also create spy objects, based on real objects, and verify behavior, as shown in the following example:
In this case, you call the add method on the List<String> object; the benefit is to confirm that the add method has been called twice, once with the parameter one and once with the parameter two. Use spying when you want to test legacy code.
Remember that, in a unit test, we want to test only a single module or component of an application and only one object if possible. In these unit tests, we use the white-box testing strategy, and we don’t want to depend on other objects. Mockito helps us achieve these goals by mocking dependent objects, which we then wire into our own objects. In addition, we can control and verify how mock objects are used. The following sections explore how to test batch applications using JUnit and Mockito.
In chapter 5, we use a FieldSetMapper to create an object from tokens with the help of a FieldSet. In our case study, a FlatFileItemReader in a product Step uses a ProductFieldSetMapper to map fields from a flat file line into a Product object. The following shows our custom ProductFieldSetMapper.
This FieldSetMapper implementation is simple by Spring Batch standards. The next listing tests our FieldSetMapper with and without Mockito.

The ProductFieldSetMapperTest class has two test methods: testMapFieldSetClassic and testMapFieldSetMock.
The testMapFieldSetClassic test method creates a DefaultFieldSet with column names and values. Then the assert methods check that a product was created and correctly populated. This is the standard JUnit style; you test expected values against actual values.
The testMapFieldSetMock test method mocks a FieldSet, invokes mapFieldSet, checks values, and also verifies that no other methods have been called on the fieldSet. The call to verifyNoMoreInteractions checks that the test didn’t call other methods on the fieldSet. If the ProductFieldSetMapper calls other methods, like readString("string"), the test fails. Using a mock object, you can check the mapFieldSet behavior in detail.
In our next example, the ProductItemListener class in listing 14.6 implements a StepListener. Spring Batch calls a ProductItemListener after processing each product object in the product step. Remember that the role of our CompositeItemProcessor is to filter products.
Note that the @Required annotation marks the property method setExcludeWriter as mandatory and causes the Spring context load to fail if it isn’t called.
If the job filters out a product, the afterProcess method has a null result argument value, and you write the Product item to a product reject file using the excludeWriter. This implementation uses a FlatFileItemWriter as a reject file writer to maintain less source code.
The goals of the tests in this section are to avoid using the file system and to write tests that filter and don’t filter items. We also control how the excludeWriter is used. The following listing shows our test case for the ProductItemListenerTest class.
In this listing, the method setUp populates the product items list fixture with one Product and mocks a FlatFileItemWriter to avoid using the file system. The testAfterProcess method calls the method afterProcess on the ProductItemListener with a Product as the input and a null value as the output product. In this case, the test simulates that the CompositeItemProcessor filters input products for prices less than or equal to zero. The test checks that the listener invokes the write method on the exclude writer once.
In the testAfterProcessResult method, the test calls afterProcess with the same input product, which means that the CompositeItemProcessor doesn’t filter this product. Finally, you ensure that this is the case.
In the next sections, we look at some of Mockito’s advanced features, like controlling values returned from a method, creating elaborate tests, and spying on objects.
You’re ready to test a JobParametersValidator (listing 14.8), which the job invokes at the beginning of its processing to validate JobParameters. The ImportValidator verifies that the product input file exists and that the statistics path parameter isn’t null. For this unit test, you don’t want to depend on the file system, so you mock a ResourceLoader.

In the testJobParameters method, you verify the ImportValidator implementation by spying on JobParameters . You use spied objects because you want to control how many times the test calls getParameter and getString
. This test shows that, for the given input, the ImportValidator validate method causes getParameters to be called twice (it could be with parameters.getParameters().containsKey(key), for example). The test also shows that the getString(String) method is called once with a PARAM_INPUT_RESOURCE argument value.
The testValidateEmptyJobParameters method verifies that the ImportValidator throws a JobParametersInvalidException when the job parameters, which are required, are empty.
The testMissingJobParameters method verifies that the ImportValidator throws a JobParametersInvalidException when the job parameters are missing a required parameter. This test checks only one case; a complete implementation would check all possible cases.
Note that Spring Batch provides a DefaultJobParametersValidator class in which you manually set required and optional keys. Spring Batch can also automatically discover these keys.
The next section tests an ItemWriter, a more complex example.
Our ProductItemWriter writes Product objects to a database via a SimpleJdbcTemplate. The following listing shows how to do this.
This writer uses SQL INSERT and UPDATE statements. If a product already exists in the database, the ProductItemWriter executes a SQL UPDATE. If the product isn’t in the database, the ProductItemWriter first tries to execute an UPDATE, which fails, and then executes an INSERT, which succeeds. For each product item, the writer creates a SqlParameterSource to bind its values into a SQL statement’s named parameters.
Let’s look at the item writer test, where you unit test everything with Spring Batch, JUnit, and Mockito. The following listing shows the unit test for the item writer.

First, you set up your fixture objects in the setUp method where you also set up a mock object for a SimpleJdbcTemplate and initialize it with its required dependencies.
The first test, testUpdateProduct, simulates at that the UPDATE statement returns only one affected row, which means that the product already exists. Using the eq and any methods, Mockito allows you to control method arguments for any instance of SqlParameterSource. After that, you count how many times the test called each SQL statement
; you expected one UPDATE and zero INSERTs.
In the second test, testInsertProduct, if the UPDATE statement affects zero rows, the SimpleJdbcTemplate executes a SQL INSERT. You expected one call to UPDATE and one call to INSERT.
You have now successfully tested a FieldSetMapper, an item listener, and an item writer, which are all key components of Spring Batch. The ability to test these core components gives you the confidence to proceed with changing and growing the application.
In the previous sections, we introduced JUnit, a powerful unit testing framework, and the Mockito mocking framework. We can’t use unit testing for most of our case study yet, but it won’t be long before we can. Next, we look at techniques that allow you to test Spring Batch applications at all levels.
Spring batch manages beans during a batch application’s lifecycle. Some of these objects are too complex to create outside the Spring Batch infrastructure, like a unit test. That’s why Spring Batch provides the Spring Batch Test module. This module includes classes like MetaDataInstanceFactory, whose goal is to create test instances of JobExecution, JobInstance, and StepExecution. The following example creates a test StepExecution and JobExecution using the MetaDataInstanceFactory class:
The Test module opens up Spring Batch domain objects to be tested. Classes like JobExecutionDecider and Tasklet, for example, have APIs that require the types of objects supplied by MetaDataInstanceFactory.
Remember that, in figure 14.2, the JobExecutionDecider manages the batch flow. You use the MetaDataInstanceFactory to create a JobExecution and StepExecution. The NextDecider sits between CleanStep and StatisticStep. It returns NEXT if the job writes any products, based on the number of written items for this execution, and COMPLETED otherwise. It’s important to test JobExecutionDecider because it’s responsible for the batch workflow. The following listing shows the NextDeciderTest class.
This test case creates a StepExecution and a JobExecution with the Spring Batch Test class MetaDataInstanceFactory. You set the write count value to a positive value, call the decide method, and check that the result is NEXT.
In the next test method, you set the write count to zero and check that the result is COMPLETED.
Let’s continue to explore the MetaDataInstanceFactory class by testing a Tasklet.
You can also manipulate complex Spring Batch domain objects like a ChunkContext (a requirement of the Tasklet API) with the MetaDataInstanceFactory class. The following listing demonstrates testing such a tasklet.
In the CleanTaskletTest class, you create a ChunkContext to test the Tasklet, which doesn’t require any dependencies. The implementation of the CleanTasklet class always returns RepeatStatus.FINISHED.
This unit test ends this section. We created unit tests for our case study with JUnit, Mockito, and Spring Batch mock domain objects. These examples show you how to improve the reliability and robustness of batch applications. The next section covers creating integration tests.
In this section, we address another aspect of testing where we test software modules in realistic production conditions to validate overall functionality. As a white-box strategy, integration testing is aware of internal implementation details. This time, we use a real database, Spring, and Spring Batch application contexts, including batch job definitions.
Table 14.5 shows test class names and corresponding Spring Batch domain classes.
Test class |
Spring Batch domain class |
---|---|
ReaderWithListenerTest | ItemReader |
ReaderWithStepScopeTestUtilsTest | ItemReader |
CompositeItemProcessorTest | ItemProcessor |
Figure 14.3 depicts what components we cover in our integration test examples.
To go on with integration testing of our case study, we introduce the Spring TestContext Framework and the Spring Batch StepScopeTestExecutionListener class. To track what you’re testing, please refer to figure 14.3. We focus next on testing instances of Step, ItemReader, and ItemProcessor.
The Spring Framework provides support for integration testing with the Spring TestContext Framework, which lets you write tests for a framework like JUnit. In JUnit, the @RunWith annotation sets a Runner class, which is responsible for launching tests, triggering events, and marking tests as successful or failed.
Spring Testcontext Requirements
To use the Spring TestContext framework, you need Java 5 or greater and JUnit version 4.5 or greater. Annotate your test class with the @RunWith annotation and the value SpringJUnit4ClassRunner.class.
For integration testing, we use the following Spring TestContext Framework features:
- The @ContextConfiguration annotation is used to load a Spring context from an XML file, for example, @ContextConfiguration("/path/context.xml"). By convention, if an application context path isn’t set, the path is set to [TestClassName]-context.xml.
- Spring TestContext caches the application context for better performance. This saves time on each test startup.
- The @DirtiesContext annotation indicates that the application context for a test is dirty and that TestContext should close it after each test.
- Spring TestContext defines a listener API for tests to interact with objects with the @TestExecutionListeners annotation. For example, the DependencyInjectTestExecutionListener class provides support for dependency injection and initialization of test instances. Spring TestContext adds this listener by default and injects field by type, annotated with @Autowired or by name with @Resource.
The following simple example uses these features:
For integration tests, you hit a real database: the H2 Database,[3] which is a fast Java SQL database. You configure it as an in-memory database to avoid file system access. The following snippet shows the Spring configuration of the DataSource bean:
In this configuration, you import the H2 configuration properties from the batch-h2.properties file. The following snippet shows the content of this file:
The keyword mem indicates that H2 should work only in memory. For database initialization, you add jdbc:initialize-database to the application context, which refers to the Datasource used to execute a list of SQL scripts:
You now have the basic elements in place to begin integration testing of our batch job. You load a Spring application context and set up an in-memory database based on SQL scripts. The next step is to deal with Spring Batch components using a special scope.
In Spring Batch, you can configure components at runtime with a special scope named step and a late binding SpEL (Spring Expression Language) expression based on a step or a job execution:
To help test these components, the Spring Batch Test module includes a special listener called StepScopeTestExecutionListener that implements the Spring Test TestExecutionListener interface. By default, this listener creates an empty StepExecution. If a getStepExecution method exists, StepScopeTestExecutionListener invokes it to create a StepExecution.
The following example illustrates this usage:
In our case study, you use an ItemProcessor in the Product step. Specifically, you use a CompositeItemProcessor composed of two ValidatingItemProcessors, which use PositivePriceValidator and PriceMandatoryValidator. Remember that you already tested each Validator separately in unit tests (see the previous section on unit testing). For an integration test, you test the real processor chain, which the Spring context defines. The following listing shows the CompositeItemProcessorTest class.

You start by adding a StepScopeTestExecutionListener to create a custom StepExecution
with a mandatory parameter in the step scope. You take advantage of the Spring TestContext Framework to autowire the real ItemProcessor
.
You can now validate your test scenarios based on various product price values . If a product price is positive, the ItemProcessor returns the same product object; otherwise it returns null. The test testNegativePriceFailure tests a negative price, and testZeroPriceFailure tests a price product equal to zero. The last test, testEmptyProductFailure, tests an empty Product object.
Note that the ValidatingItemProcesors for this job are configured with filter = true, which means they don’t throw exceptions.
This integration test validates that the CompositeItemProcessor has no bugs in its Validator order. If you had the PositivePriceValidator in the first position, these tests would fail with a NullPointerException because the validator assumes that the price product isn’t null.
Let’s continue with a more complex example: testing an ItemReader.
In this section, we describe two ways to test an ItemReader. First, we see an example using the same technique as previously shown. Then we use the Spring Batch Test class StepScopeTestUtils.
In the test in the following listing, you read data from a real file in the file system (but you could mock it). The test checks the content of the first line of data and how many lines the file includes.

We start each test with the @Before setUp method to open the stream with a new ExecutionContext. We read a first line
and compare the expected ID value
. The product file contains eight lines, which we verify by calling read eight times and checking that each call returns data. Then, we expect the ninth call to read to return null
, indicating that we’ve reached the end of the file. After each @Test method, we close the stream in the @After tearDown method
.
The Spring Batch Test StepScopeTestUtils method doInStepScope is the other way to test a Spring Batch component in a step scope for the ItemReader in our case study. We must create an implementation of the java.util.concurrent.Callable interface that returns an object, in this case, the count of lines read. Listing 14.15 shows our ReaderWithStepScopeTestUtilsTest class.

You start the test by creating an anonymous implementation of the Callable interface . Then you open a stream with a new ExecutionContext, and while the reader reads items in a loop, you count lines as you read them
. Finally, you close the stream. Again, you ensure that you have read eight lines
.
We don’t see a best approach here. Using a listener is simpler than using StepScopeTestUtils, but the latter is more flexible and may be more effective for a complex ItemReader.
Now we move on to functional testing.
Table 14.6 shows functional test classes and corresponding Spring Batch domain objects.
Table 14.6. Functional testing plan and Spring Batch domain objects
Test class |
Spring Batch domain object |
---|---|
ProductStepTest | Step |
StatisticStepTest | Step |
WholeBatchTest | Job |
Figure 14.4 shows what components we cover in our functional test examples.
Here, we focus on the functional requirements of an application, and remember that we use the black-box testing strategy. Considering the job’s overall functionality, we provide input values and verify output values without concern for any implementation details. This kind of testing gives you confidence in the correctness of a whole batch job.
Because this is a section on testing Step and Job objects, we validate the product and statistics step and the batch overall (see the test plan in figure 14.4).
The JobLauncherTestUtils class is another class from the Spring Batch Test module to help you test a single Step or Job. The JobLauncherTestUtils class automatically injects a job by type from the application context; this implies that there’s only one batch job in your test application context. This is a best practice. With JobLauncherTestUtils, you can launch a single step of a job by specifying the step name. You can also specify job parameters. The following snippet shows how to launch only one step:
You can also launch a whole job with job parameters, as shown in the following snippet:
The AssertFile class from the Spring Batch Test module includes assert methods to compare File and Resource contents. You use the AssertFile class to compare the content of the expected reference file with an actual exclude or statistics file. Recall that JUnit uses the terms expected and actual in its APIs consistently, where the expected value comes first and the actual value second:
Using these new testing classes, we can now work on the Step test.
Steps define the sequence of actions in a job. A step is a critical part of a job, so it’s important to test it in isolation. It’s easy to write such a test with the JobLauncherTestUtils class. Our test scenario in the following listing provides input data, launches the productsStep, ensures that the batch status is COMPLETED, counts how many lines the job has filtered and written, and finally compares the rejected products file with a reference file.

In this test, you start by declaring instance variables for JobLauncherTestUtils and SimpleJdbcTemplate
, and use Spring TestContext dependency injection to initialize them. In the testIntegration method, you set up JobParameters and use JobLauncherTestUtils to launch the productsStep
. At
, you start checking expectations. You expect the COMPLETED batch status for the job execution. Then you retrieve the first step in the StepExecution, count filtered items, and count written items. Finally, you count the products in the database and compare file contents from the exclude product file and the reference file.
The statistics step calculates the average price of products; there’s no code, only Spring Batch configuration, as shown in the following listing.
This step uses a reader based on a JdbcCursorItemReader that computes the average price for all products using the AVG SQL function. The step has a simple writer to get the result, via a PassThroughLineAggregator, and write it with a FlatFileItemWriter.
The following listing shows you another example by testing the step statisticStep and setting up data in a database.
This test is similar to the product step test except that you set up data in a database. You launch the step statisticStep and check that the file content is equal to the content of the reference file.
These examples show that it’s easy to test with Spring and Spring Batch. What a difference from using a bash shell! With Spring Batch, applications are easy to write and test. Stay with us: the final section tests a whole job.
We finish this chapter with The Big One: testing an entire job—an easy task with all that we’ve learned. With the help of the Spring TestContext framework and the JobLauncherTestUtils class, it takes only a few lines of code to do the job, as demonstrated in the following listing.
You start with Spring injecting a JobLauncherTestUtils , then call launchJob
, and check the batch status. Finally, you count product table rows, and that’s all! You have successfully tested a whole batch job!
It’s now time to conclude our journey in the land of batch application testing.
In this chapter, you learned how to implement unit, integration, and functional tests for batch applications. You looked at test concepts and why writing tests improves the reliability and robustness of applications. We introduced the notion of test strategies like white-box and black-box testing. You also learned how to write unit tests with JUnit and the Mockito mock framework, where you learned how to test your application’s behavior. Then, you looked at the Spring TestContext Framework and the Spring Batch Test module, which helped a lot. Finally, you created Step and Job tests to check overall functionality. Based on our case study, you created many test cases to show that all aspects of a batch job can be tested. Indeed, it has never been easier to create tests for batch jobs.
This is the final chapter; we hope you enjoyed this book. Now, go out and practice on your own. The appendixes that follow show you how to configure your favorite IDEs and Maven for use with Spring Batch and how to set up Spring Batch Admin, the web administration console for Spring Batch.