Appendix C. Spring DM development with Ant and Ivy
We consciously chose to use Maven 2 throughout this book, mainly because that’s the build tool we’re the most familiar with, but also because Spring DM uses it for its own building and testing. Nevertheless Ant remains a very popular build tool, so here we’ll provide enough information for you to get started with OSGi and Spring DM development using Ant.
The aim of this appendix is to reproduce part of what we did in chapter 3, but in an Ant and Ivy fashion: writing and packaging a Spring-powered bundle, then running the corresponding integration test. We won’t focus on pure Spring DM topics—you should already be familiar with the core principles of Spring DM before reading this appendix.
Why would you want to use Ant instead of Maven 2? There are many reasons, the first being that Ant is your favorite build tool! Generally speaking, Ant can address complex builds, because it lets the user handle very technical tasks, whereas Maven 2 has a more declarative approach.
We’ll start with the installation of Ant, and then dive into writing the bundle itself and compiling it with Ant. We’ll then cover how to create an OSGi bundle using Bnd, which integrates nicely with Ant. Apache Ivy will help us handle our dependencies, and we’ll see how to customize Spring DM’s testing framework to make it work with Ivy. We’ll finish by writing and running the integration test with Ant.
Ant can be downloaded from its official website, http://ant.apache.org. It comes as an archive file that creates the directory apache-ant-1.8.1 when it’s extracted.
Note
We’re using Ant 1.8.1 here. For all Ant’s tasks to work properly, you should use a JDK (not a JRE). Java 1.5 or later is strongly recommended.
Next, you need to create an ANT_HOME environment variable that contains the directory where you installed Ant. To make the ant command available in your shell, add the ANT_HOME/bin directory to your PATH environment variable (use $ANT_HOME/bin if you’re using a Linux-based operating system or %ANT_HOME%\bin for Windows).
Note
You should also set the JAVA_HOME environment variable to the directory where your JDK is installed. The *_HOME variable should not contain quotes nor end with / or \.
You can check that Ant is correctly installed by running ant –version, which outputs information about the version of Ant:
Now that we’re sure that Ant works, we’re ready to create a Spring DM bundle and the corresponding Ant build file.
Creating our bundle will involve three steps:
1. Creating the bundle’s files (a Java class and a Spring configuration file)
2. Writing the Ant build file
3. Using Bnd’s Ant task to package the project as an OSGi-compliant bundle
We’ll look at each step in turn.
Listing C.1 shows the structure of the project, which uses the standard Maven 2 layout. The bundle’s Java class and Spring configuration file are displayed in bold.
Listing C.2 shows the SpringDmSample class, which outputs a message on the console when an instance is created.
The Spring configuration file is in the META-INF/spring directory, which Spring DM’s extender looks at when searching for an application context to bootstrap when the bundle is started. Our Spring application context will create an instance of SpringDm-Sample, which issues the message in listing C.2 on the console.
Listing C.3 shows the content of the Spring configuration file, springdm-sample.xml.
That’s it for the content of the project; let’s now see how to build it with Ant.
An Ant build file is an XML file located at the root of the project and usually called build.xml. If you run the ant command in a directory that contains a build.xml file, Ant will use it by default, whereas you’ll have to provide the name of the file on the command line if it’s not called build.xml.
An Ant build file consists of a succession of targets that can run from compilation to packaging to the creation of test reports. Here we’re going to see how to compile our project and package it as a standard JAR.
First, we’ll create a build.xml file at the root of the project. Its content is shown in listing C.4.

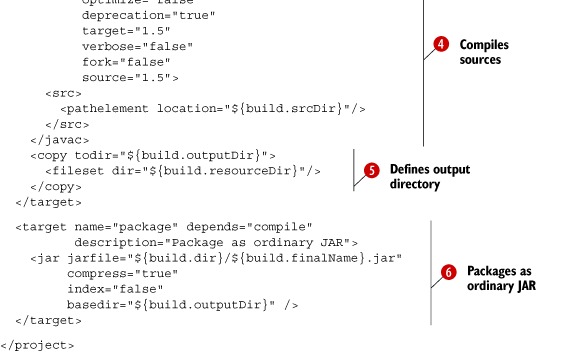
The build file starts with the declaration of a set of properties  . These properties are then used throughout the build file with the ${propertyName} syntax. The first target declared at
  is for cleaning the output directory. We then define the compilation target at
  , followed by the compilation itself
  and then the copying of resources to the build directory
  . The build file ends with the packaging of the project as a standard JAR at
  (note that this target depends on the compile target).
You can build a JAR archive by launching the following command at the root of the project:
This produces the JAR file in the target directory. But don’t we want to produce an OSGi-compliant bundle? The clean and compile targets are suitable for this, but we need to change the package target so that it uses a tool more appropriate to OSGi. In our case, we’re going to use Bnd.
We introduced Bnd in chapter 3, where we used it inside a Maven 2 plug-in. We also used it as a command-line tool in chapter 6. The good news is that Bnd can also work as an Ant task!
We’ll look at how to make Bnd available to Ant builds and how to use the Bnd task inside a build file to produce an OSGi bundle.
Ant can support new tasks by adding the corresponding libraries to its classpath. There are several ways to do this, but the easiest is to copy the library into the ANT_HOME/lib directory.
You can download Bnd from its web page (http://www.aqute.biz/Code/Bnd). The Bnd JAR contains the Ant task, so you only have to copy it to the ANT_HOME/lib to make the Bnd task available for all your builds.
Let’s see now how to leverage this task.
Using the Bnd task in Ant consists of two steps: importing the task and then using it with the bnd XML element. That’s what listing C.5 illustrates.
The package target is declared in the first line, the same way other targets are. But because the Bnd task isn’t an Ant core task, we need to define it using a properties file that the Bnd JAR contains.
We can then use the task with the bnd element. Bnd isn’t exactly a packaging tool: it scans the classpath (not a directory with class files) and gathers class files and resources into a JAR, following rules detailed in a configuration file (it also uses this file to generate the JAR manifest with the necessary OSGi metadata). That’s why we use the classpath attribute to tell Bnd to scan the output directory, and the files attribute to indicate a configuration file.
Note
Chapter 6 provides more details about Bnd’s features and how to write configuration files.
The next step is to write the build.bnd file that the files attribute is pointing at. This file contains instructions that Bnd uses to generate the JAR. Listing C.6 shows the file content.
Note that the Bnd configuration file can contain references to properties defined in the build file. We use this feature for defining the version of the bundle.
To package the bundle, launch the following command:
This produces a JAR in the same place as before, but this time it contains a manifest with the necessary OSGi metadata. You can try the bundle with the Equinox container we configured in chapter 3. Once the bundle is installed and started, the SpringDm-Sample should output a message to the console indicating that it has been created.
Testing the bundle manually—by installing it in an OSGi container—is cumbersome. That’s why we introduced you to Spring DM’s testing framework in chapter 3. The testing framework relies on Maven 2’s local repository to provision an embedded OSGi container that the integration test then bootstraps. This is the default behavior, but as we’re in an Ant appendix, we don’t have a local Maven 2 repository, so we need to override the default behavior. Fortunately, Spring DM provides enough hooks in its testing framework to do this—we’ll cover that in section C.4.
What we have to do immediately is retrieve the bundles we need for provisioning the OSGi container. For this we’ll use a popular dependency management tool that integrates nicely with Ant: Apache Ivy.
Apache Ivy (http://ant.apache.org/ivy/) is a powerful dependency manager that’s primarily used with Ant. What can Ivy help us with when developing a Spring DM bundle? It will download the bundles we need for our integration test. These bundles will then be used for compiling the project and provisioning the embedded OSGi container that the test framework launches.
We’ll see in the following sections how to set up Ivy for Ant, how to configure the repositories Ivy will use to retrieve dependencies, and how to declare the dependencies in a configuration file before retrieving them from Ant.
Ivy is launched through an Ant task, so we need to make this task available to our Ant installation. All we have to do is download the Ivy distribution and copy the Ivy JAR to ANT_HOME/lib, just as we did with Bnd. Once this is done, all Ivy’s tasks will be available to your Ant build.
We’ll only use the retrieve task here, but before we do this, we need to configure the repositories Ivy will use for retrieving the dependencies.
Ivy can be configured with an ivysettings.xml file located in the same directory as the Ant build file. This file can contain many configuration options, but we’ll focus on resolvers.
In a nutshell, a resolver finds and downloads dependencies. We’ll use a chained resolver here, which successively tries several remote repositories to download dependencies. Listing C.7 shows the content of the ivysettings.xml file.

The default-chain resolver is set as the default resolver at and its definition starts at . The chain is made of three repositories that host only OSGi-compliant JAR files and the usual Maven 2 repository, IBiblio . Note that this repository will be queried only if none of the previous ones can return a dependency, because it’s the last element in the chain.
The next step consists of declaring the dependencies and modifying the Ant build files to make Ivy download them.
Ivy dependencies are declared in an ivy.xml file, located in the same directory as the Ant build file. Listing C.8 shows the structure of an Ivy dependency file.

Note that with Ivy, a dependency is identified by its organization, its name, and its revision number. Ivy also has the notion of type of dependency, but we’ll only use JAR files here, which happens to be the default.
For brevity’s sake, we won’t include the whole set of dependencies needed for running our integration test; you can find the complete Ivy file in the code samples for this appendix. All you need to know is that these dependencies can be roughly divided into the following categories:
- Spring DM (I/O, core, extender)
- Spring Framework (core, lightweight container, AOP, and so on) and its dependencies
- Logging libraries
- Test libraries
- OSGi (the Equinox container that the testing framework will bootstrap in the test)
Our project now has the following structure:
What we need to do next is to Ivy-enable our build file. Listing C.9 shows how to do so.
Ivy comes with its own namespace that we declare in the root tag of the build file. This allows the use of the ivy:retrieve element in a target for retrieving dependencies.
Let’s run the resolve target to do so:
Here is part of the resulting console output:
What did Ivy do? It downloaded the dependencies from the various remote repositories, copied them into a directory to cache them, and then copied them into a newly created lib directory in the project directory. The project now has the following structure (with the library directory and its content shown in bold):
We’re done with dependencies! It’s time to take advantage of these dependencies to write the integration test and run it using Spring DM’s testing framework.
As explained in chapter 3, Spring DM provides a test framework to run test cases in an embedded OSGi container. The test framework handles the bootstrapping of the OSGi container and turns the test into an on-the-fly bundle to run the test methods in an OSGi environment.
In section C.4.1 we’ll see how to write the test and how to compile it by modifying the Ant build file. As the Spring DM test framework uses the Maven 2 dependency management system by default, section C.4.2 shows how to customize it to make it work with our Ivy-managed dependencies. Section C.4.3 then covers how to launch the test with Ant.
We’ll stick to Maven 2’s project layout by putting tests in the src/test/java directory of our project. The project now has the following structure (with the test directory and its content shown in bold):
Listing C.10 shows the backbone of our integration test. The test mainly consists of checking that our bundle has been installed and correctly started.

The test will be updated in section C.4.2 to reflect that we don’t rely on the Maven 2 local repository to provision the OSGi container that the test framework bootstraps. For now, we just need to compile the test. Listing C.11 shows the updates needed in the build file to compile the test.

Modifications start at , with the declaration of properties for the location of test source files and for the test output directory. We take advantage of our dependencies at , by defining a dedicated path for our classpath. Note that the test compilation target depends on the resolve target , which means that the dependencies will be retrieved before its execution. We refer at to the classpath we created, as the test uses the OSGi API and the Equinox JAR (in the dependencies) provides this.
Compilation time! Launch the following command:
The test is almost ready to run, but before we do that, we need to tune the Spring DM test framework a little to use the Ivy-managed dependencies.
By default, the test framework uses the Maven 2 local repository to provision the embedded OSGi container that it then bootstraps. What does the test framework provision the container with? With Spring DM’s bundles (I/O, core, extender, and so on) and their corresponding dependencies (Spring Framework, logging, and the like). These bundles are referred to as framework bundles. It also provisions the container with the bundles that should be tested together with their own dependencies. Let’s call them application bundles.
The main issue we’re going to face is the way the test framework locates dependencies: we don’t want it to search the Maven 2 local repository, but rather the directory we copied the dependencies to. Fortunately, the test framework offers a hook to customize the way bundles are found: the ArtifactLocator. Here is the definition of the ArtifactLocator interface:
With an ArtifactLocator, dependencies are identified by their group, ID, version, and type. Note the use of Spring’s resource abstraction.
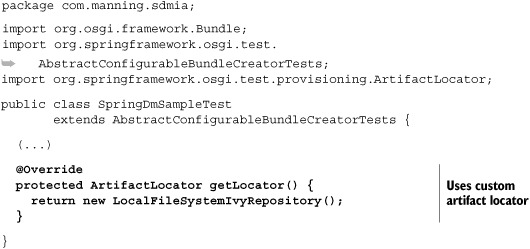
We’ll provide a simple implementation that only uses the ID and the version to return a Resource from our lib directory. Listing C.12 shows the implementation of the LocalFileSystemIvyRepository.
Note
The LocalFileSystemIvyRepository is rather simple. Don’t hesitate to write an implementation that suits your needs better.
How do we use our LocalFileSystemIvyRepository in our integration test? This can be done by overriding the getLocator method, as shown in listing C.13.
Now, each time the testing framework needs a bundle, the request will be forwarded to our LocalFileSystemIvyRepository.
By default, Spring DM loads the necessary framework bundles and doesn’t load any application bundles. You can change this behavior by overriding the getTestFrameworkBundlesNames and getTestBundlesNames methods. You’re already familiar with getTestBundlesNames, because we overrode it to set the application bundles we wanted to install in the OSGi container in chapters 3 and 10. We also need to override the getTestFrameworkBundlesNames to make it consistent with our artifact locator, as shown in listing C.14.
We’re now done with the customization of the test framework: it uses our Ivy-managed dependencies instead of the Maven 2 local repository. We can’t say it’s been particularly easy, but Spring DM gives us enough hooks to achieve what we wanted!
Get ready for the last step: running the test with Ant.
Ant has an optional task to launch JUnit tests, which is installed by default in the standard distribution. When it comes to running tests, Spring DM integration tests don’t differ from plain JUnit tests, as shown in listing C.15.
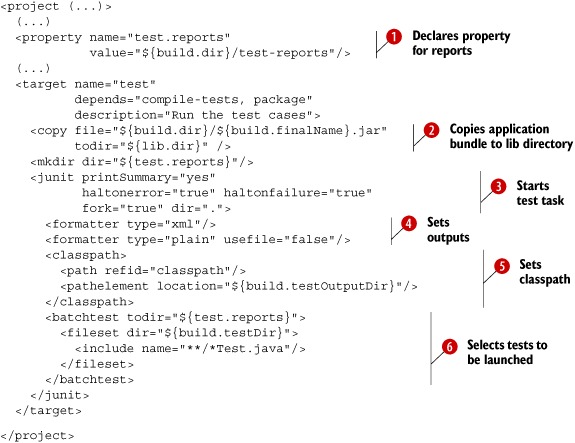
The JUnit Ant task can generate reports—that’s why we define at a property for the directory where the reports should be generated. At we copy our bundle into the lib directory to make it available for provisioning (with our custom ArtifactLocator). The junit element at starts the JUnit task. It takes several options: formatters at (to set where the results of the tests should be printed–on the console and in XML files in our case), the classpath to use for launching the tests , and the batchtest element specifying the set of tests that should be launched .
We’re now ready to run the test with the following command:
The command will trigger the compilation of the SpringDmSample class, the bundle creation, the retrieval of dependencies, the test compilation, and the test launching. Here’s a part of the console output:
That’s it! We managed to run our Spring DM integration test with a 100 percent Ant solution!
Even though we favored Maven 2 throughout this book, we haven’t forgotten Ant users. Doing OSGi and Spring development with Ant isn’t only possible, it’s not too difficult at all.
The build file for the Spring DM sample is similar to that of any other project. Only the packaging task differs; for this we used Bnd to generate the OSGi metadata and create the bundle with the appropriate content. The biggest difference comes with integration tests, as Spring DM testing defaults to using the Maven 2 local repository for provisioning. Instead, we used Ivy to gather the necessary bundles and customize the test framework so that it used them from the project directory.
This gives you a shrink-wrapped solution for launching Spring DM-based integration tests but also enough knowledge to build your own solution. Also keep in mind that once the testing framework is correctly customized, running the integration tests is the same as for any other tests, because Spring DM tests are JUnit-based. Using Spring DM with Ant won’t force you to change your build habits, and most of your build files can remain the same.