concept Eclipse in category gwt

This is an excerpt from Manning's book GWT in Action.
When you install plug-ins for Eclipse, you use the Install New Software tool. In Eclipse you’ll find this wizard under the Help menu. In this section we’ll walk you through how to use this tool.
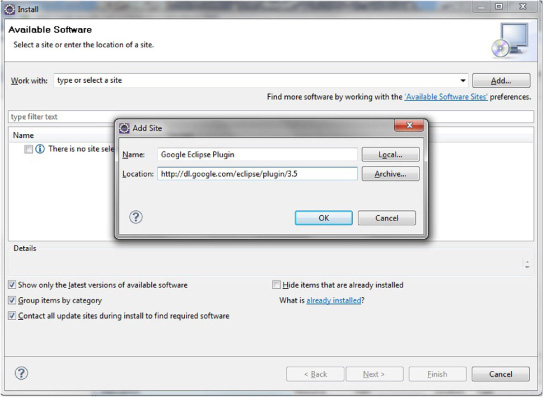
The first step is to find the location of the update site. An update site is a URL to a web server that’s providing the Eclipse plug-in. The Google Plugin for Eclipse has different update site URLs depending on which version of Eclipse you’re running. You’ll need to visit the Google Plugin for Eclipse website, located at http://code.google.com/eclipse/docs/download.html, to find the appropriate URL.
The download page will list different update URLs for different versions of Eclipse. The easiest way to know which version of Eclipse you’re running is to look at the splash screen when you start Eclipse, which will display the version name.
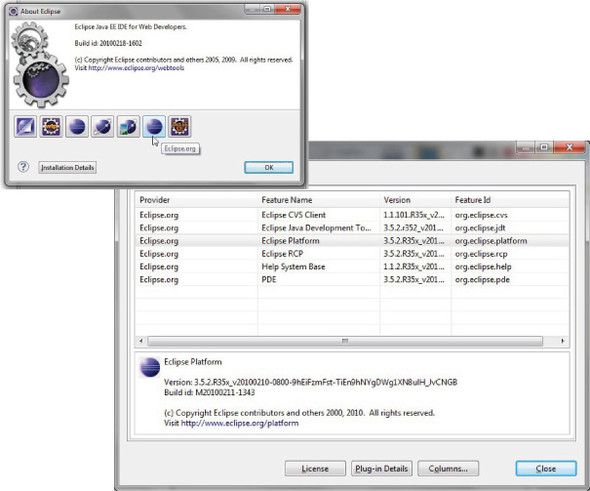
If you’re unable to determine the version from the splash screen, which could happen if you’re using a distribution of Eclipse from another vendor (for example, the SpringSource Tool Suite), you’ll need to find it in the Help menu. To find the version of Eclipse, or the version of any installed plug-in, you choose Help > About on the menu bar. On the About screen there will be several buttons, as shown in figure 1.8. You’ll want to click the button that has the tooltip “Eclipse.org.” Clicking this will bring up the versions of the individual features. The feature version you’re interested in is the Eclipse Platform.
Figure 1.8. The About Eclipse dialog box (left) includes several icons representing the different organizations that provided the features and plug-ins you currently have installed. Clicking the icon for Eclipse.org will present the feature versions (right), including that of the Eclipse Platform.
Once you’ve determined the version of Eclipse you’re running and the URL of the update site for your version, you can install the Google Plugin. In Eclipse click Help > Install New Software. This brings up the Install dialog, as shown in figure 1.9.
This chapter covers step 1, and we’ll go through the process of creating a simple HelloWorld application using some of the wizards from the Google Plugin for Eclipse (GPE). The resulting application is the simplest GWT application that can be built that places some text on a web page. You’ll use this to explore the wizards, understand some GWT terminology, get familiar with application code layout and the files involved, and learn how to run and debug the application in Eclipse as well as compile it to JavaScript—the basics of GWT development.
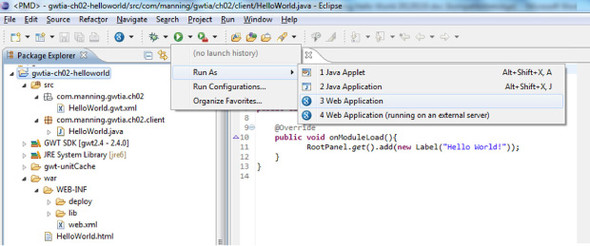
To start development mode, all you do is select the project in Eclipse’s Package Explorer, click the Run button in the Eclipse toolbar, and navigate down to Run As > Web Application (see figure 2.15).
Figure 2.15. Running the project in development mode through the Eclipse Run button (highlight the project in Package Explorer, click the Play button, and choose Run As > Web Application)
If you have only one HTML page in your project, as we do, then GWT will assume that’s the page you want to load when the user arrives at your application (projects with several HTML pages will trigger GWT to ask which page is the startup URL). After a while, you’ll notice a new view window open inside Eclipse, with a URL in it (usually at the bottom of the screen). You can see part of this view in figure 2.16.
Figure 2.16. In development mode the Eclipse view window shows the project’s URL. You can then enter the URL into a browser of your choice as long as it supports the Development Mode Browser Plugin.
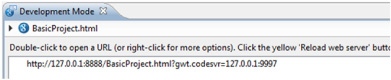
Development mode is now running, but you won’t see your application yet. To see your application, you need to fire up your favorite supported browser: IE, Firefox, Safari, or Chrome. When your browser is running, go back to Eclipse, copy the URL you see in the development mode view window, paste it into your browser, and press Enter.