Chapter 2. Using and configuring Web Parts in SharePoint 2010
This chapter covers
A key factor in becoming a great developer is a good understanding of how end users work with the tools that SharePoint 2010 provides. As a developer, you may often be asked to build a solution or a Web Part that accomplishes a specific task. Taking advantage of the out-of-the-box features can get you up to speed faster. Sometimes, you may even end up with a solution that requires no programming and no new code.
As you learned in the first chapter, the best SharePoint developers know how to leverage the platform and use the tools that SharePoint supplies. You’ll most likely build better Web Parts if you know how your end users will use your Web Parts and how they’ll create their own applications using them. In this chapter, we’ll explore a few of those possibilities.
Once you know what users can accomplish using only the web interface and SharePoint Designer, you should use the same techniques. You can use the built-in Web Parts to create mockups and demos to show a concept application or to validate your solution with your customer even before you start programming. The out-of-the-box Web Parts can also be a part of your final solution, in combination with your custom Web Parts and pages.
The first thing you’ll notice in SharePoint 2010—if you’ve worked with SharePoint before—is the new user interface. Menus have been drastically changed and moved around and the interface has a more modern design, but it won’t be long before you find your way around and feel at home. SharePoint hides a lot of functionality to avoid cluttering the interface; for example, the Web Part options menu in the upper-right corner of the Web Part is visible only when you select it or hover over the Web Part with your mouse.
SharePoint has several new and improved features such as the Ribbon (you’ll recognize it from Microsoft Office 2007) and Ajax dialog boxes and notifications. These components, which you’ll learn about in the next section, make SharePoint efficient to work with. They also give you, the developer, a whole new way to interact with the users of your Web Parts.
Tip
If you’re upgrading or have upgraded your SharePoint 2010 site from SharePoint 2007, you’ll notice that the new version retains the SharePoint 2007 interface. This is because of the enhanced SharePoint upgrade procedure that uses the backward-compatible master pages. You can switch over to the new 2010 interface at any time, temporarily or permanently, using the Visual Upgrade option found under Site Settings.
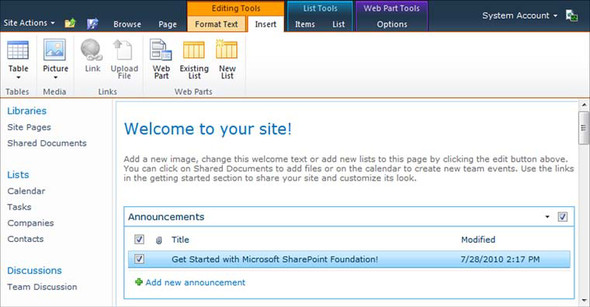
Microsoft Office 2007 introduced a revolutionary and innovative interface, including the now well-known Ribbon interface. The Ribbon is the new combined menu and toolbar and is based on the user’s current context; for example, if the user is editing a table, the table editing commands appear. This context-aware interface has now made it into SharePoint 2010 (see figure 2.1) and is one of the most significant UI changes for end users.
Figure 2.1. SharePoint 2010 includes the Ribbon toolbar, introduced in Office 2007. The Ribbon is context aware, which means it changes its contents depending on what the user is doing.

The Ribbon consists of a number of tabs that are divided into sections containing controls. These tabs are context aware and appear when needed. For example, when you’re editing a page, the Editing Tools tab containing the Format Text and Insert tabs appears, as you can see in figure 2.1. The tabs and sections are dynamically loaded without any postbacks and screen refreshes, which makes the interface easy and fast to use. Even a Web Part, such as the SharePoint Server Media Web Part, can have its own Ribbon controls.
The Ribbon experience is extensible in that you can add and remove tabs, sections, groups, and controls to make a superior end user experience. Chapter 10 will introduce you to the Ribbon objects and show you how to create Ribbon- and context-aware Web Parts.
SharePoint has borrowed other features from the Microsoft Office UI, such as Live Previews and Galleries. Live Previews facilitate the editing process and allow you to preview your design changes without saving the information.
The Ribbon is not the only interface improvement in SharePoint 2010. There are several features that you as a developer can take advantage of and plug into. SharePoint is using Ajax-based dialog boxes and notifications as well as other JavaScript-based features that you can extend.
To avoid postbacks and make the web interface faster and more intuitive, SharePoint uses the new Ajax-based Dialog Framework, a JavaScript-based framework for creating modal dialogs. When you click to edit an item in a list, instead of going to a new page, which you did in SharePoint 2007, you’re now presented with an in-browser overlay pop-up window.
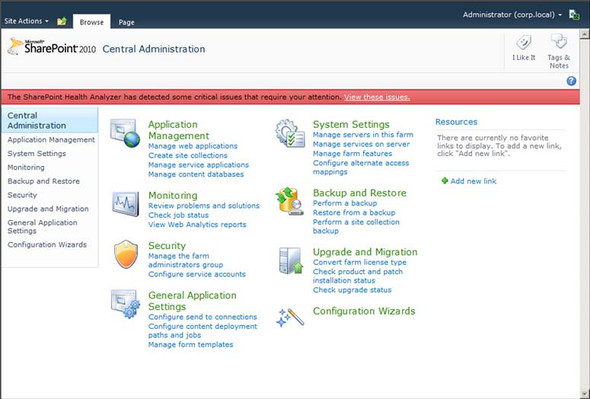
Another dynamic interface feature is the status bar, which is located under the Ribbon. This bar is used to provide status messages to the user and optionally gives the user the opportunity to take some action without stopping work. The status bar can be used to alert users about configuration errors or that certain actions need to be taken. For example, the status bar is used when you have a save conflict on a Web Part page. In Central Administration (Central Administration is the SharePoint administration website), the status bar notifies administrators when the Health Analyzer has detected issues (see figure 2.2).
Figure 2.2. The Central Administration in SharePoint contains a Health Analyzer that analyzes the current state of the farm. If any critical errors are found, the Health Analyzer uses the status bar to notify administrators.
Notification messages are the small messages that appear below the Ribbon on the right side when, for instance, a page is loading or saving. The difference between the status bar and notification messages is that the status bar is used for more persistent user information whereas notification messages are used for transient information. Chapter 10 will show you how to utilize these new features in your Web Parts.
You can use all these features to create just the user experience that you want, and I’ll show you how it’s done in this book.
You choose Web Parts from the Web Part Gallery, which you’ll find in the Ribbon menu when editing a page. The gallery is a site collection-based library that contains information and metadata about the Web Parts that are available to end users in that specific site collection. The gallery is used to publish the Web Parts that you build or install so that your users can select the Web Parts they want. Using the gallery or directly importing Web Parts is the only way for users to add Web Parts to a page.
Each site collection has its own gallery; you can access a gallery by choosing Site Settings and, under the Galleries section, clicking on Web Parts. SharePoint displays a list of all the available Web Parts in the gallery (see figure 2.3).
Figure 2.3. The Web Part Gallery contains all installed Web Parts for the current site collection and is used to locate and add Web Parts to pages.
Not only does the Web Part Gallery host the Web Parts but it also contains metadata about how Web Parts are organized in groups as well as permissions for Web Parts. As a developer, you can deploy your default Web Part configuration into the gallery, and the site collection administrator can, at any time, change the configuration of any Web Part in the gallery. In this section, I’ll walk you through the gallery so that you’ll know where your Web Parts are deployed and how they can be used and configured after deployment.
The Web Part Gallery is a special catalog created by SharePoint to host the site collection’s Web Parts. When users are building Web Part pages using either the browser or SharePoint Designer, they pick the Web Parts they need by selecting them from the gallery. The gallery doesn’t contain the compiled Web Part assembly; it’s simply a list of Web Part items with metadata columns and a file attachment that contains a Web Parts control description file. This file contains the default value used by any created instance of the Web Part as well as the reference to the assembly and Web Part class. All Web Parts can also have a group value, which is used for organizing and grouping the Web Parts.
The Web Part Gallery contains a set of preconfigured templates for Web Parts that editors can choose from. When you’re adding a Web Part to a page, the Web Part properties are copied from the control description file to the page. If you later go back and edit the Web Part in the gallery, this change won’t affect Web Parts that have already been added. Chapter 3 will show you what the Web Parts control description file looks like and how it works. When I talk about Web Parts in the Web Part Gallery, I’m referring to the definition and configuration of a Web Part. That’s also what end users are referring to when they talk about Web Parts. When a developer talks about a Web Part, they’re most often talking about the Web Part class existing in an assembly.
When working with pages programmatically, you don’t have to use only the Web Parts listed in the gallery—you can use any Web Part that you create through code. This topic will be discussed further in chapter 15 when we explore building pages and dashboards.
If you’re adding Web Parts to a page, you also have access to a special group called Lists and Libraries. This category contains the XSLT List View Web Parts (see section 2.3.1) configured for all available lists and libraries in the site and shows a view of the selected list.
- Upload a Web Parts control description file (.webpart).
- Populate the gallery with Web Parts discovered in registered assemblies.
The first approach, uploading a Web Parts control description file, is also used behind the scenes when you install a SharePoint solution package containing Web Parts. You simply click the Upload Document button in the gallery and, when the file is uploaded, you’re prompted to configure the Web Part with a title, description, and so forth, before you save the item.
In the second method, which involves discovery of Web Parts in registered assemblies, you click the New Document button in the gallery. SharePoint iterates all assemblies registered as safe in the web.config file and then searches for any classes inheriting from the System.Web.UI.WebControls.WebParts.WebPart class and displays a list of them. When you select one or more of the Web Parts in the list and click Populate Gallery, SharePoint creates the Web Parts control description files for you automatically and adds the Web Parts to the gallery. Using the populate method has a drawback: the Web Part won’t get any default property values, which may result in unexpected behavior. Only use this approach when you have to or when you need to modify and upload a default control description file.
If you want to edit the metadata and information of a Web Part in the gallery, you first have to go to the Web Part Gallery, which you’ll find in the Site Settings of the site collection. Note that, if you’re in a subsite, you have to navigate to the root site and choose Site Settings. The Web Part Gallery is located under the Galleries section; just click the link to view the gallery.
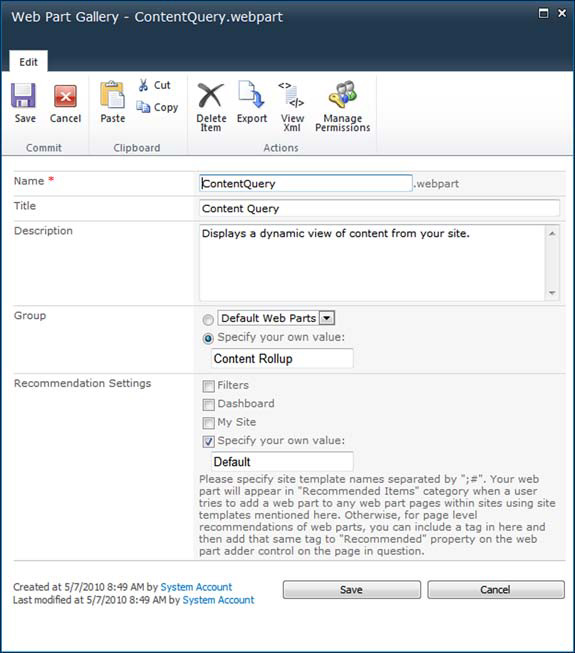
The gallery is just like any SharePoint list and can be sorted and filtered. This is great if you have a lot of Web Parts, especially when you’re using SharePoint Server 2010 and have a number of features activated. When you click on one of the Web Parts listed in the gallery, you’ll see the Web Part Preview page, which shows you the Web Part in preview mode. To edit the Web Part metadata, select the Web Part, click the Documents tab in the Ribbon, and click Edit Properties (or you can click the edit icon that appears directly to the right of the Web Part name). A dialog box appears (as shown in figure 2.4), where you can edit the properties of the Web Part. These aren’t the Web Part properties that are stored in the Web Parts control description file discussed in chapter 5; you’re editing metadata about the Web Part configuration in this site collection. The dialog box lets you change the title, description, grouping, and other properties for the Web Part. Save the information by clicking the Save button in the Ribbon.
Figure 2.4. You can configure, group, export, and manage the permissions for the Web Parts in the Web Part Gallery catalog, accessed from the Site Settings page.
Note
Web Parts are grouped in the gallery, which helps end users find the relevant Web Part more easily. The groups are defined by the metadata on the Web Part in the gallery and can be changed by users who have appropriate permissions. Custom-developed and imported Web Parts appear in the Custom group unless otherwise specified. In chapter 3, you’ll learn how to define these groups in your custom solution.
If you want to change groups or add groups to a Web Part in the gallery, you have to edit the Web Part metadata. You can specify a new group name or use the default ones to group your Web Parts.
Not all users can add Web Parts to the gallery, but, by default, all users with permissions to edit a page can use all the Web Parts in the gallery. Only users with the Design or Full Control permission level are allowed to add or edit Web Parts in the gallery. More specifically, you need the Manage Lists list permission to be able to edit the gallery.
Normally, there’s no need to prohibit users from using all the Web Parts available in the gallery. Instead, you build Web Parts in such a way that they display a friendly error message if they’re used or viewed by someone who shouldn’t have access. For example, if you create a Web Part that reads information from a restricted content source and displays that data, you should make sure in your Web Part that only the intended users can see that information.
Sometimes, it’s necessary to hide Web Parts from the editors so they don’t use them. You can do this by modifying properties on the Web Part and then selecting Manage Permissions. The permissions are, by default, inherited from the gallery, which is, by default, inherited from the site. So you first have to break the permission inheritance and then set the permissions that you want the Web Part to have. This only prevents the editors from using the Web Part when creating a new page and it doesn’t hide any Web Parts currently used on pages or prohibit users from seeing Web Parts.
SharePoint 2010 comes with a number of out-of-the-box Web Parts that are available for end users to use when they’re creating pages and dashboards. The Web Parts that are included reflect which version of SharePoint is installed, which site template is used, and which features are enabled on the site collections. Not all Web Parts are available through the gallery. Some, like the Data Form and the XSLT List View Web Parts, need to be added and configured using SharePoint Designer. Some you have to add manually to the gallery.
The following sections cover the most important out-of-the-box Web Parts in SharePoint. I’ve separated them into the free version SharePoint Foundation 2010 and the license-based version SharePoint Server 2010 so that you can see the differences. For a full list of Web Parts and more details, see appendix A.
SharePoint edition details
The official SharePoint web site contains a detailed edition comparison diagram where you can see what features each edition contains. Compare the features of the SharePoint Foundation, SharePoint Server Standard and Enterprise at http://sharepoint.microsoft.com/en-us/buy/pages/editions-comparison.aspx.
SharePoint Foundation 2010, which is the entry-level edition of SharePoint 2010, contains a set of Web Parts. They’re either generic, for information display, or focused on building simple collaboration sites. Table 2.1 lists the Web Parts that you can find in the gallery in a SharePoint Foundation site.
Table 2.1. The Web Parts of SharePoint Foundation
| Description |
Group |
|
|---|---|---|
| HTML Form Web Part | Connects simple form controls to other Web Parts. | Forms |
| Picture Library Slide-show Web Part | Creates a slideshow of pictures from a picture gallery. | Content Rollup |
| XML Viewer | Imports an XML source and transforms it using an XSLT document. For example, it can be used to import an RSS feed, which is then transformed using a custom XSLT into displayable content. | Content Rollup |
| Relevant Documents | Displays relevant documents for the current user. | Documents |
| Content Editor | Used to add formatted text, tables, and images to a page. Can be used to add JavaScript functions to the page. | Media and Content |
| Image Viewer | Shows an image. | Media and Content |
| Page Viewer | Allows you to frame in another or external page in the page. This Web Part can be used to add framed custom external applications to a site. | Media and Content |
| Silverlight Web Part | Adds a custom Silverlight application to the page. | Media and Content |
| Site Users | Shows the current users and groups of a site. | People |
| User Tasks | Displays the current tasks for the user from the site where the Web Part is placed. | People |
The generic Web Parts, such as Content Editor, HTML Form, and XML Viewer, can be used to create basic applications. For instance, you can use Content Editor to execute JavaScript code or insert custom HTML into a page. Using HTML Form, you can create an input form that creates a filter for other Web Parts.
The Silverlight Web Part—new in SharePoint 2010—allows you to add a Silverlight application to your site by either uploading a Silverlight XAP file to a document library or linking to an external XAP file. Using this Web Part and the Client Object Model (discussed in detail in chapter 11), you can create rich and advanced applications without even touching the server. Silverlight is a convenient way to extend your SharePoint site in situations when you aren’t allowed to add server-side code and can’t use sandboxed solutions.
Some of the out-of-the-box Web Parts aren’t accessible from the Web Part Gallery and are often overlooked by developers. These include the Data Form Web Part (known as the Data View Web Part in SharePoint 2003) and the new XSLT List View Web Part, as shown in table 2.2. They can only be added to SharePoint programmatically or by using tools such as SharePoint Designer 2010. The configuration options of these Web Parts are advanced and that’s one of the reasons they can’t be created through the web interface. On many occasions you can use these Web Parts rather than developing a custom Web Part.
Table 2.2. SharePoint Foundation Web Parts not available in the web interface
| Description |
|
|---|---|
| Data Form (DFWP/DVWP) | The Data Form Web Part can be used to create views from external sources such as Web Services and SQL Server databases. It’s still called the Data View Web Part internally. |
| XSLT List View (XLV) | This is a new Web Part in SharePoint 2010 and replaces the List View Web Part. It’s based on XSLT instead of Collaborative Application Markup Language (CAML). |
The XSLT List View Web Part, new in SharePoint 2010, is superseding the old CAML-based List View Web Part. Instead of using CAML formatting to generate the output of the Web Part, the XSLT List View Web Part uses Extensible Stylesheet Language Transformation (XSLT). XSLT is a more standardized approach, and you’ll find it easier to learn XSLT than CAML. I recommend that you get up to speed on XSLT; not only is it used in this Web Part, but it’s also leveraged in other Web Parts, such as some of the Search Web Parts. The XSLT List View Web Part also has better performance and supports in-browser editing compared to its predecessor.
Note
The Collaborative Application Markup Language (CAML) is an XML-based language that’s used by SharePoint. It’s mainly used to query the information in SharePoint but also provides support for defining data and rendering. Support for rendering in previous versions of SharePoint was provided in the List View Web Part, which has been replaced by the new XSLT List View Web Part.
The Data Form and XSLT List View Web Parts support rich customization with SharePoint Designer 2010, with support for extensible, shareable view styles and conditional formatting.
Tip
To learn more about the Data Form Web Part and how to work with the out-of-the-box Web Parts without any code there is a great set of series and blog posts at the End User SharePoint section at www.nothingbutsharepoint.com.
When using a SharePoint 2010 Server edition, you get a whole lot of Web Parts in the different features. SharePoint Server is essentially SharePoint Foundation with a set of features and services applied to it, which means that all the Web Parts listed in tables 2.1 and 2.2 also are available in SharePoint Server.
SharePoint Server comes in two major editions: Standard and Enterprise. The Enterprise edition has a number of features and Web Parts that aren’t available in the Standard edition. This section doesn’t separate the Standard and Enterprise Web Parts, but appendix A lists all Web Parts available in SharePoint Foundation, Standard, and Enterprise and indicates the edition in which they’re accessible.
When you create a site, you won’t see all these Web Parts in the site collection’s Web Part Gallery by default. They’ll appear only when features are turned on or installed. For example, you won’t have access to the PerformancePoint Web Parts until the PerformancePoint feature is activated.
I’ve grouped the Web Parts using the same default groups in which the Web Parts appear in the gallery. First is the most used: Content Rollup.
Content Rollup Web Parts are used to collect and merge content and information from lists and sites and create views. Table 2.3 lists the rollup Web Parts that are available in SharePoint Server.
Table 2.3. Content Rollup Web Parts in SharePoint Server 2010
| Web Part name |
Description |
|---|---|
| RSS Viewer | Shows an RSS feed. |
| Web Analytics | Displays configurable popular contents for the site or site collection. |
| Content Query (CQWP) | Dynamically rolls up content and information and creates a view for end users. |
The most interesting and the most used in this group is the Content Query Web Part (CQWP). It can, for instance, be used to show items of specific content types from all subsites and present them to end users. To use the CQWP, you have to activate the SharePoint publishing infrastructure feature on your site collection. The CQWP has had numerous improvements since the 2007 version; here are a couple most important ones:
- In-browser support to pass additional fields to the XSLT transformation
- Dynamic filters based on Page fields and query string parameters
If your solution calls for rolling up content, this is the Web Part you should start with.
Filter Web Parts are used in combination with other Web Parts. SharePoint Server contains a set of great Web Parts, as shown in table 2.4. Filter Web Parts are used to filter the contents of other Web Parts using Web Part connections.
Table 2.4. Filter Web Parts available in SharePoint Server 2010
| Web Part name |
Description |
|---|---|
| Text Filter | Filters a Web Part using a value entered by the user. |
| Current User Filter | Sends a user id to a Web Part. |
| Date Filter | Filters a Web Part with a selected date. |
| Filter Actions | Synchronizes two or more filter Web Parts. |
| SQL Server Analysis Server Filter | Filters a Web Part with values from a SQL Server Analysis Server cube. |
| Page Field Filter | Filters a Web Part based on metadata of the Web Part page. |
| Query String (URL) Filter | Filters a web part using query string parameters. |
| SharePoint List Filter | Filters a Web Part using a list of values. |
| Choice Filter | Filters a Web Part using a list of values entered by the page author. |
Web Part Connections
Web Part connections let you connect one Web Part to another to send data or information from one provider Web Part to a consumer Web Part. In chapter 14, I’ll show you all the details you need to build custom connectable Web Parts. In section 2.4.3, you’ll learn how to use Web Part connections.
Chapter 14 provides more information about connecting Web Parts and will give you more details on how these filter Web Parts work. In chapter 15, you’re going to build dashboards and use some filter Web Parts.
The publishing feature of SharePoint Server contains a media Web Part that can display audio and video using a Silverlight player. This Web Part takes advantage of the new SharePoint 2010 features such as the Ribbon for configuration and Silverlight integration. Unfortunately, the Web Part is sealed, which means that you can’t modify or add features to it.
The navigation Web Parts (see table 2.5) are used to enhance websites with improved features such as sitemaps and tag clouds (a visual representation of tags, often weighted) and the ability to display sites in the site directory.
Table 2.5. Navigational Web Parts for use with SharePoint Server 2010
| Web Part name |
Description |
|---|---|
| Sites in Category | Displays sites from a specific category in the site directory. |
| Categories | Displays the categories from the site directory. |
| Site Aggregator | Displays documents and tasks from selected sites. |
| Tag Cloud | Displays a tag cloud of tagged subjects. |
| Summary Links | Displays a list of grouped and styled links. |
| Table of Contents | Displays the sitemap of your site. |
The People Web Parts (see table 2.6) are focused on users and their social activities. For example, you can add the Note Board Web Part to pages for users to create and share notes about that specific page.
Table 2.6. People Web Parts
| Description |
|
|---|---|
| Contact Details | Displays contact details for a specified user. |
| Organization Browser | Silverlight-based Web Part for browsing the organization. |
| Note Board | Allows the user to make a note of the current page. |
SharePoint Server 2010 comes with a highly customizable search engine. The search and results pages are built using a set of Web Parts. In many projects, the search pages are customized with either the out-of-the-box Web Parts or custom-built ones. On many occasions, you may need to tweak the out-of-the-box Web Parts but you can’t achieve what you want by modifying the properties; in such cases, you can subclass these Web Parts. Fortunately, the newly added Web Parts aren’t sealed (most were in SharePoint 2007), so they can be subclassed and you can create your own inherited Web Parts from them. Table 2.7 shows the most important Search Web Parts and indicates whether they’re sealed.
Table 2.7. Search Web Parts of SharePoint Server 2010
| Web Part name |
Description |
Sealed |
|---|---|---|
| Advanced Search Box | Parameterized options for search | Yes |
| Federated Results | Shows the search results from a federated (external—non-SharePoint) location | No |
| People Refinement Panel | Used to refine people search results | No |
| People Search Box | A search box used to search for people | No |
| People Search Core Results | Displays the people search results | Yes |
| Refinement Panel | Refinements for search results | No |
| Related Queries | Displays queries related to the current | No |
| Search Best Bets | Displays the best bets of the search results | Yes |
| Search Box | Displays the search box to search for information | Yes |
| Search Core Results | Displays the results of a search or search actions | No |
| Top Answer | Displays the top federated results from a federated location | No |
| Visual Best Bets | Displays visual best bets | No |
The Search Web Parts don’t use Web Part connections to provide and consume information from one another. Instead, they use a special object on the page called SharedQueryManager, from which all Search Web Parts locate and retrieve information. The best way to learn how these Web Parts work is to go to a Search Center in your SharePoint site and edit the search and results page and see how the various Web Parts interact with one another.
SharePoint Server comes with My Information Web Parts, which can be integrated with Outlook Web Access (OWA), the web version of Microsoft Exchange Server. These Web Parts, listed in table 2.8, are normally used on the profile pages.
Table 2.8. My Information Web Parts for integration with Outlook Web Access
| Web Part name |
Description |
|---|---|
| My Mail Folder | Displays a mail folder from OWA. |
| My Calendar | Displays your calendar from OWA. |
| My Contacts | Displays your contacts from OWA. |
| My Inbox | Displays your inbox from OWA. |
| My Tasks | Displays your tasks from OWA. |
The Business Data Web Parts are used to leverage information from Business Connectivity Services (BCS). Even though BCS is a part of SharePoint Foundation 2010, these Web Parts are only available in SharePoint Server 2010. Table 2.9 lists the available Web Parts in this category.
Table 2.9. Business Data Web Parts in SharePoint Server 2010
| Web Part name |
Description |
|---|---|
| Business Data Actions | Lists available actions for a specified external content type. |
| Business Data Connectivity Filter | A filter Web Part that provides the consumer with a set of values from the Business Connectivity Services. |
| Business Data Item | Displays a specific item from an external content type. |
| Business Data Item Builder | Creates a BCS item using query string parameters and provides this item to other Web Parts. |
| Business Data List | Displays a list of items from an external content type. |
| Business Data Related List | Lists related items from one or more parent items. |
| Indicator | Displays a single status indicator. |
| KPI List | Displays a list of status indicators. |
PerformancePoint Services are a new feature of SharePoint Server with business intelligence features. If you’ve configured PerformancePoint Services 2010 in your SharePoint Server farm and you’ve activated the PerformancePoint Feature, you’ll get a handful of specialized Web Parts for that service application.
The Office Client Web Parts, listed in table 2.10, are part of the Enterprise edition of SharePoint Server and are used to display Office files. They include Excel Services, which can display a workbook as a web page and InfoPath Form, which can be used to display InfoPath-based forms as Web Parts that can be connected with other Web Parts.
Table 2.10. The Office Web Application Client Web Parts
| Web Part name |
Description |
|---|---|
| Excel Web Access | Shows an Excel Workbook as a web page. |
| InfoPath Form | Displays an InfoPath browser-enabled form. |
| Visio Web Access | Shows a Visio Web Drawing (.vwd file). |
| WSRP Viewer | Shows portlets from websites using Web Services for Remote Portlets (WSRP) 1.1. WSRP is an OASIS-approved standard for communications with remote portlets. |
Web Parts, whether custom or default, are self-contained applications. You can create them so that end users can configure them, or you can provide no configuration options at all. Web Parts can be added to pages and may be connected with other Web Parts to create new applications or mashups.
Users with appropriate permissions can create and edit Web Part pages in SharePoint to create their own solutions. They’re provided with a set of out-of-the-box Web Parts as well as those custom Web Parts that are installed in the site collection’s Web Part Gallery. Using only a web browser, users can add Web Parts and connect them using the user-friendly SharePoint 2010 interface.
The following sections will show you how to create a page, add a Web Part, and filter it using a Web Part. We’ll build a new page that contains a view of a library and use a connected HTML Form Web Part to filter the list.
The task of creating a page has been improved in SharePoint 2010. In earlier versions, only publishing sites had the benefit of a decent user interface that was adapted for creating and editing pages. Nearly all SharePoint sites are now created with a Site Pages library to contain site pages.
To create a new page, all you have to do is either add a new page in the library the traditional way—by adding a new item to the library—or select Site Actions > New Page. These two methods differ slightly; the former will make you fill in the standard New Item form and then return to the library. The latter shows you a simple interface where you just enter the name of the page and, once the page is created, you enter Edit mode. The option to create a page isn’t available on all sites; it depends on which definition or template the page is based on.
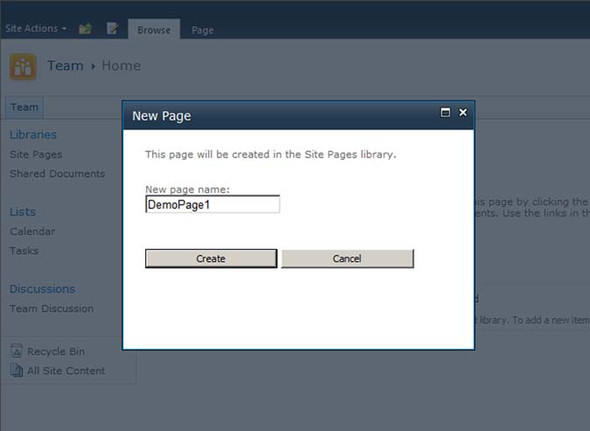
To create the page, choose Site Actions > Create Page and enter the page name. Then you simply click Create. Figure 2.5 shows adding a new page called DemoPage1.aspx. You don’t need to specify the .aspx file extension—it’s automatically added to the file.
Figure 2.5. The New Page dialog box used to create new pages uses the new Dialog Framework. It improves usability by reducing the number of page loads and makes the interface user friendlier and faster.
Note
To be able to add or edit a page, you must have the permission level of Contributor on the list or the page itself. By default, Contributor has the Add, Edit, and Delete permissions on list items.
Now you have a page to which you can add Web Parts and content. Because you created it using the Site Actions menu, you should be in Edit mode. Next, I’ll walk you through the steps to add Web Parts using this mode. (If you later want to edit the page, click the Edit button on the Quick Access toolbar or the Edit button on the Page tab of the Ribbon.)
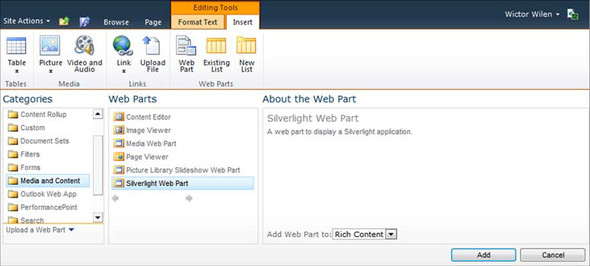
When you’re in Edit mode, the Ribbon will adapt its contents accordingly and you’ll see two new tabs, Format Text and Insert, under the Editing Tools tab group. To insert a new Web Part, select the Insert tab and position your cursor in a Web Part zone or wiki content area. The Insert tab contains a group called Web Parts, and within that group, you have a Web Part button, as you can see in figure 2.6.
Figure 2.6. The Ribbon adapts to your current context. If you’re editing a Web Part page, the tools for editing content and adding new Web Parts appears. And if you select a Web Part when editing the page, the Web Part tools and, optionally, Web Part–specific tabs appear.
To insert a Web Part, click the Web Part button, which opens the Web Part Gallery. Our first Web Part on this page is List View, which shows the Site Pages library. The List View Web Parts are automatically created for all lists and libraries in the site using the XSLT List View Web Part. They’re located in the Lists and Libraries category in the gallery. Select the Site Pages Web Part and then click the Add button in the lower right of the gallery. If you placed your cursor in the wrong Web Part zone, you can use the Add Web Part To dropdown menu to change the target zone of your Web Part.
When you select a Web Part in the gallery, a preview of the Web Part appears to the right, along with the name and the description. You can modify the name and the description in the gallery. The preview of the Web Part is created by the developers of the Web Part. In chapter 5, I’ll show you how to create a good preview of the Web Part, designed to help your users and spare you and your administrators support time.
Once you add the Web Part, the web page will be updated automatically. Note that this is done asynchronously in SharePoint 2010 compared with SharePoint 2007, which reloaded the whole page. You should now see the Site Pages library on your pages showing all the pages within it.
The Web Part will have all its default values set and you can now edit those properties. To begin, select the Web Part and click the Web Part menu, located in the upper-right corner of the Web Part, and choose Edit Web Part. The Web Part menu is only visible if you’ve selected the Web Part by clicking it once or if you hover over the Web Part with your mouse. The Web Part tool pane appears to the right. If your page is in Edit mode, you can also access the tool pane by clicking the Web Part Properties button on the Ribbon.
The tool pane consists of two types of Editor Parts, controls that are used for editing properties of a Web Part. Some of the Editor Parts in the pane are automatically created for every Web Part and you the developer can add new ones. (You’ll learn more about Editor Parts in chapter 5.) Figure 2.7 shows editing properties for a list that uses the XSLT List View Web Part.
Figure 2.7. You edit the properties of a Web Part in the editor pane, which consists of Editor Parts. Each Web Part type has its own setup of Editor Parts.
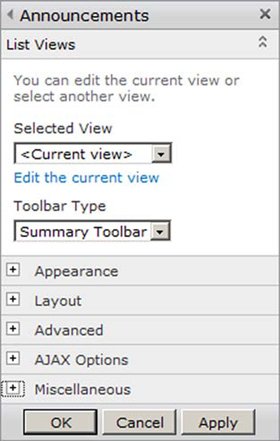
The following Editor Parts are automatically added to your Web Part:
- Appearance— Controls the visual style of the Web Part.
- Layout— Controls how the Web Part appears in the Web Part zone.
- Advanced— Contains advanced options.
To change the properties, just modify the values in the Editor Part controls and click OK. At that point, the editor pane closes. If you click Apply instead, the changes will be saved but the tool pane will still be available for you to make more changes.
Once the Web Part is added to the zone and you’re done editing properties, you can save the page. Do so by clicking the Save button on the Quick Access toolbar or by clicking Save on the Page tab on the Ribbon.
The ability to connect Web Parts is a powerful feature and can be done using the web interface. A common use is filtering a Web Part based on information in another. Web Parts connections can be used to build mashups that combine information from one or more sources. When you’re connecting Web Parts, SharePoint is sending information from one Web Part, called the provider, to another Web Part, called the consumer.
In our earlier example, you added the SitePages Web Part to a page. If you’d like to filter this library depending on some input from your users, you could add an HTML Form Web Part and let that Web Part send values to the SitePages Web Part. The HTML Form Web Part consists of an editable Web Form that provides an input box and a button by default.
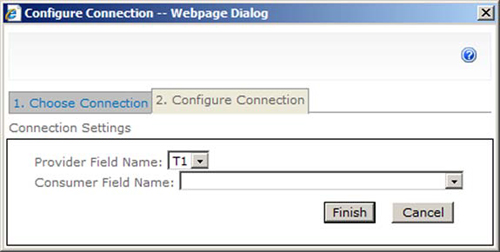
To connect the default HTML Form Web Part to the SitePages Web Part, you use the Web Part options menu and select Edit Web Part, just as you do when editing its properties. The options menu will then display a Connections option. Choose Connections > Provide Form Values To > Site Pages and a dialog box will appear, as shown in figure 2.8. You use this dialog box to configure the connection. First, on the Choose Connection tab, select the connection type—in this case, Get Filter Values From—and then click the Configure button to continue to the next tab. On the Configure Connection tab, click the Provider Field Name dropdown list and select the name of the field in the HTML Form Web Part (the default is T1). Then, choose the consumer field name from the Consumer Field Name dropdown list; for this sample, specify the Name field. Then, click Finish to complete the connection configuration and save the page to store the changes.
Figure 2.8. Use the Configure Connection dialog box when connecting Web Parts to send values from one Web Part to another.
To test your connection, enter the name of any page in the Site Pages library, such as Home.aspx, and then click OK in the HTML Form Web Part. The screen should refresh and you should now only see one page in the SitePages Web Part.
Our example using the out-of-the-box Web Part that you just connected illustrates just one way to create an application using Web Parts. In many cases you configure the Web Parts for your users using the Web Part’s properties, and sometimes you allow users to configure the Web Parts themselves. Web Parts and Web Part pages have two major views: Shared and Personal. These views are also often referred to as customized or personalized views. The Shared view is the default view of a page and its Web Parts, managed by the page editor. All users will see the Shared view until they decide to make changes to the page. To do so, they’ll create a Personal View of the page, in a process known as personalization.
It’s important to understand the differences between the Shared and Personal views and the implications:
- The Personal view can only be seen by the user.
- The Personal view is the default view if it exists.
- Changes to Web Part properties in the Shared view won’t override the Personal view properties.
- Not all properties can be changed in the Personal view.
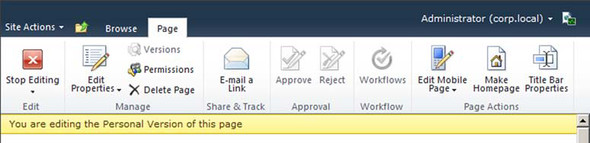
Before you make any changes to a Web Part page, make sure that you are in the correct view by checking the Users menu in the upper-right corner. If it displays the option Show Personal View, then you’re in the Shared view; if it says Show Shared View, you’re in the Personal view; and if neither option appears, that also means you’re in the Shared view. When you’re in Edit mode and Personal view, the status bar will show that you’re editing the personal version of the page, as shown in figure 2.9.
Figure 2.9. The status bar displays when the current page is edited in Personal view and this version of the page is only available to the current user.
Chapter 5 describes how you as a developer can adapt your Web Part to take advantage of Shared and Personal views. For example, you can prohibit a user from changing a specific property on a Web Part in the Personal view. This section presents an overview of Shared and Personal views. We’ll also explore the difference between closing and deleting Web Parts. Finally, we’ll take a look at the Maintenance view, which can be used to look at all the available Web Parts without rendering them. You’ll find this view handy if you have a Web Part that fails and prevents the page from rendering.
Shared is the default view of a Web Part page. The Shared view uses the default values or those specified by the page editor. Any changes to the page and its Web Parts will be seen by all users who haven’t personalized the page.
When a new Web Part is added to the Shared page, it also appears in all the Personal views, which may cause the Personal views to look different. When Shared Web Parts are deleted, they’re also deleted from the Personal views together with all personalization.
The Personal view is created once a user who isn’t a page editor (and thus cannot change the Shared view) wants to change anything on the Web Part page. In the personalization process, SharePoint combines the Shared view with all the personal changes into the Personal view.
A user can add, edit, or close Web Parts from the Personal view without these changes being reflected in the Shared view. The user can’t delete Web Parts that are created in the Shared view but can delete those that are added in the Personal view. Normally, properties such as Appearance and Layout can be changed, such as the height and width of a Web Part or how many items should be listed in a specific Web Part. Users can move Web Parts to different zones and customize the page. Web Parts in Wiki Content zones can’t be moved or closed in the Personal view.
If a page is personalized, SharePoint uses the Personal view by default. If you want to make changes to the Shared view, select User > Show Shared View. Use the same menu to switch back to the Personal view by selecting Show Personal View.
If you’re a wiki page editor and want to create a Personal view of the page, you have to add PageView=Personal to the URL of the page, as in
Likewise, this parameter can be used to show the Shared view, by appending PageView=Shared to the URL. In standard Web Part pages, choose Users > Personalize This Page to create a Personal version of the page.
One very important thing to keep in mind is that there’s a big difference between closing and deleting Web Parts. Deleting a Web Part does exactly what it says; it removes the Web Part from the page, including all customization and personalization. Closing a Web Part, on the other hand, only makes the Web Part invisible—the Web Part is still loaded when the page is rendered but it doesn’t do anything. If the user wants to remove a Web Part from a personalized page and the Web Part is added to the Shared view, the user only has the option to close the Web Part because it can’t be deleted from the Personal view. Having a lot of closed Web Parts can cause performance implications for your site both in terms of speed and storage. In chapter 4, I’ll show you why it can slow down your page, and, in chapter 5, you’ll learn how to prohibit the users from closing Web Parts.
All closed Web Parts are accessible through a special group in the Web Part Gallery for the page called Closed Web Parts. This is a virtual group and only appears in the gallery when there are closed Web Parts. It doesn’t correspond to any group in the site collection’s Web Part Gallery; it exists only for the actual page. To restore a closed Web Part, select the Web Part from the Closed Web Parts group and add it back to any zone on the page.
If you’re editing a page and you want to ensure that any changes you make are reflected for all users, you can remove all Personal views for that page by appending Contents=1 to the page URL—for example:
This will redirect you to the /_layouts/spcontnt.aspx page, called the Web Part Maintenance page (see figure 2.10). This page will display all Web Parts that are used on the page without loading and rendering them. It will show Web Parts that you won’t see in the normal views—for instance, if they’re closed, hidden, or in any way failing. This application page can be used to reset, close, or delete Web Parts.
Figure 2.10. The Maintenance View of a page can be used to close, reset, and delete Web Parts from the Shared or Personal Views when, for instance, a Web Part fails to load and makes the whole page inaccessible.
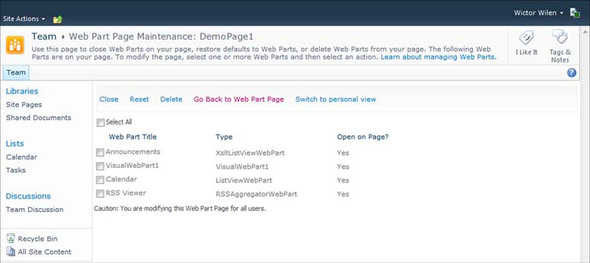
If you have a Web Part that fails and crashes the whole page you’re using, perhaps due to bad error handling in your code or someone else’s, enter the Maintenance mode of the page and delete the failing Web Part(s). Simply check all the Web Parts that you’d like to remove and click the Delete link. If you select to close a Web Part instead, it’s not removed and you can restore it as described in the previous section.
You can reset Web Parts if you’ve reconfigured a Web Part in the Shared view and you’d like to remove all personal settings. This approach will reset the selected Web Parts in all Personal views to the current Shared view configuration.
Using the SharePoint web interface to customize Web Parts and build simple mashups is just one method. Sometimes using the free tool called SharePoint Designer 2010 is the better choice.
Take our tour and find out more about liveBook's features:
- Search - full text search of all our books
- Discussions - ask questions and interact with other readers in the discussion forum.
- Highlight, annotate, or bookmark.
During recent years, no-code or assembly-free solutions have become quite popular. No-code solutions is the term used when you mean that you don’t put any compiled code on the server. Instead, you use clever workarounds with the Data Form Web Part, JavaScript, jQuery, calculated columns, or other techniques. A user who has the knowledge of these techniques can accomplish a great deal. But this approach also has its drawbacks when it comes to users who don’t master the techniques and mess up the functionality.
One of the items that should be in every SharePoint developer toolbox is SharePoint Designer 2010. This tool is a non-code-oriented application for customizing and editing your SharePoint sites. SharePoint Designer 2010 can be used to create reusable applications and features, something previous versions didn’t allow. You can create solutions using SharePoint Designer and configure and export them as solution packages. You can then import these packages into Visual Studio 2010 and prepare them for deployment. For example, if you create a Web Part page or a dashboard or customize a site in SharePoint Designer, you can reuse the page, dashboard, or site by packaging it as a deployable and maintainable solution in Visual Studio.
SharePoint Designer fun fact
Before SharePoint Designer, Microsoft had an application called Microsoft FrontPage that you could use to edit and create web pages. FrontPage acted as an editing client to SharePoint 2003, using extensions to IIS called FrontPage Server Extensions.
FrontPage received criticism for creating invalid HTML markup and for changing the HTML without telling you. When Microsoft released SharePoint Designer 2007, it discontinued the FrontPage product.
SharePoint Designer 2010 is a free and downloadable application that can be used to customize and control SharePoint 2010. Using SharePoint Designer, you can create new items such as sites, lists, and content types. You can also edit and configure these items as well as change the layout of pages and edit the master pages. SharePoint Designer can do everything that you do using the web interface and more. For example, using SharePoint Designer, you can create external content types and connect to the external data; you can’t do this using the web interface.
You have to use SharePoint Designer 2010 if you’re going to use the Data Form Web Part or customize list views using the XSLT List View Web Part. These two Web Parts are powerful and require a far more advanced user interface than the one available in SharePoint.
SharePoint Designer 2010 can only be used for editing SharePoint 2010 sites, and SharePoint Designer 2007 can’t be used with SharePoint 2010. If you need to work with SharePoint 2007, you have to use SharePoint Designer 2007.
Note
You can download SharePoint Designer 2010 from http://sharepoint.microsoft.com/. If you do not have SharePoint Designer installed when choosing to open it using the Site Actions menu, you will be redirected to the download page of SharePoint Designer.
By now, you should be familiar with the web interface and how users and administrator can work with Web Parts. The following sections will explore similar scenarios but using SharePoint Designer 2010. We’re also going to look at how to export and import a Web Part.
Just as you can use the web interface to add Web Parts to a page, you can use SharePoint Designer to do the same. The benefits of using SharePoint Designer instead of the web interface are:
- You can use the Data Form Web Part.
- You can use the XSLT Designer for the XSLT List View Web Parts.
- For other Web Parts, you can access more properties and customization options compared to the web interface.
When working with pages in SharePoint Designer, you can switch between Edit mode and Advanced Edit mode. Edit mode allows you to add and edit Web Parts and content in the zones, just as you’d do in the web interface. But, if you switch to Advanced Edit mode, you can edit the code outside of the zones. This mode allows you to add and configure static Web Parts (those not confined in a zone) or add ASP.NET controls.
To add a Web Part to a page using SharePoint Designer, you have to open the site with the application. This can be done using one of two methods:
- Open SharePoint Designer 2010 and open the site by entering the address of your site.
- Use the Site Actions menu in SharePoint 2010 and choose Edit Site in SharePoint Designer.
Once you have your site opened, navigate to the library using the left-hand navigation in SharePoint Designer. Wiki Page libraries, which the Site Pages library is based on, are listed at the top level. If you’re using another type of library to host your pages, you have to click List and Libraries and browse to your library. When you select one of the libraries, you’ll see a list of all the pages and items in that library. To edit a page, right-click it and select Open from the context menu. If you, instead, click on a page, you’ll see the item’s Overview page in SharePoint Designer. On the Overview page, you can access the Edit page view by clicking Edit in the Customization dialog box.
When you’re in the page’s Edit mode, notice that the Ribbon has changed its context and you now have an Insert tab with a Web Parts group (see figure 2.11). To add a Web Part, place your cursor in one of the zones (or anywhere on the page if you’ve switched to Advanced Edit mode). Then, click the Web Part button and select one of the Web Parts from the dropdown list that appears. The Web Part will be added and selected where you positioned your cursor.
Figure 2.11. When you edit a page in SharePoint Designer, the Ribbon adapts to the editing context and makes the Insert tab visible. The Insert tab gives you access to the Web Part button, which is used to insert new Web Parts.

Web Parts can be configured using SharePoint Designer 2010. If you select a Web Part in SharePoint Designer or if you add a new one to a page, the Ribbon will display the Web Part Tools tab. This tab allows you to edit some of the common properties of a Web Part, such as chrome, size, and connections. If you need to edit the properties of the Web Part, you have to click the Properties button in the Web Part group on the Format tab or right-click the Web Part and select Properties. The resulting dialog box is just a web page that reads the Editor Parts of the Web Part and shows exactly the same interface as you have in the web interface.
If you have properties that aren’t accessible using the web browser or advanced properties that have no default web interface, such as arrays and complex types, you can use SharePoint Designer to set those properties. For example, if you have a property of your Web Part that’s an array of strings, this property won’t get a default property editing interface. Using SharePoint Designer, you can still change these complex properties by selecting the Web Part and then choosing View > Task Panes > Tag Properties in the Ribbon. This will display a task pane in SharePoint Designer that lets you edit all properties publicly exposed by the underlying .NET Web Part class. If you’d like to provide an interface for editing complex Web Parts in the web interface, you need to create your own custom Editor Part; read more about them in chapter 5.
SharePoint Designer lets you add new pages to libraries using the Navigation pane to the left and selecting a library. Once you select a library, the Pages tab will appear. On this tab click the Web Part Page button and select a page design to add a new page. Note that SharePoint creates a Web Part page (not a Wiki page, even if it’s a Wiki Page library). You can then customize this page using the SharePoint Designer editing tools.
When editing, you can add any ASP.NET control or custom control, including new Web Part zones, to a page. Most controls are available from the Toolbox in SharePoint Designer 2010, but not Web Part zones. To add a new Web Part zone, you have to enter code in the Code view of the page editor. Select to edit the page in Advanced Edit mode and then manually write the Web Part zone tags, as shown in listing 2.1. You access Advanced Edit mode by right-clicking on the page and selecting Edit File In Advanced Mode or by clicking the Advanced Mode button on the Edit tab.
This Web Part Zone will have an ID called MyZone and a Title of My Zone. The Zone-Template is empty so there are no Web Parts in it. You will learn more about how to add zones to pages in the final chapter (15) of this book.
When you’re editing pages in Advanced Edit mode using SharePoint Designer 2010 and you save the page, the page will be customized and will no longer be based on the site definition. SharePoint Designer 2010 will warn you when you’re trying to customize a page. All customized pages will have a blue icon in front of them so that you can identify them. If you need to revert back to the original definition of the page, you can right-click or use the Ribbon button Reset To Site Definition to restore the original definition. If you reset a customized page, you’ll lose all your customized settings.
One of the most powerful features in SharePoint Designer 2010 is the ability to import and export information and solutions. If you’re creating and configuring Web Parts using SharePoint Designer, you can export the configuration to a file, which you can then later add to the Web Part Gallery in the same site collection or on a totally different farm, and use it as long as the Web Part assembly is installed. SharePoint Designer also allows you to directly publish a configured Web Part to the local Web Part Gallery so that you can reuse the configuration within that site collection. Publishing the Web Part configurations to the gallery is a good way to reuse configured Web Parts such as the Content Query and XSLT List View Web Parts.
You’ll use the Ribbon to export Web Parts from SharePoint Designer. When you’ve selected a Web Part, the Format tab appears. This tab contains the group Save Web Part, which displays two buttons. The first button, To Site Gallery, saves the selected Web Part configuration to the local Web Part Gallery. The second button, To File, allows you to save the Web Parts control description file on your local drive. Note that for XSLT List View Web Parts the export buttons are located on the Web Part tab instead of the Format tab.
You also have the ability to save a site or a list as templates for reuse, and you can export pages edited in SharePoint Designer so that you can include them in a Visual Studio 2010 SharePoint solution.
Note
SharePoint Designer 2010 is not a tool that you should equip all users with, because it has a lot of powers. If you make changes to, for instance, the master page and it fails, your whole site will fail. To secure your SharePoint environment, you can lock down SharePoint Designer using settings in the sites or the Central Administration tool.
When working with SharePoint, you most often have several environments, such as development, test, staging, and production, to secure and validate your implementation. You start with building and configuring your Web Parts in the development environment before it moves to the test environment and so on. If you have a Web Part with a lot of configuration options and would like to move it into another environment, you might find it hard to reconfigure the Web Part in the new site. Managing the Web Part configurations is especially important in application life cycle management scenarios when you’re scripting your environments and configurations.
In this section, you’ll learn how to export and import a configured Web Part and how to prohibit users from exporting a Web Part. You’ll find this information valuable as you start developing your Web Parts, and it will save you some time if you export the Web Parts instead of manually typing everything.
A Web Part can be exported to a Web Parts control description file (using the .webpart extension), which contains information about which Web Part is exported and the current state of all the Web Part’s properties. The file is an XML file and can be viewed using Notepad or any XML editor. You’ll learn more about the .webpart file in chapter 3.
You can export a Web Part from the web interface by editing the page and then using the Options menu of the Web Part that you’d like to export. Then choose the Export verb. You will be prompted to save the file locally to your machine and the file should have the .webpart file extension. This file contains XML that describes which Web Part class and assembly to use and the default values of the Web Part properties. Once you’ve saved this file, you can use any text-editing tool, such as Notepad or Visual Studio 2010, to change the values of the properties.
If you have a Web Parts control description file (a .webpart file) that you either created yourself or received from someone else, you can upload this definition to the Web Part Gallery. Note that, in order to get the Web Part to work, you need to have the corresponding Web Part assembly installed in your environment; otherwise, the Web Part will fail with an error message.
To add a Web Part to the gallery using a .webpart file, open the Web Part Gallery and upload the file using the options on the Library Tools > Documents tab. Once the file is uploaded, you can specify metadata on the Web Part such as the title, description, and group, just as you’d do on any item that’s added or uploaded into SharePoint.
You can add a preconfigured Web Part to a page without uploading it to the Web Part Gallery. Use the Ribbon to add a new Web Part and, when the Web Part Gallery shows up in the interface, click Upload A Web Part under the Categories list. This Web Part will appear in the category Imported Web Parts and can then be added to the page. The uploaded Web Part configuration is only temporarily available in the gallery to the user editing the specific page and won’t be available once you exit Edit mode.
.webpart or .dwp file definitions?
In SharePoint 2003, the Web Parts control description files had the extension of .dwp, but, in SharePoint 2007, it changed to .webpart. Both files contain XML to define the Web Part but the XML schema differs. The .dwp files contains version 2 of the schema (SharePoint version 2), and the .webpart uses version 3 of the schema (SharePoint 2007 was version 3).
If you export a Web Part based on the old SharePoint Web Part implementation, you’ll get a .dwp file with version 2 of the schema instead of a .webpart file.
You’ll find yourself in situations when you don’t want your users to be able to export your Web Parts; you might store confidential data in properties or there might be other reasons. The Web Part defines a property called Export Mode that defines how a Web Part can be exported. It can have one of the following values:
- Do Not Allow
- Non-sensitive Data Only
- Export All Data
You can access this property by editing the Web Part’s properties and changing the Export Mode property’s value under the Advanced category.
- More details on sensitive data and Export mode are discussed in chapter 5.
This chapter summarized the features in the web interface and in SharePoint Designer 2010. What you’ve seen so far are mostly end-user tasks, and this is essential knowledge for you as a developer. If you understand how end users work with SharePoint, you’ll likely design and build Web Parts that will be more usable.
At this point, you should be acquainted with the various parts of the SharePoint 2010 interface and the features that we’ll address later in the book. If you’re new to SharePoint 2010, then give yourself some extra time to become accustomed to the new interface. You should also explore the possibilities of the new SharePoint Designer 2010, which is a whole new experience compared with the previous SharePoint Designer version, 2007. You can accomplish a lot with this application and the out-of-the-box Web Parts, especially the new XSLT List View Web Part, and you should have these at hand in your toolbox.
By now you’re probably anxious to see some code—and that’s where we’re heading next.