concept segue in category ios

This is an excerpt from Manning's book iOS Development with Swift.
We’ve already explored adding animations to coordinators of scene transitions called transition coordinators. In chapter 6, you passed a closure to a transition coordinator object containing changes to properties of a view that you want to animate during a size change. You can also pass a closure of animations to the transition coordinator during transitions between trait collections (size classes), or transitions between scenes, called segues. We’ll come back to animation during segues in chapter 9.
Override this method so that you can get a reference to the destination view controller using the segue parameter’s destinationViewController property, ready to perform any additional customization. Because the BookViewController is embedded in a navigation controller, the segue’s destinationViewController will be a navigation controller. The destinationViewController property is a UIViewController type, so you’ll need to downcast it to a UINavigationController.override func prepare(for segue: UIStoryboardSegue, sender: Any?) {
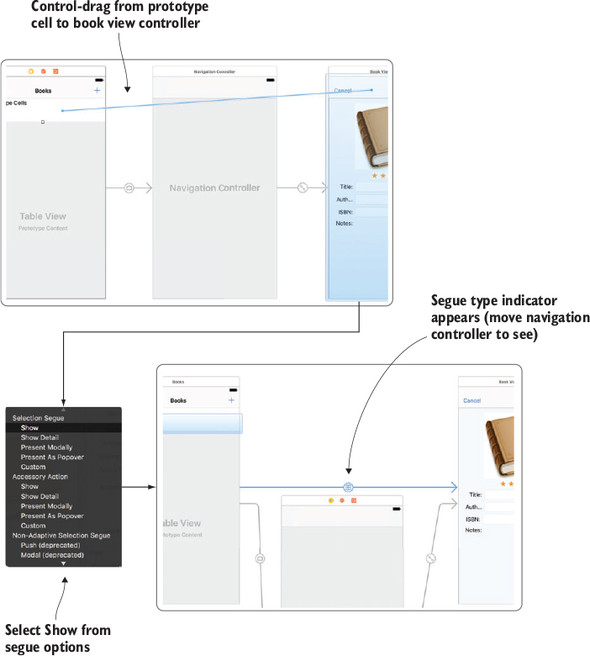
Create a segue for when the user taps the add button, by Control-dragging from the add button to the book detail view controller. We’ll explore different types of segues shortly, but for now select Show. A symbol appears between the two scenes representing the type of segue you created (see figure 9.16).

This is an excerpt from Manning's book Anyone Can Create an App: Beginning iPhone and iPad programming.
Back in section 1.2.1, you named the segue used to transition between the MainViewController and the DetailViewController, and now you get to find out why. Remember what you’re trying to do here: when you tap a row in the table view, you want the app to show the detail screen and show the details from the LioN object that was tapped. When the user taps a row, the segue is used to move to the next screen—so let’s see what we can do with segues, shall we? Add the followings lines to your code in MainViewController—and remember that Xcode will try to use auto-complete to predict the function that you’re trying to add:
override func prepare(for segue: UIStoryboardSegue, sender: Any?) {This function is overriding the implementation of the superclass (hence the override keyword) and the function prepare(for segue gives you the opportunity to do things before the segue occurs. You can see the parameters for this function are segue, which is of type UIStoryboardSegue, and sender, which can be any kind of object but may also be null. The Any? is the object that’s calling the function, and this is saying that anything can call it.
You connected two views together back in chapter 12, so you’ve done it before, but let’s walk through it anyway. On the scene with your table view on it, click once on the prototype cell (it’s called lionCell) so it’s the active object. Control-click the cell, hold down the Control key, and drag your mouse pointer over to the new view. Once the new view turns blue, release the mouse button and the Control key. A new dialog will pop up, and you can select the kind of segue you would like to use (segues are the transitions between scenes). In this case, you want to select Show in the Selection Segue section at the top, as shown in figure 19.3.
Most apps have more than one segue in them because they have more than one scene or ViewController that loads. You need to be able to tell the difference between the segues so you can take different actions depending on what the user action is. In your storyboard, click the segue—the arrow between your two ViewControllers, as shown in figure 19.4.
Figure 19.4. Click the segue between your two ViewControllers to change the Attributes Inspector panel so you can set the identifier for the segue.

Now you can change the identifier of the segue in the Attributes Inspector. Change the identifier to showLionDetail. You can run your app again, and it shouldn’t look any different than the last time you ran it.

This is an excerpt from Manning's book iOS 7 in Action.
Simply put, a view controller manages your views and segues between view controllers. They are a core component of each iOS app and act as the glue between your views and your models. They initialize and set up your models and populate your views. View controllers are also the controller objects in the MVC pattern.
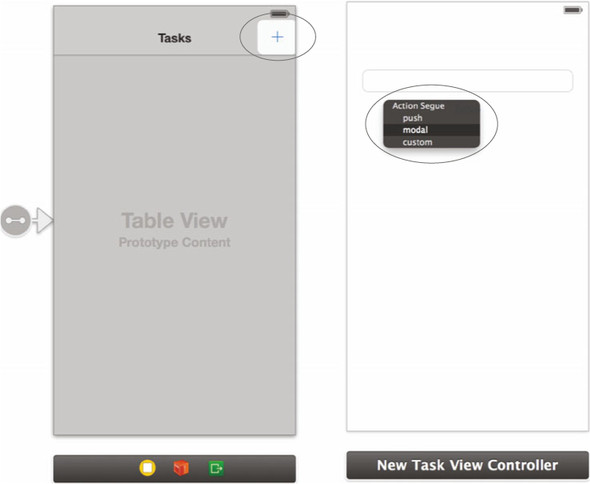
Jump back into your storyboard and select the + button that you added to the tasks list scene. In the same way that you created outlets, click the button with your mouse, hold down Control on your keyboard, and then drag a connection to the new task scene. Once you let go, you’ll see a popover that asks you what type of segue you want to create, as shown in figure 3.17.
Figure 3.17. Choose a modal segue when creating a segue from the button in the navigation bar to the new task scene.
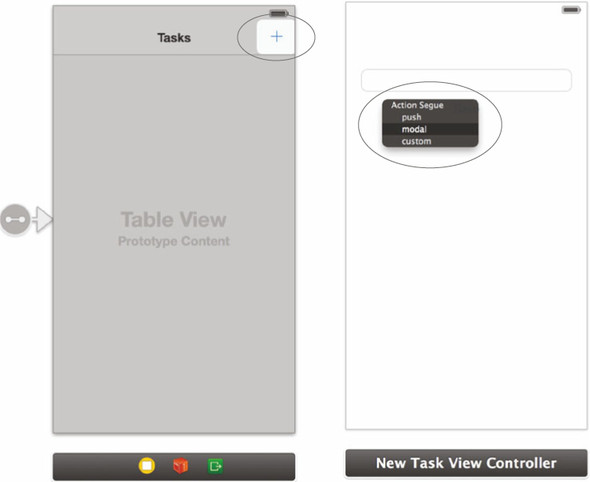
Choose modal as the type of segue you want to create. This segue will open the new task scene when you tap the + bar button. Create another segue by Control-dragging from your scene (the Tasks View Controller) to the scene you’ve created for viewing an individual task. Instead of choosing modal, choose push. You want this to be triggered when someone clicks a row within the table view. To do this you’ll need some way to identify this segue and give it a name. Click the arrow between the two scenes, and go to the attributes inspector. Here you can set the identifier to taskSegue.
Listing 3.2. Performing a segue when a row is selected
-(void) tableView:(UITableView *)tableView didSelectRowAtIndexPath:(NSIndexPath *)indexPath { [self performSegueWithIdentifier:@"taskSegue" sender:self.tasks[indexPath.row]]; } - (void)prepareForSegue:(UIStoryboardSegue *)segue sender:(id)sender { UIViewController *destination = segue.destinationViewController; if ([segue.identifier isEqualToString:@"taskSegue"]) [destination setValue:sender forKeyPath:@"task"]; else destination = [segue.destinationViewController topViewController]; [destination setValue:self forKeyPath:@"delegate"]; }
Segues allow you to easily transition from scene to scene. Segues are represented by the UIStoryboardSegue class. You created two segues within your Tasks application. One of them was triggered automatically to display the scene to create a new task. The segue you created for displaying the scene for viewing an individual task was triggered programmatically. Segues can be identified within a storyboard, as shown in figure 3.28.
You create segues in your storyboard by using your mouse to drag a connection from one scene or an actionable object to another, as shown in figure 3.29.
When creating a segue from an actionable object like a button, the segue is automatically triggered when the button is tapped with the Touch Up Inside event.
Segues can be triggered programmatically, as you did with the segue from your tasks list to the individual task scene. You had to set an identifier for it, taskSegue, so that you could reference it in your code by calling performSegueWithIdentifier: from the originating view controller. You chose to trigger it when a row in your table view was selected.