concept top in category ios

This is an excerpt from Manning's book iOS Development with Swift.
On the left is the navigator area. Notice the eight icons in the bar at the top of the panel. These icons represent eight types of navigators that you can open in this area.
After setting up the views programmatically in the viewDidLoad method, create the view’s constraints, as shown in the code in this step. First, pin the red view’s top, and leading and trailing anchors to the root view, and set the red view’s height to half the height of the root view. Next, pin the label’s leading anchor to the root view, and the top anchor of the label points from the bottom of the red view. For simplicity, set up an array of NSLayoutConstraints, and then activate them all at once. let constraints:[NSLayoutConstraint] = [ //red view redView.topAnchor.constraint(equalTo: view.topAnchor), redView.leadingAnchor.constraint(equalTo: view.leadingAnchor), redView.trailingAnchor.constraint(equalTo: view.trailingAnchor), redView.heightAnchor.constraint(equalTo: view.heightAnchor, multiplier: 0.5), //label label.topAnchor.constraint(equalTo: redView.bottomAnchor, constant: 8), label.leadingAnchor.constraint(equalTo: view.layoutMarginsGuide.leadingAnchor) ] NSLayoutConstraint.activate(constraints)
Run the app on an iPhone simulator. The layout should (fingers crossed!) adapt in a more significant way to its new environment as you rotate the device. If you rotate an iPhone to landscape, the red view moves from the top to the left, and the label moves from halfway down the view, to halfway across.

This is an excerpt from Manning's book Anyone Can Create an App: Beginning iPhone and iPad programming.
Apple— A good place to start exploring, but it may seem overwhelming at first. There are some “getting started” resources you can review in the Apple Developer Member Center (https://developer.apple.com). You’ll need to become a member of the Developer Program first (see appendix A for more info). You do not need to read these documents to use this book. I am providing the location for you if you want to learn more about a topic. The first place to start in Apple Developer Member Center is the Develop link at the top of the screen; then select Guides.
Change the Connection type (at the top of the pop-up) from Outlet to Action, type buttonClick in the Name field, change Type from Any to UIButton, and click Connect (see figure 5.5). You should see on the right panel (the ViewController.swift side) that Xcode added a new line for you. It should state the following: @IBAction func buttonClick(sender: AnyObject) {
Think about making pizza in the same way you planned painting a wall way back in chapter 1. You got out all the things you needed and you painted. In this case, you get out your ingredients, get out a pizza pan, and so on. Now make the dough for the crust and spread it out in the pan, add sauce, add cheese, and add pepperoni to the top. Pop it in the oven (or on the grill—mmmmm) for some time until you have a warm, yummy, gooey pile of goodness.
Make sure you right-clicked the table view and not the table-view cell. The table-view cell’s first option at the top of the menu is Triggered Segue. If you see that, you right-clicked the cell, not the table view. Click off of it, and try again.
Figure 15.1. The Table View connections properties are available when you right-click the table view in the storyboard.
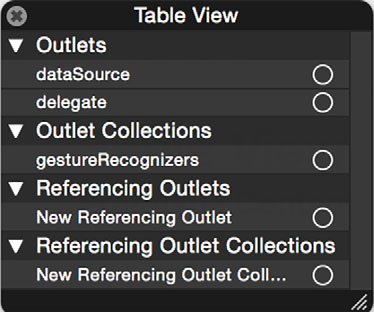
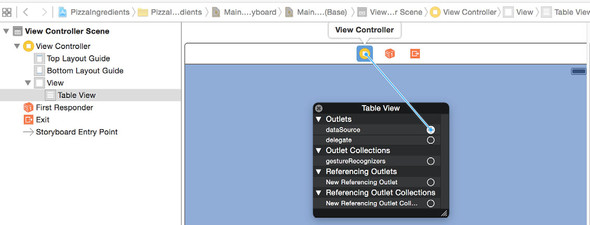
As you’ve learned in previous chapters, these outlets connect the table view to the ViewController. Once connected, the table view will look to the ViewController for the dataSource and delegate properties. With this dialog open, click the open circle for dataSource and drag it to the yellow icon at the top of the ViewController in the storyboard, as shown in figure 15.2.
Figure 15.2. Connect the dataSource property for the table view to the ViewController in the storyboard.
There’s another way you can connect the outlets to the ViewController. On the right side of Xcode, in the Utilities panel, the last button on the top of the panel is the Connections Inspector. Click this button to display the panel (figure 15.3).
Figure 15.3. The Connections panel shows which connections are connected and which are available for connections.
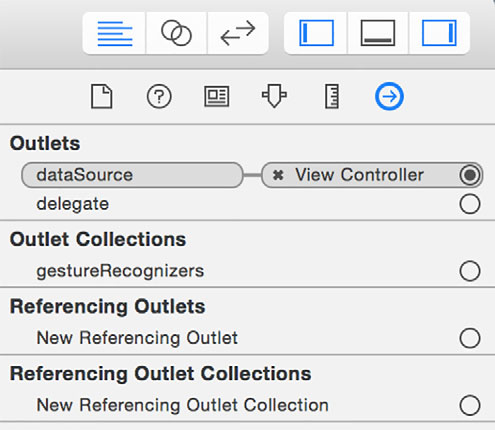
Click the circle next to delegate, and drag it over to the storyboard ViewController icon (the yellow icon at the top of the view) to make the connection. Now your connections are made for the table view. Like your other apps in earlier chapters, you need to first make the connections in the storyboard, and then in the code. You’ll connect the code later in this chapter, but first I want to show you the prototype cell.

This is an excerpt from Manning's book iOS 7 in Action.
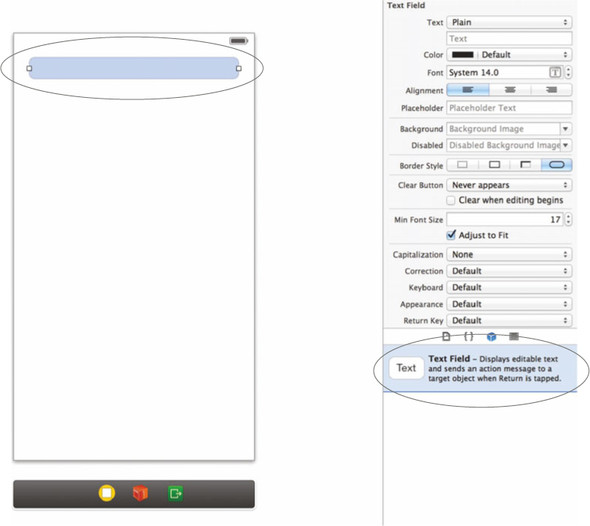
Change the width of the label by clicking and dragging the two center anchors on the left and right sides of the label. Drag them so that the label’s width is the exact same width as the view it’s contained within. The height also needs some adjustment. Drag the middle anchor on the top of the label to make it taller. It should look similar to what’s shown in figure 1.9.
There are so many things you can do with motion effects and dynamics, and you’ve only just skimmed the surface. There literally are endless possibilities, even with dynamics alone. On top of using both of these, you can also combine Core Animation and gestures to make something truly unique. All of these together, if used wisely, can simulate realistic and fun animations that can help provide a level of delight for your users as they use your applications.

This is an excerpt from Manning's book iOS 4 in Action: Developing iPhone and iPad Apps.
Each of these layers contains a variety of frameworks that you can access when writing iOS SDK programs. Generally, you should prefer the higher-level layers when you’re coding (those shown toward the top in the diagram).
To allow a user to navigate to a page deeper in your hierarchy, you need to use the navigation controller’s interface to push a new view controller on top of the navigation controller’s stack, which then causes that new view controller’s view to become the visible view in your program. This is shown in the following listing, which continues to expand on RootViewController.m.

This is an excerpt from Manning's book iPhone and iPad in Action: Introduction to SDK Development.
Programmatically, the iPhone OS is built on Apple’s OS X, which is itself built on top of UNIX. Xcode, the same development environment that’s used to write code for the Macintosh, is the core of native programming for the device. Putting these two elements together reveals a mature development and runtime environment.
To allow a user to navigate to a page deeper in your hierarchy, you need to use the navigation controller’s interface to push a new view controller on top of the navigation controller’s stack, which then causes that new view controller’s view to become the visible view in your program. This is shown in listing 7.3, which continues to expand on RootViewController.m.

This is an excerpt from Manning's book iPhone in Action: Introduction to Web and SDK Development.
Programmatically, the iPhone is built on Apple’s OS X, which is itself built on top of Unix. Xcode, the same development environment that’s used to write code for the Macintosh, is the core of native programming for the device. Putting these two elements together reveals a mature development and runtime environment of the sort that hasn’t been seen on most other cell phones (with the possible exception of Windows Mobile) and that upcoming smarterphone technologies won’t be able to rival for years.
To allow a user to navigate to a page deeper in your hierarchy, you need to use the navigation controller’s interface to push a new view controller on top of the navigation controller’s stack, which will then cause that new view controller’s view to become the visible view in your program. This is shown in listing 15.3, which continues to expand upon RootViewController.m.