Chapter 4. Managing security

published book

This chapter covers

  • Introducing AWS Identity and Access Management
  • Writing policies to allow or deny access to AWS resources
  • Using policy variables to make policies more flexible
  • Assuming roles to avoid the use of hard-coded AWS credentials
  • Using roles with AWS Lambda functions

In the previous chapters, you created your first functions. At first you used those functions directly, using the AWS Lambda interface from the command line. Later, you exposed those functions via a web API provided by the Amazon API Gateway.

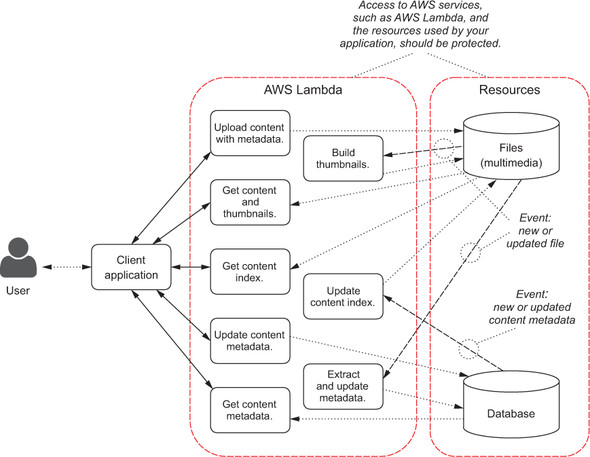
This chapter introduces the security framework provided by AWS, mostly based on AWS Identity and Access Management (IAM). You’ll learn how to protect your functions and applications implemented using AWS Lambda and (optionally) the Amazon API Gateway. As an example, any interaction with AWS services, such as AWS Lambda and the resources used by your application, must be protected to avoid unauthorized access (figure 4.1). We’ll also look back at the functions we created earlier to see how security was managed there.

Figure 4.1. You should always protect the use of AWS services and the resources used by your application to avoid unauthorized access. All lines crossing the borders surrounding AWS Lambda and the resources should go through a form of authentication and authorization.

These features are designed to let developers focus on the functionalities they want to build and simplify the realization of an overall secure application. You can use AWS IAM features at no additional cost. Amazon Cognito, which we’ll explore in the next chapter, has no charges for authenticating users and generating unique identifiers. This is another reason to use them to secure your AWS resources. The synchronization features of Amazon Cognito do have a charge, but we won’t use them in this book.

The first step is to learn how to manage identities within an AWS account.

join today to enjoy all our content. all the time.
 

4.1. Users, groups, and roles

To use AWS services, you have to interact with AWS APIs. That can happen directly, via the AWS CLI you used in chapters 1 and 2, via SDKs for your favorite language, or via the web console you used to build the sample functions and the web API in chapters 2 and 3.

In all those interactions, AWS needs to understand who the user making the API call is (this is the authentication) and if the user has the necessary permissions to do what’s requested in the call (this is the authorization).

To provide the necessary authentication, AWS credentials are used to sign API calls. Credentials can be temporary, in which case they have a limited validity in time and must be regenerated (rotated, according to the security jargon) every once in a while.

When you create a new AWS account, it only has its own root account credentials that give unrestricted access to all resources within the account, including access to billing information. I recommend you use those root credentials only for the first login and then create users (and roles, as you’ll see next in this chapter) with limited permissions for daily use, keeping the root credentials in a safe place for when you need them.


Tip

It’s good practice to protect root credentials with Multi-Factor Authentication (MFA), using a hardware MFA device or a virtual MFA device running on your smartphone. For more information on MFA, please see https://aws.amazon.com/iam/details/mfa/.


Using AWS Identity and Access Management, you can create groups and users to reproduce the organization of your company. You can see an example in figure 4.2.

Figure 4.2. Within an AWS account, you can create groups and users. Users can be added to one or more groups, if that makes sense for your use case.

Tip

Users can be added to more than one group, if that makes sense for your use case. For example, User1 can be part of both the Development and the Test groups.


To create your first groups and users, open your browser and go to https://console.aws.amazon.com. Log in with your AWS credentials and select Identity & Access Management (IAM) from the Security & Identity section.

You’ll see the AWS IAM console dashboard (figure 4.3), which provides, among other things, a summary of your IAM resources, the sign-in link for IAM users in your account (which you can customize), and a few tips to improve the security status of your account.

Figure 4.3. The AWS IAM console dashboard, with a summary of your IAM resources, the link that IAM users in your account can use to log in, and the security status of your account

In addition to groups and users, you can create roles. The main difference between roles and groups is how they’re used:

  • Users can be added to groups, inheriting the permissions given to those groups.
  • Users, applications, or AWS services can assume a role, inheriting the permissions given to the role.

AWS Lambda can use roles: functions can assume a role to get the necessary permissions to do their job. For example, a function can assume a role to get read (or write) permission to a storage service, such as Amazon S3,[1] and then read (or write) data. You can see the relationship between users, groups, and roles within an AWS account in figure 4.4.

1 Amazon S3 is an object store with a REST API. Objects are grouped in buckets and the contents of a bucket are uniquely identified by a key.

Figure 4.4. This is the relationship between users, groups, and roles within an AWS account. Users can be added to groups, but roles are not linked to a specific user. Roles can be assumed by users, applications, or AWS services.

To make users, groups, and roles useful, you need to attach them to one or more policies (figure 4.5). Policies give the actual permissions, describing what those users, groups, or roles are (or are not) allowed to do within the account. By default, nothing is allowed and you need at least one policy. With policies, you give the necessary authorization that those users, groups, and roles require.

Figure 4.5. Policies can be attached to users, groups, and roles to describe what they are (or are not) allowed to do within the account.

For authentication, you need security credentials. Security credentials can be assigned to the root account, but, as discussed, you should use root credentials only to create your first admin user. Users can have permanent credentials, which can be rotated periodically to improve security. Roles don’t have credentials assigned to them, but when a user, an application, or an AWS service assumes a role, it gets temporary credentials that will authorize it to do what’s described in the policies attached to the role (figure 4.6). Temporary security credentials, when expired, are automatically rotated by the AWS CLI and SDKs. If you obtained temporary security credentials in other ways, you need to rotate them manually.

Figure 4.6. How security credentials are used by AWS IAM resources. Users have permanent credentials, which should be periodically rotated for security. Roles, when assumed, give temporary credentials, whose rotation is automatically managed by the AWS CLI and SDKs.

User (and root account) security credentials are composed of

  • An access key ID
  • A secret access key

The access key ID is added to all AWS API calls. The secret access key is never sent on the wire, but is used to sign the API calls. Usually you don’t need to know the details of how AWS API signature works, because the AWS CLI and SDKs will automatically manage that for you.


Note

If you want to get more information on how AWS API signature works, AWS currently uses the Signature Version 4 process described in detail at http://docs.aws.amazon.com/general/latest/gr/signature-version-4.html.


Temporary security credentials are generated by the AWS Security Token Service (STS), but usually you don’t need to interact directly with it, because AWS services (such as Amazon Cognito) and the CLI and SDKs are designed to manage that on your behalf. Temporary credentials are slightly different from standard security credentials and are composed of

  • An access key ID
  • A secret access key
  • A security (or session) token

Now that you know how an AWS account can use users, groups, and roles to improve the security of its operations, let’s see how policies can be implemented to authorize access to AWS resources.

Get AWS Lambda in Action
add to cart

4.2. Understanding policies

At a high level, policies have effects, which tell if you’re allowing or denying access to perform actions on specific resources (figure 4.7). In the context of policies, actions are AWS API calls and are expressed by specifying the AWS service and the API call(s) you want to give (or remove) access to. You could use an asterisk (*) to give a service access to all actions, or to all actions that begin with a certain string (for example, Describe*), but that can be risky and I usually recommend the more verbose approach of listing all actions in your policies. Resources depend on the services specified by the actions. For example, for a storage service like Amazon S3, resources are buckets and, optionally, a prefix inside the bucket. For a database service such as Amazon DynamoDB, resources can be tables or indexes.

Figure 4.7. High-level summary of how policies work. They have the effect of allowing or denying actions on some resources.

There are three types of policies, each covering a different kind of authorization for AWS resources (figure 4.8):

  • User-based policies can be attached to users, groups, or roles and describe what a user (or an application or an AWS service) can do.
  • Resource-based policies can be attached directly to AWS resources and describe who can do what on those resources. For example, S3 bucket policies authorize access to S3 buckets.
  • Trust policies describe who can assume a role. Roles used by AWS Lambda have specific trust policies that allow functions to assume those roles. The same applies to roles used by Amazon Cognito, as we’ll see in the next chapter.
Figure 4.8. How the different types of policies are used by users, groups, roles, and resources

Policies are written using a JSON syntax. In figure 4.9 you see the different elements that compose a policy. The main elements are statements. Statements include the effect (allow or deny), the actions, and the resources, and can optionally include one or more conditions that further limit the scope of the policy. For example, you can limit access to Amazon S3 based on the HTTP referrer used in the API calls. For resource-based and trust policies, the principal describes to whom this policy is allowing (or denying) access.

Figure 4.9. The different elements that compose a policy: the main elements are statements, which describe who can do what and on which resources.

Policies can be directly attached to users, groups or roles. To simplify the configuration of policies—for example, when the same policy is used with multiple roles, one that can be assumed by a Lambda function and one by users authenticated via Amazon Cognito—you can use managed policies. You can create a managed policy using the Policy link in the left of the AWS IAM console (see figure 4.10). Managed policies can also be versioned.

Figure 4.10. You can create managed policies from the AWS IAM console. Managed policies can be attached to multiple roles, groups, or users and can be versioned.
Sign in for more free preview time

4.3. Policies in practice

As a first example, I’ll use policies that authorize access to Amazon S3 resources. For now, you won’t use these policies and don’t need to create them, so focus on the syntax. You’ll create policies in the next chapter.


Note

Amazon S3 buckets have no internal hierarchy, but you can browse objects inside a bucket and specify a delimiter such as / for the keys to list content in a way that resembles accessing a filesystem. For example, you can list objects within a bucket whose keys start with the prefix folder1/folder2/. Note that no / is present at the beginning of a prefix. Amazon S3 has additional features that aren’t described here. Other features will be introduced as required.


A user-based policy that gives read/write access to an Amazon S3 bucket is shown in the following listing.

Listing 4.1. Policy to give read/write access to an Amazon S3 bucket
{
  "Version": "2012-10-17",                          #1
  "Statement": [                                    #2
    {
      "Effect": "Allow",                            #3
      "Action": [                                   #4
        "s3:ListBucket",                            #4
        "s3:GetBucketLocation"                      #4
      ],                                            #4
      "Resource": "arn:aws:s3:::BUCKET"             #5
    },
    {
      "Effect": "Allow",                            #6
      "Action": [                                   #7
        "s3:PutObject",                             #7
        "s3:GetObject",                             #7
        "s3:DeleteObject"                           #7
      ],                                            #7
      "Resource": "arn:aws:s3:::BUCKET/*"           #8
    }
  ]
}

Note

The actions in the previous policy are taken from the AWS API, in this case the Amazon S3 REST API. You can find a detailed description of all possible operations on Amazon S3 at http://docs.aws.amazon.com/AmazonS3/latest/API/APIRest.html.


If you want to use the previous bucket from the web console, you need to give permissions to get the list of all the buckets in your account (shown in the following listing; changes are in bold).

Listing 4.2. Adding permissions required by the Amazon S3 web console
{
  "Version": "2012-10-17",
  "Statement": [
    {
      "Effect": "Allow",                            #1
      "Action": "s3:ListAllMyBuckets",              #1
      "Resource": "arn:aws:s3:::*"                  #1
    },
    {
      "Effect": "Allow",
      "Action": [
        "s3:ListBucket",
        "s3:GetBucketLocation"
      ],
      "Resource": "arn:aws:s3:::BUCKET"
    },
    {
      "Effect": "Allow",
      "Action": [
        "s3:PutObject",
        "s3:GetObject",
        "s3:DeleteObject"
      ],
      "Resource": "arn:aws:s3:::BUCKET/*"
    }
  ]
}

To limit read/write access only to a specific prefix inside a bucket, you can

  • Add a condition to actions that work on a bucket (such as “ListBucket”)
  • Include the prefix in the resource for actions that work on objects (such as “PutObject,” “GetObject,” “DeleteObject”)

You can see an example that limits access to a specific prefix in the following listing.

Listing 4.3. Limiting access to a prefix inside an Amazon S3 bucket
{
  "Version": "2012-10-17",
  "Statement": [
    {
      "Effect": "Allow",
      "Action": [
        "s3:ListAllMyBuckets",
        "s3:GetBucketLocation"
      ],
      "Resource": "arn:aws:s3:::*"
    },
    {
      "Effect": "Allow",
      "Action": "s3:ListBucket",
      "Resource": "arn:aws:s3:::BUCKET",
      "Condition": {"StringLike": {"s3:prefix": "PREFIX/" }}           #1
    },
    {
      "Effect": "Allow",
      "Action": [
        "s3:PutObject",
        "s3:GetObject",
        "s3:DeleteObject"
      ],
      "Resource": "arn:aws:s3:::BUCKET/PREFIX/*"                       #2
    }
  ]
}

Tip

If you want to give read-only access, you can remove “PutObject” and “DeleteObject” from the list of allowed actions in the previous policies.


Now, let’s see a few examples of policies controlling access to Amazon DynamoDB.


Note

Amazon DynamoDB is a fully managed NoSQL database. You can scale storage and throughput (in reads or writes per second) of DynamoDB tables via AWS API, CLI, or the web console. Tables don’t have a fixed schema, but you need to specify a primary key. A primary key can be a single hash key or a composite key containing a hash key plus a range key. Amazon DynamoDB has more features that are not described here, but which will be introduced as required in the book. If you want to look at those features, you can start with the Amazon DynamoDB Developer Guide found at http://docs.aws.amazon.com/amazondynamodb/latest/developerguide/Introduction.html.


The following listing gives read/write access to items in a specific DynamoDB table.

Listing 4.4. Policy to give read/write access to a DynamoDB table
{
  "Version": "2012-10-17",
  "Statement": [
    {
      "Effect": "Allow",
      "Action": [
        "dynamodb:GetItem",                                             #1
        "dynamodb:BatchGetItem",                                        #2
        "dynamodb:PutItem",                                             #3
        "dynamodb:UpdateItem",                                          #4
        "dynamodb:BatchWriteItem",                                      #5
        "dynamodb:DeleteItem"                                           #6
      ],
      "Resource":
        "arn:aws:dynamodb:<region>:<account-id>:table/<table-name>"     #7
    }
  ]
}

Resources are specified in statements using Amazon Resource Names (ARNs) that are unique. S3 bucket names are unique globally, so you can specify only the bucket name to identify the resource. DynamoDB table names are unique within an AWS account and region, so you need to specify both, together with the table name, to identify the resource in a policy.

Depending on the region you choose to operate in, you can get the region code to build the ARN of the DynamoDB table by looking up the value at http://docs.aws.amazon.com/general/latest/gr/rande.html#ddb_region.

For example, if you used DynamoDB in US East (N. Virginia), the region would be us-east-1. In EU (Ireland), it would be eu-west-1.

You can find the AWS account ID from the web console. Open your browser and go to https://console.aws.amazon.com/, log in with your AWS credentials, and select the drop-down menu with your name on the top right of the web console (figure 4.11).

Figure 4.11. You can access account information by selecting the drop-down menu with your name at the top right of the web console.

You’ll see a dashboard with your account settings (figure 4.12).

Figure 4.12. In the account page, the account Id is at the top, in the Account Settings section.

As a result, the ARN used as a resource in a DynamoDB policy is similar to

"arn:aws:dynamodb:us-east-1:123412341234:table/my-table"

Listing 4.5 adds the option to run queries (but not full table scans, which are I/O expensive) to the previous policy.

Listing 4.5. Adding query permissions to Amazon DynamoDB
{
  "Version": "2012-10-17",
  "Statement": [
    {
      "Effect": "Allow",
      "Action": [
        "dynamodb:GetItem",
        "dynamodb:BatchGetItem",
        "dynamodb:Query",                      #1
        "dynamodb:PutItem",
        "dynamodb:UpdateItem",
        "dynamodb:BatchWriteItem",
        "dynamodb:DeleteItem"
      ],
      "Resource":
        "arn:aws:dynamodb:<region>:<account-id>:table/<table-name>"
    }
  ]
}

Tip

To give read-only access, remove PutItem, UpdateItem, and DeleteItem from the previous policies.


Least privilege

When creating IAM policies, follow the standard security advice of giving the minimum permissions required to perform a task. In doing that, it’s more secure to start with a smaller set of permissions and then grant additional ones as necessary, rather than starting with a larger set and then trying to remove the permissions that aren’t required.

“Every program and every privileged user of the system should operate using the least amount of privilege necessary to complete the job,” Jerome Saltzer, Communications of the ACM. The electronic version is located at http://dl.acm.org/citation.cfm?doid=361011.361067.


join today to enjoy all our content. all the time.
 

4.4. Using policy variables

Sometimes you may want to use values in a policy—for example, in a condition—that aren’t “fixed” but depend on dynamic parameters, such as who’s making the request, or how. You can specify values in a policy that are replaced dynamically every time a request is received by AWS using policy variables.


Warning

To use policy variables, you must include the Version element and set the version to 2012-10-17; otherwise, variables such as ${aws:SourceIp} are treated as literal strings in the policy and aren’t replaced by the expected value. Previous versions of the policy language don’t support variables.


For example, a few policy variables that can be useful in writing your policies are listed in table 4.1.

Table 4.1. Common policy variables that you can use to enhance your policies (view table figure)

Policy variable

Description and sample usage

aws:SourceIp The IP address of who’s making the request to the AWS API; it can be used in an “IpAddress” condition to limit the validity of a policy to a specific IP range: "Condition": {
"IpAddress" : {
"aws:SourceIp" : ["10.1.2.0/24","10.2.3.0/24"]
}
} To exclude an IP range from the validity of a policy, you can use the “NotIpAddress” condition: "Condition": {
"NotIpAddress": {
"aws:SourceIp": "192.168.0.0/16"
}
}
  Be careful that the previous policies work only if the requests are directly made by a user, but wouldn’t work if the requests come through another AWS service, such as AWS CloudFormation.
aws:CurrentTime The current time of the request; it can be used to give or block access before or after a specific date and time. A condition valid only during the month of January 2016 would be "Condition": {
"DateGreaterThan":
{"aws:CurrentTime": "2016-01-01T00:00:00Z"},
"DateLessThan":
{"aws:CurrentTime": "2016-02-01T00:00:00Z"}
}
aws:SecureTransport A Boolean value that tells if the API request is using a secure transport such as HTTPS. This is particularly useful to force S3 access via “https://...” URLs. For example, if you host the static assets of a website on S3, you can use an S3 bucket policy (a particular case of resource-based policies) to give public access to reads only in HTTPS using the following statement (that can be included in a wider policy): "Statement": [ {
"Effect": "Allow",
"Principal": "*",
"Action": "s3:GetObject",
"Resource": "arn:aws:s3:::your-bucket/*",
"Condition": {
"Bool": {
"aws:SecureTransport": "true"
}
}
} ]
aws:MultiFactor-AuthPresent A Boolean value that tells if the request was made using Multi-Factor Authentication (MFA) using a hardware or virtual MFA device. A sample condition (that you can include in a statement as part of a policy) would be "Condition": {
"Bool": {
"aws:MultiFactorAuthPresent": "true"
}
}
aws:Referer The HTTP referrer (as described by the relevant HTTP header) in the request. Using this policy variable in a condition, S3 bucket policies (a particular case of resource-based policies) can limit access only to requests that originate from specific webpages. For example, if you put the static assets of a website (such as images, CSS, or JavaScript files) on S3, you can give access to everyone to read the objects and use this policy variable to avoid other websites linking to your assets. A sample statement that you can include in a policy would be "Statement": [ {
"Effect": "Allow",
"Principal": "*",
"Action": "s3:GetObject",
"Resource": "arn:aws:s3:::your-bucket/*",
"Condition": {
"StringLike": {"aws:Referer": [
"http://www.your-website.com/*",
http://your-website.com/*
] }
} } ]

Note

Other interesting use cases use policy variables for users authenticated by Amazon Cognito, which you’ll see in the next chapter, after you get a better understanding of roles.

Sign in for more free preview time

4.5. Assuming roles

Roles can be assumed by users, applications, or AWS services to get specific permissions on AWS resources without hard-coding AWS credentials in your application. For example, AWS services like Amazon EC2 (which provides virtual servers on the AWS Cloud) or AWS Lambda (which we’re exploring in this book) can assume an IAM role. In those cases, assuming a role means that you get temporary security credentials to allow the code running in an EC2 instance or in a Lambda function to perform actions on other AWS resources, such as reading from an S3 bucket or writing in a DynamoDB table.

Code using AWS SDKs in an EC2 instance or in a Lambda function will use those credentials automatically to get the necessary authorizations: the AWS SDK gets and rotates the temporary credentials for the corresponding role without any intervention on your part. Using roles, you don’t need to put AWS credentials explicitly in your code or in a file distributed with your application, avoiding the risk that those credentials might leak outside of your control or that those credentials are released publicly by mistake—for example, when committing your code to a public code repository on GitHub or Bitbucket.

Roles have two policies attached to them:

  • A user-based policy describing the permissions that the role gives.
  • A trust policy describing who can assume the role; for example, a user in the same AWS account or in a different account, or an AWS service. This is sometimes called the trust relationship of the role.

For example, in chapter 2, when you created your first AWS Lambda function “greetingsOnDemand,” you created a “Lambda basic execution” role and assigned that role to the function. Let’s look now at that role in more detail.

You can get more information from the AWS IAM console by selecting Role on the left, as described in figure 4.13. I suggest you always look for the roles that are created by the AWS console to better understand what’s allowed and what’s not.

Figure 4.13. You can see and edit current roles and create new roles from the web console. Always check the roles that are created on your behalf by the AWS console to understand what they allow.

There you can search for the role using the text form on the top of the window:

  • The user-based policy describes permissions; for that function, you needed to write to CloudWatch Logs (listing 4.6).
  • The trust policy describes who can assume the role; in this case, the AWS Lambda service (listing 4.7).
Listing 4.6. Lambda basic execution role permissions
{
  "Version": "2012-10-17",
  "Statement": [
    {
      "Effect": "Allow",                          #1
      "Action": [
        "logs:CreateLogGroup",                    #2
        "logs:CreateLogStream",                   #2
        "logs:PutLogEvents"                       #2
      ],
      "Resource": "arn:aws:logs:*:*:*"            #3
    }
  ]
}
Listing 4.7. Lambda basic execution role trust relationships
{
  "Version": "2012-10-17",
  "Statement": [
    {
      "Sid": "",
      "Effect": "Allow",                                #1
      "Principal": {
        "Service": "lambda.amazonaws.com"               #2
      },
      "Action": "sts:AssumeRole"                        #3
    }
  ]
}

You can look at how the role is used by AWS Lambda to have a better understanding of all the moving parts. The greetingsOnDemand function is executed by AWS Lambda, a service that has a trust relationship with the “Lambda basic execution” role and can assume that role for the execution of the function. As a result, the function has access to CloudWatch Logs and can log relevant information there, using “console.log()” in the Node.js runtime and “print” in the Python runtime. For example, if you modify the user-based policy in listing 4.6 by removing the “logs:PutLogEvents” action, the function won’t log anymore.

If you need to access other AWS services—for example, to read from Amazon S3 or write to Amazon DynamoDB—you can add statements to the policy giving permissions to the role using the syntax you learned earlier in this chapter. You’ll build finely tailored policies later in this book when creating a sample event-driven serverless application.

Summary

In this chapter you saw how AWS security works and how you can secure your application with AWS Lambda. In particular, you learned about

  • Using AWS Identity and Access Management (IAM) to create users, groups, and roles
  • Authenticating via AWS temporary credentials
  • Writing policies to authorize access to AWS resources
  • Using policy variables to have dynamically replaced values in your policies
  • Authorizing Lambda functions via roles

In the next chapter you’ll learn how to use functions from a device, such as a mobile device or a JavaScript web page running in a web browser, and how to subscribe functions to events in the AWS Cloud.

Exercise

Write a user-based policy to give read-only access to a bucket called my-bucket only for content under the prefix my-prefix/.

Solution

Starting from listing 4.3, you should remove writing actions such as PutObject and DeleteObject:

{
  "Version": "2012-10-17",
  "Statement": [
    {
      "Effect": "Allow",
      "Action": [
        "s3:ListAllMyBuckets",
        "s3:GetBucketLocation"
      ],
      "Resource": "arn:aws:s3:::*"
    },
    {
      "Effect": "Allow",
      "Action": "s3:ListBucket",
      "Resource": "arn:aws:s3:::my-bucket",
      "Condition": {"StringLike": {"s3:prefix": "my-prefix/" }}
    },
    {
      "Effect": "Allow",
      "Action": [ "s3:GetObject" ],
      "Resource": "arn:aws:s3::: my-bucket/my-prefix/*"
    }
  ]
}

.jpg"

sitemap
×

Unable to load book!

The book could not be loaded.

(try again in a couple of minutes)

manning.com homepage