A diffusion model generates an image by learning to reverse a noising process. During forward diffusion, small amounts of noise are added to training images until they become random noise. During reverse diffusion, a denoising model starts with noise and progressively produces a clean image resembling the training images. The two directions are distinct: adding noise supplies the training task; removing it generates samples. section 15.1 section 15.6
A flower-image example makes the steps concrete:
- Prepare roughly 8,000 flower images at shape (3, 64, 64). A batch of four has shape (4, 3, 64, 64); smaller batches can reduce GPU memory use. section 15.2 section 15.2.1
- Add normally distributed noise over 1,000 discrete time steps. As the step increases, the weight on the clean image decreases and the weight on noise increases. section 15.1.1 section 15.2.2
- Train a denoising U-Net to reverse the process. Once trained, use it to reduce noise over successive steps and produce a new flower image. section 15.1
Inspect the forward process
Create a noise tensor with the same shape as a batch of clean images. Set `DDIMScheduler(num_train_timesteps=1000)`, then call `add_noise(clean_images, noise, timesteps)` at selected steps. Plotting steps 200, 400, and onward beside the originals shows the images becoming progressively less recognizable. The scheduler also manages the sequence and step sizes used for denoising. section 15.2.2
Figure 15.5 The forward diffusion process. The four images in the first column are clean images from the training dataset. We then gradually add noise to these images from time step 1 to time step 1,000. As the time step increases, more and more noise is injected into the images. The four images in the second column are images after 200 time steps. The third column contains images after 400 time steps, and they have more noise than those in the second column. The last column contains images after 1,000 time steps, and they are 100% random noise.
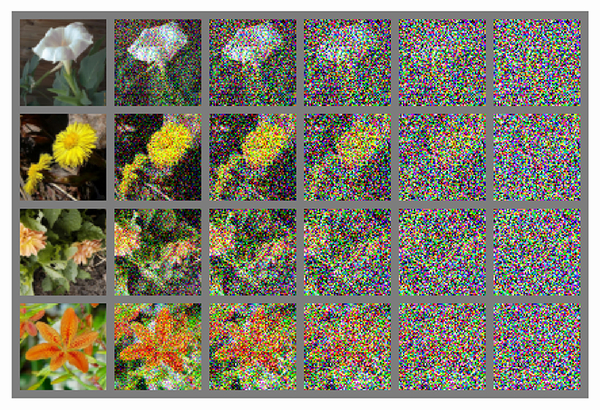
Compare the same four flowers across time steps: each column adds noise, ending in random noise at step 1,000. section 15.2.2
Diffusion also provides the image-generation mechanism in text-to-image systems such as DALL-E 2, Imagen, and Stable Diffusion. There, an encoded text prompt conditions the repeated denoising so the resulting image matches the description. The flower example isolates denoising before adding that text–image connection. section 15.0 section 15.5